EP22 – September 2, 2017: Lawn Seeding 101, Must-Have Painting Tools, Electrical Questions Answered, and Basement Floor Painting


We live in Michigan where our basements can be a little scary; especially if you have an older house! There are lots of things that can be done to remedy that. But perhaps the simplest thing to do is to simply paint the floor. It’s amazing how much a coat of paint can brighten a dreary basement. We’ll help give you the confidence to tackle your floor this weekend!

Listen here:

Show notes for episode 022:

Summer is almost over. And that means our lawns have made it through the toughest part of the year. Some may have made it through the heat like champs. Others, however, may have lost the battle with heat and minimal rain, and now have featured brown and dead patches.

Don't fret! According to Matt Bakker from Landscape Design Services, you can still bring your lawn back to its glory days before snow flies. He's got everything we need to know about seeding the bare patches in our yards.

There is nothing more frustrating than trying to do a simple task, only to find you don't have to right tool on hand. Try opening a bottle without a bottle opener (Dan!), or tighten a screw using a penny (Betsy!). It takes way more time to complete the task and there is so much frustration involved!

This same theory applies to painting as well. If you follow our list and always have these painting tools on hand, your next project is guaranteed to be a lot less stressful because you won't have to stop midway through the project (or maybe before you even begin!) to buy the right tool.

Must-Have Painting Tools Check List!

There are a lot of home improvement projects we are comfortable tackling--anything involving wood is generally acceptable, minor plumbing projects are ok, and anything involving paint is a breeze. But electrical....oh, electrical....that is a whole different story! Sure, we can change light bulbs and maybe even wire up a fan or a new lighting fixture. But when it comes to questions like "why do my lights dim when I run the microwave?" we figure it's best to ask a professional.

Lucky for us, Bill Haveman, co-owner of Haveman Electric, agreed to stop by and talk about some common household electrical questions. Hopefully, by the end of the conversation, our power concerns will be put to rest.

Miss Etta James, in the 60s, sang about all the fun you can have in the basement. But what happens if you have a Michigan basement? What if you have dark, cold concrete floors and tony spiders hanging in the corners? It's sounds more like a dungeon that a place to hang out and have fun.

But there is  solution! It's amazing what a difference just painting the floor can make. It will brighten up the space and make it feel a little less cold. And if you are concerned about tackling the project, don't be! We've got you covered with tips and tricks from start to finish.

Floor Painting Tips

  • Use a 14" or 18" cover if possible
  • Use a 3/8" nap cover
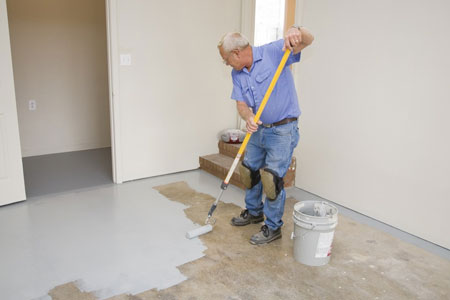
  • Use an extension pole. It will save your back!
  • Brush 2" strip around all the edges (cut in)
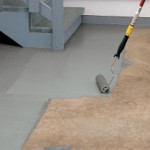
  • Roll paint from paint tray
  • OR try pouring paint straight out of the bucket in a line on the floor!
    • Pour a few feet from wall
    • Pour a 4" wide strip
    • Only pour as much as you can evenly spread before the paint dries
    • Could use a 3/16" nap cover with this application method
    • Work with a helper
  • Let paint dry completely before introducing light foot traffic
    • Waterborne - at least 6 hours
    • Oil - at least 12 hours
    • All dry times will be slowed even more without air circulation and/or humidity

Basement Floor Paint: The Options

basementfloorpaintPainting a basement floor is a great way to improve your home without dropping a lot of money.  However, while the project isn’t complicated, there are a few things you should know.  First off, as we wrote here, you first must make sure that your floor is even a candidate for paint.  If you’ve done that and you’ve determined that your floor can be painted, the next step is to determine which floor paint to use.

There are many options out there, but you should be aware of fancy packaging and vague marketing promises.  The box may “say” that the paint wears like steel.  It may highlight the fact that the paint is an epoxy.  But understand that not all epoxies are the same.  And that marketing claims can sometimes be made based on a “best case, controlled-environment, scenario”.  (They’re also quite subjective–as some marketer’s idea of what steel wears like is not necessarily what you think steel will wear like!).

So with that said, let’s discuss a couple options we have at RepcoLite when it comes to basement floor paint and let’s compare these to the standard kits you see at the Big Box Stores.  Hopefully this will give you the information you need to make an informed choice based on your situation.

LATEX SINGLE-COMPONENT FLOOR PAINT

This is a very basic floor paint and offers a number of benefits.  Single-component latex floor paints are incredibly easy to use.  There is no mixing, no catalyzing, no “open time” or anything along those lines.  Simply stir or shake the container before use, pour out, and roll on.

These paints apply easily, usually cover quite well, and best of all, they dry very quickly and with very low amounts of residual odor.  There are no dangerous fumes to deal with and there’s no concern regarding turning off pilot lights and furnaces.  Also, single-component latex floor paints like RepcoLite’s AquaTred floor paint are usually more inexpensive than other basement floor paint systems.

On the downside, these paints are probably the least durable of all floor paints.  Yes, a lot of the durability of a particular product is directly related to proper surface preparation, but still, latex single-component paints are best suited for areas that receive only light to moderate foot traffic.  If you’re painting a work room or some other area where you’ll be using (and potentially dragging) equipment across the floor, this might not be the best option for you.

BOTTOM LINE:  In comparison to other “Big Box” epoxy systems, these paints are a little less durable.  However, they compensate for this however by offering you ease of use, a quick dry time and a great price.  However, if the room you’re working in is simply a storage area or a lightly trafficked laundry area (and you’re looking to accomplish the job quickly, inexpensively and with little or no residual odor) this might be perfect.

SOLVENT-BASED SINGLE-COMPONENT FLOOR PAINT

The second option RepcoLite offers when it comes to basement floor paint is our Urethane Floor Enamel.  Like its latex counterpart, Urethane Floor Enamel is relatively simple to use.  No catalyst is required, no “open time”, and so on.  All you need is the paint itself, a quick stir or shake, and you’re ready to go.

These paints apply well, self-level beautifully and offer much better absorption than a latex would.  The added urethane in RepcoLite’s product provides dramatically increased durability over other “solvent-based” floor systems.  This added fortifier makes Urethane Floor Enamel nearly equivalent in durability to those Big Box Epoxy kits–at a much lower price.

Urethane Floor Enamel is suitable for moderate to high foot traffic floors and will even hold up (once they’re cured) to dragging and sliding of small equipment (bench saws, small cabinets, etc.).

However, there are some drawbacks.  First and foremost, as is the case with any solvent-based product, there is an odor.  Also, you will have paint fumes to deal with.  You will need to ventilate your room well while working and after you’re finished.  Turning off pilot lights and furnaces is also important.  And, speaking from sad experience, if you have a gas clothes dryer, you MUST make sure the fumes are entirely out of the room before using it.  (If you don’t, all the clothes you or your wife dries will end up smelling like Kerosene and your wife will make you rewash them.  And will remind you about this experience for the rest of your life.)

BOTTOM LINE:  These paints are a great option if you can’t or don’t want to work with an epoxy coating.  They’ll provide great durability for almost every basement application at a fraction of the price of the more expensive (and often less durable) epoxy systems.  They do, however, pack a bit of a wallop with paint fumes, so be sure to ventilate well.

CONCLUSION

Painting  a basement floor is a great project.  It’s inexpensive, can be accomplished in just a few short hours, and will make a world of difference in your basement.  However, finding the right product can seem tricky for those who aren’t familiar with paint and all the new technologies out there.  If you’re considering the project, don’t just pick up a floor kit at a Big Box Store and roll it on!  Take time and head to a RepcoLite near you for some straightforward advice and information.  We’ll help you find the best product for your job and we’ll walk you through the proper steps to make sure the product lasts for years to come!  (And if you’re nowhere near a RepcoLite, head to a reputable paint dealer in your area.)

Concrete Floors: Is My Floor Even a Candidate For Paint?

garage_floor_painter_web

All concrete floors are different and many variables are at play. Some floors are composed of bare concrete. Some of this concrete is old, some new. Some old concrete floors are clean, others are dirty. Some are dirty, others are filthy. Still other floors are painted. Of those, some are holding up beautifully and others are peeling like a summer sunburn.

All too often, folks wander into a Big Box Store on a weekend and just happen to spot a gallon or a kit of “Floor Paint”. They read the can and are informed that after applying two simply coats of this paint to their floor, they’ll have a beautiful, showroom basement.

Some buy into this idea and consequently buy the paint. If you’re curious how their project ends, head to the websites of any of these stores and check out the reviews for their floor paint. Eight times out of ten, the reviews are bad. And almost 100% of those bad reviews are the result of people painting floors in the wrong way, without the right prep. Some are even the results of people painting floors that should NEVER have been painted in the first place.

So, all that to say, before you rush into a paint job on your basement floor, be aware that there’s a level of great deal of information and understanding you need to be able to tackle this project successfully. No, it’s not complicated. Yes, anybody can do it. But it DOES take a few extra steps that you’re not likely to be hear about at your average Big Box Store.

Is painting my floor even an option?

As we mentioned above, some floors are simply not cut out for a paint job. There are certain situations that simply preclude the option of painting.

If you’re wondering about your floor, work your way through the following steps for the following scenarios:

1. YOUR FLOOR IS BARE CONCRETE (Old or New)

A. IS IT CURED? The starting point with bare concrete is to determine whether or not the floor has cured for at least 60 days. If it hasn’t, wait until it has. If it has cured for anywhere from 60 days to 50 (or more) years, proceed to “B” below.

B. TEST FOR MOISTURE: Duct Tape a 2 x 2 sheet of plastic to your floor, secure the edges of the tape to ensure a tight bond, and let it sit for 24 hours. After the 24 hour time frame, pull up the plastic and examine it: is there condensation visible? Has the concrete in that spot darkened? If so, you still have moisture in the concrete and should let it continue to dry. If your concrete is old and still exhibits a moisture problem as evidenced by the plastic test, you should reconsider painting that floor. It has a moisture issue and will definitely result in paint failure. In short, if your floor is old and still exhibits a moisture problem, it’s NOT a candidate for a paint job.

2. YOUR FLOOR HAS PREVIOUSLY BEEN PAINTED

A. IS THE PAINT PEELING? Examine your painted floor: is it peeling or flaking off in relatively large quantities? Some peeling or chipping can be expected, but if you’re seeing large scale failure, that is an indication of a deeper problem. The problem could be a surface contaminant that was painted over or, more likely it’s a moisture problem in your concrete.

1. IS IT A SURFACE CONTAMINANT PROBLEM? If the peeling is relatively localized–a few large areas–it COULD be a surface contaminant. One option would be to clean those spots with a household detergent, let them dry and then proceed to painting (we’ll discuss this in a later post). However, be aware, that this is no guarantee. The peeling paint could be caused by a surface contaminant, but it could also be caused by moisture (see below). And, even if it is a surface contaminant, it’s very likely that it’s in more places than just the spots you see now. You could clean up and fix those spots only to find, within a few months, other spots starting to let loose and peel. This is frustrating and is one of those perfect examples of why the proper prep work is so important! If the first steps are done incorrectly–especially on a floor–ALL subsequent work is affected!

2. IS THERE A MOISTURE PROBLEM?  While the peeling you see could be a cause of a surface contaminant, it’s much more likely it’s a moisture problem. Moisture can work through concrete in any number of ways, but the important thing to realize is this: if you’ve got excess moisture coming through your concrete, for whatever reason (unless the floor wasn’t allowed to cure 60 days), it’s virtually impossible to fix. Painting over the cement will temporarily make it look good, but the moisture will eventually (sometimes sooner, sometimes later) push that paint coating off.

3.  CONCLUSION:  If your painted floor exhibits peeling on a large scale, it’s likely not a good candidate for a paint job. However, since it’s painted, you will likely want to at least throw a new coat on there. Go ahead and scrape off as much loose paint as you can, wash the floor and rinse it well (we’ll discuss this step in a later post). Then you’ll be ready to paint. Just understand that your previous paint didn’t bond for a reason and it’s very likely the new paint will eventually peel as well.

B.  THE PAINT IS NOT PEELING AND IS IN GOOD CONDITION: If your previous coating is holding up well, all you’ll need to do is give it a quick wash, a good rinse, and some time to dry. Then it’s time to paint.

As I’ve mentioned multiple times in this post, we’ll dig into the washing, rinsing and drying steps in a later post. This first one was meant to help you determine whether or not your floor was even a candidate for a paint job. If it’s not, think about carpet or tile or maybe just leaving it alone. If it is, look for the next part of the discussion tomorrow.