EP65: Oak Cabinets, Paint Warranties, Safe Electrical Outlets

On today’s show we talk about painting Oak cabinets. It’s not a complicated project, but the big question always revolves around the open graining: what do you do about it so you can get a great look on your finished cabinets? We talk about that as well as the riveting topic of paint warranties. (And as boring as that may sound, it’s important to understand exactly what a warranty will cover. You’ll be surprised how little some warranties actually mean!) And finally, we wrap up the show with an interview with Brad Krause from Service Professor. Brad sits down with us and discusses a number of electrical safety concerns that are probably happening in your home right now!

Listen now:

SHOW NOTES

Segment 2

Here’s the “homemade air conditioner” we talked about at the beginning of the second segment. Yes, we know this could be a “fake” YouTube video. Yes, we know it might not work as well as it’s shown. But we still think it looks like a ton of fun to try!

EP63: Wool Carpet, Solid Color Stain Explained, A Crafty Flower Pot Project, and Sewer Backups No More!

Today’s show covers a wide variety of topics. We start by discussing the long-term benefits of wool carpet (as well as the sheep that make it possible). From there, we discuss a confusing topic among homeowners: solid color stain. What is it? Why use it? How is it different from paint? We dig into all of that and then, Betsy goes all “crafty” and has a great project using solid color stain. Finally, we wrap up with an interview with Service Professor in Grand Rapids about sewer backups and all the different solutions that are available to you!

Listen Here:

Show notes for episode 063:

Wool carpet is expensive, right? Overpriced? Not worth it? Absolutely not! We sit down with Nick Sargent from Johnson Carpet One in Grandville to talk about the charm, durability, and incredibly functionality of wool carpet.

Solid Color Stain is typically a confusing product. People think of stain as something you can see through and which has a brown tone! They don't realize that solid color stains actually look pretty much like paint!

But that brings up the next question: when do I use paint and when should I use stain? We answer all of that and more!

Finally, we mentioned an EPA Guide to Lead Safe Repair, Renovation, and Painting. Here it is if you'd like to check it out!

Betsy gets all "crafty" and talks about a perfect Saturday project for you, your kids, your grandkids . . . pretty much everyone!

Sewer backups are tremendously . . . inconvenient. Horrible. Life-Altering. You name it. But did you know there are alternatives to simply "rootering" your line every few months? Alternatives that don't require you to dig up your yard?

We're in the studio with Paul Gerbaisi from Service Professor in Grand Rapids to highlight all the options available to you!

EP14 – July 8, 2017: It’s Toilet Talk Time!

We know, it’s something people don’t normally talk about in social circles. It’s a topic left for the privacy of our own homes. But we’re breaking the mould and asking all the toilet questions you may have pondered. Mark DeVisser from The Plummer Is Here stops by to answer our questions and walk us through the options when buying a new toilet. The subject matter makes us uncomfortable, but the information is worth the discomfort!

Listen here:

Show notes for Episode 014:

Kitchens are the most commonly redone room in a house. They are also some of the most costly. And there are some things you can do to change the look, without spending a ton of money. We've all heard of painting the cabinets and replacing the hardware. But there is one more project that is often overlooked, but dramatically changes the look of your kitchen.

Painting a tile backsplash can really change the look and feel of your kitchen. It can make a dated kitchen feel current. And, with a little creativity, you can make your backsplash a one-of-a-kind. Check out our Backsplash Ideas Pinterest board to see what inspired us!

Figuring out the perfect lighting for your home can be a challenge. But it can be more difficult as we get older. Our eyes go through drastic changes as we age and most people will require more and different types of light.

Renee Huff from The Lighting Corner in Grandville stops by to discuss how eyes change as we age and some things that we can implement to help us, or our loved ones, see better as we gracefully age.

Outdoor living spaces are the fastest growing segment of home improvement. Everyone is trying create that backyard spaces that every neighbor wants. And all may be perfect until it comes to the furniture.

There are three general issues that come up when it comes to patio furniture:

  1. It looks terrible from sitting in the weather.
  2. It's the wrong style. You bought log furniture, but now hate it!
  3. It's an eclectic collection of yard sale finds.

When people find themselves in one of the above situations they generally do one of two things: they either live with it, or they toss it (for the eclectic collector to find!) and buy new. But there is a third option that we like a lot better! It will save you money over replacing and you can make it something the neighbors will envy! You can find amazing ideas on our Outdoor Furniture Pinterest board.

Yes, we have finally come to Dan's favorite segment of this episode! He has been dying to have all of his hard-hitting toilet questions answered by an expert plumber. And lucky for us, The Plumber Is Here!

Mark DeVisser from The Plumber Is Here! stops by to answer all Dan's questions and add a few laughs.

Mark DeVisser is a Master Plumber and Owner of  Great Lakes Plumbing Services, LLC (or, as it is more commonly known, The Plumber Is Here!). The plumber Is Here can take care of all your plumbing needs including water heaters, faucets, tubs and showers, water and sewer hookups, drain cleaning and so much more! They service residential, commercial and new construction in all areas around Saugatuck, Holland, Zeeland, Grand Haven, Grandville, Jenison, Hudsonville, and beyond. 

How to Paint and Distress Crown Royal Bottles

So, what does The Purple Stiletto do with things that most people would throw away? Get creative, of course!

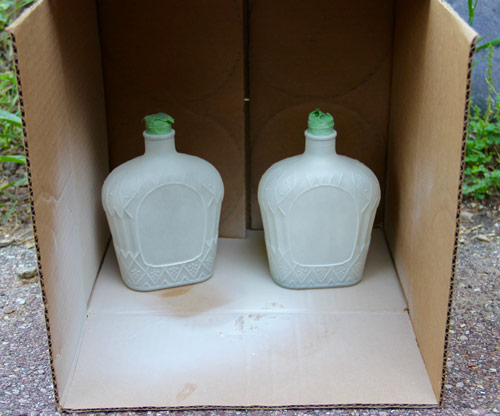
I was presented with some clear glass bottles, the contents having long since been enjoyed. The texture was exactly what I was looking for! This made things interesting and, in some way, made my job easier.

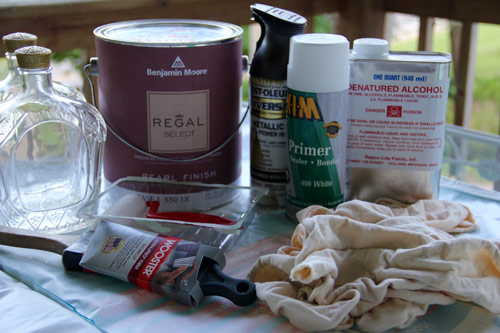
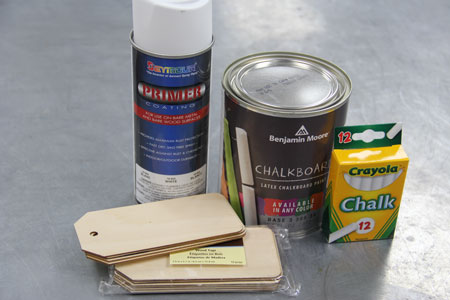
I started by gathering the supplies that I would need for a day of creativity….and waiting for paint to dry.

  • Empty bottles … check!
  • X-I-M primer (because it sticks to glass) … check!
  • Metallic spray (bronze because I’m currently on a dark metallic kick) … check!
  • Latex paint for topcoat (way more than I needed but it was a mistint gallon I changed to suit my mood) … check!
  • Denatured alcohol & rags for distressing … also check!

IMG_6523_web

With my supplies gathered together, I was ready to prime my glass. Now, I should mention that all adhesive residue and grease had been cleaned from the bottles before I started this project. Also, I realized that the lids may not screw back on correctly if the threads had been painted over, so I decided to tape the opening of the bottles to be on the safe side.

IMG_6528_web

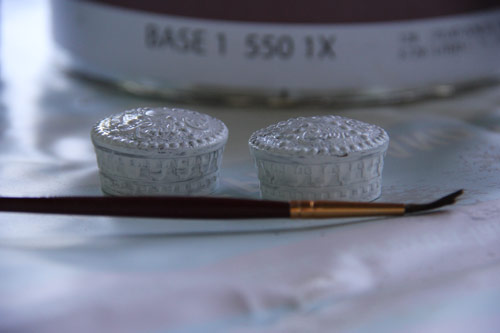
While I waited for the primer on the glass to dry, I painted the caps with a very small artist brush and practiced walking around in my stilettos.

IMG_6526_web
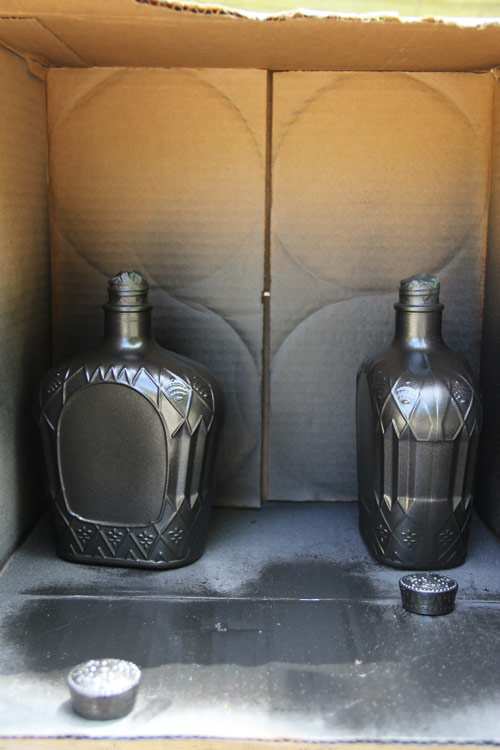
After letting the primer COMPLETELY dry on both the bottles and lids (and with aching feet!), I sprayed a couple basecoats of the bronze metallic according to the can instructions. This one specifically said to spray multiple light coats in a one hour window. And, being that it was quite humid when I did this project, it took all of my patience to let the paint dry all the way before moving on to the topcoat.

IMG_6539_web

After some lunch and a short walk with the dog (not in stilettos), my paint was FINALLY dry! I decided to try rolling the latex topcoat. I have done other projects that I brushed out and was not really happy with the brush strokes. This is nothing but a game of trial and error. As I found out, I did not like the rolling any better. Next time, I think I will try spraying.

IMG_6541_web

Two coats of latex (and more waiting) later, it was finally time to see what I could create!

Now, I will say I was going to just use a rag to wipe on the denatured alcohol but too much dry time gives one plenty of time to think of other ways to distress.

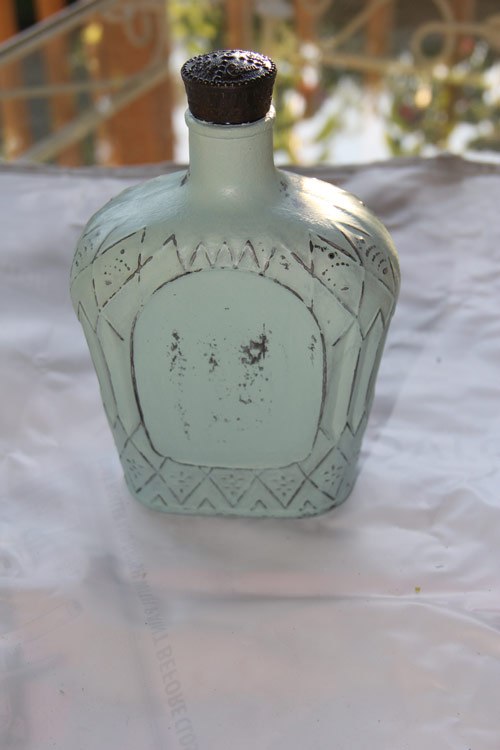
In the end, I began with a gray scuff pad lightly dipped in the alcohol. I did not want to put too much on, for fear it would eat away more paint in certain areas than I would like. I alternated between the scuff pad and rags, taking off paint only on the raised areas.

When I was happy with the raised areas, I moved on to the center of the bottle. For this, I tried a couple different techniques. The one I liked the best was cutting through certain areas with a piece of sandpaper. Just as I was getting to the metallic layer, I switched to denatured alcohol and a rag. From there, I was able to “buff out” the rough edges made by the sandpaper and reveal just the right amount of bronze. I could plan the “wear spots.”

IMG_6543_web

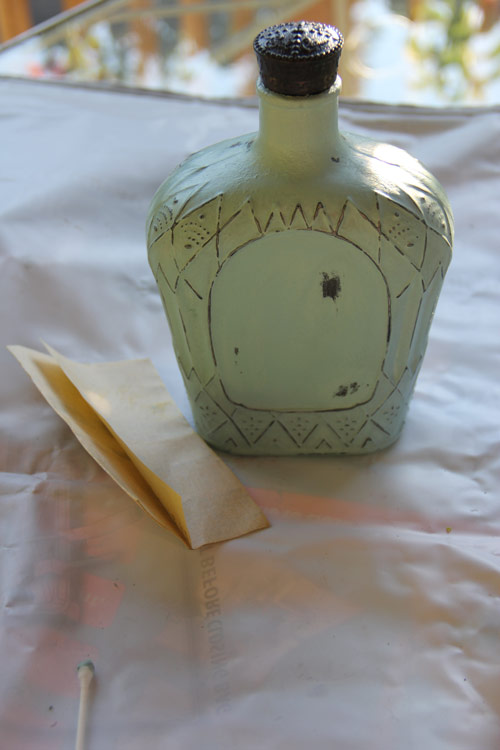
The other technique I tried was just continuously wiping the whole center section with alcohol until the bronze wore through. I did not like this as well because I felt it looked a little splotchy when it was done. I much prefer the “planned aging” look!

IMG_6544_web
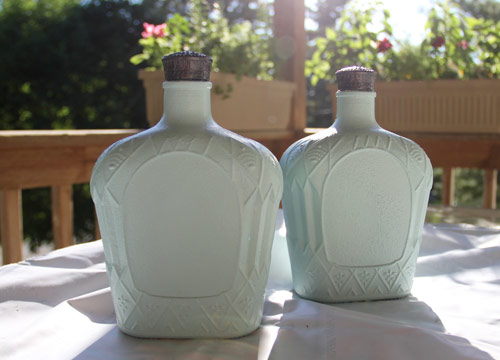
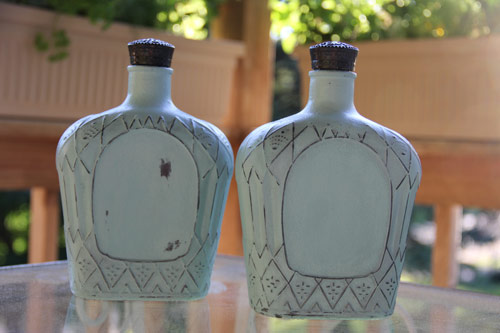
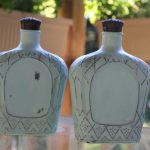
I left one bottle center plain. I think it could be used for a monogram or initial. The jury is still out on what to use the blank space for. Perhaps the Purple Stiletto symbol (which I have yet to create)? These are the two completed bottles. Just another day’s work. The Purple Stiletto crafts again!

IMG_6545_web

Chalkboard Paint Tags in 5 Easy Steps!

Benjamin Moore’s Chalkboard Paint is a versatile product that can really bring out the “creative” in us! Here’s an interesting project by Betsy Thompson from our 17th Street Store that might get you thinking about some different ways you can use Chalkboard Paint in your own home!

Chalkboard Storage Tags

chalkboard_paint5

STEP 1

The first step is to gather all your supplies. You’ll need some wooden tags from a local art supply store as well as some light-colored chalk designed specifically for chalkboards. Finally, you’ll want to stop at RepcoLite for some primer, a quart of Benjamin Moore’s Chalkboard Paint (in whatever color you want!), and a sheet of 180 grit sandpaper.

chalkboard_paint4

STEP 2

The second step is to apply primer to the wooden tags. In our project, we used a spray primer to minimize brush strokes or roller marks on the tags and because it’s a little quicker!  Now, even though “Primer-and-Paint-in-one” products are very popular, we still recommend the primer step in a project like this. The reason is that bare wood can be exceptionally porous. The helps fill in the wood grain and creates a smooth surface for the Chalkboard Paint.

STEP 3

The third step involves a light sanding of the primed tags. Depending on how quickly your particular primer dries, you might be able to do this quite soon after application. At any rate, when the primer is sufficiently dry, lightly sand the surface to knock down any raised wood fibers. When finished, wipe the tags clean with a damp cloth. Don’t introduce a lot of water to the surface. We’re only talking about using a damp rag to get the dust that you created from the sanding step off of the surface.

chalkboard_paint3

See Corona Excalibur Brushes in our Shop!

STEP 4

The fourth step is to apply the Chalkboard Paint. Once the tags have dried from step four, apply one or two coats of Benjamin Moore Chalkboard Paint. In our project, we used a high quality Corona Excalibur Brush for application. However you accomplish it, Whether rolling or brushing, make sure you use a high quality applicator. Cheap brushes will be more likely to leave brush strokes (or release bristles into your finish). Cheaper roller covers will provide you with a rougher, orange-peel, texture.

chalkboard_paint2

STEP 5

The final step is to condition the chalkboard surface. After allowing the painted area to cure for at least 3 days, rub the entire chalkboard surface with a piece of white chalk. After you’ve erased that, you’re chalkboard surface is ready for use!

chalkboard_paint1

Benjamin Moore’s Chalkboard Paint is available in any color in the Benjamin Moore spectrum. So, get creative! Think outside the box and see what you can come up with!

Some Hints:

  • For erasing, we recommend using a clean, damp cloth or paper towel. We do not recommend using a chalkboard eraser.
  • You’ll acheive the best results when using light-colored chalk designed for use on chalkboards.


Stenciled Dresser Project

green_furniture_web_030816
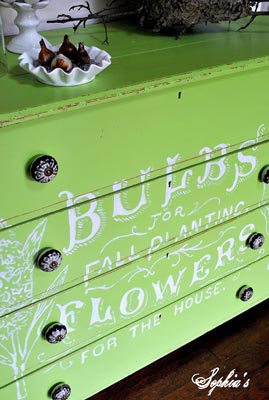
Finding and old piece of furniture–something that’s seen it’s better days–and breathing new life into it with a little paint and some creativity is easily one of my favorite do-it-yourself projects. I love it because it’s usually inexpensive (if you’re a smart shopper), doesn’t take much time, and the results can be dramatic.

Today, I want to highlight and recommend a simple project we discovered on a great decorating blog called “Sophia’s Decor“.  (Check it out sometime–you’ll thank us later!)

This is a simple project that anyone can accomplish.  Please head to Sophia’s Decor for some great pictures and more detailed comments about the project.  But to quickly summarize:

Here’s What You Need:

  • A piece of furniture to paint (this is important)
  • Paint (main color and stencil color)
  • TSP
  • Sandpaper
  • Paint Supplies
  • Stencil or Projector

Here’s What You Do:

1 Start by scuff sanding your furniture piece with some 120-150 grit sandpaper.  This doesn’t need to be a complicated, lengthy, arm-breaking, sweat-producing sanding job.  You’re basically just dusting over the piece to dull the previous finish so your paint will bond.
2 After the scuff-sanding, wash the piece down with a TSP and water mixture.  This will remove the sanding dust and will also help to clean away any surface contaminants that might be left from cleaners and so on.
3 When the piece is completely dry, apply your main color.  Brush or roll it directly onto the furniture piece without a primer.  (If you plan to distress it, it’s important to skip the primer step.)
4 Once the piece is painted (it may take one or two coats depending on your color), go ahead and distress it.  This is a bit of an art project and takes a little bit of thought.  It’s not complicated, but you want to be careful to create an authentic distressed look without going too far.  Carefully run your sandpaper over the edges of the drawers and the top and the legs and you’ll notice that very quickly you cut through to the wood beneath.  Work around the spots that would see normal wear over the years:  the drawer pulls, edges and so on. Continue like this until you’ve achieved the look you desire and then wipe the piece clean with a damp rag.
5 When it’s dry, it’s time to apply the stencil.  This part will take some planning and some thinking and some searching to find just the right graphic.  In this case, the blogger at Sophia’s Decor used a projector to display the image on the dresser and then she traced it with a pencil, using an off white paint to fill in the lines.  You could also accomplish the same affect if you found a stencil to your liking.
6 However you put the design on, let it dry a couple days.  Once it’s dry, the last step is a light sanding over the letters.  (Don’t work too hard with this sanding or you’ll remove too much of the lettering!)  The goal here is to lightly distress the lettering and give the piece an aged look.
7 At that point, you can leave the piece as is, or, if you prefer, you could apply a light, single coat of polyurethane in a low-gloss or flat finish.  A solvent-based polyurethane will yellow slightly over time, so be aware of that before you top-coat anything that’s white!

Overall, this project will take you a couple days from start to finish–though most of that time will be just letting it dry in between paint coats. It’s fun, easy and, because the furniture piece is small compared to the room it is eventually placed in, you can experiment with colors that might be too strong for the walls.

If you try something like this, or have a project you think turned out really well, please post a pic on our Facebook page here.  We love to see what you’ve come up with!