
Interview with Dave Stegink from ABI Inspection Services: The Number 1 Issue Home Inspectors Discover on a Walk Through | Fixing and Preventing Mold and Mildew in a Bathroom | Cleaning Up Water Stains On Your Ceiling | Tips for Selling Your House: Interview with Roger Nyhuis from Keller Williams Lakeshore Realty
Tag Archives: mold

Color Me Home Episode 16: Scary Bathroom? Simple Advice!
Sometimes spending time in our bathrooms can almost feel like we’re on the set of a horror movie. Mold and mildew growing in the corners, on the ceilings, and some bizarre, horrible oily stuff oozing out of the walls. These things are real and they’re very common. But the good news is that they’re very easy to fix! In today’s episode, Betsy and Dan talk about how you can fix the problems and, better yet, avoid them in the future!
Episode Outline
- Surfactant Leaching (0:27)
- How Do You Fix Surfactant Leaching? (5:33)
- Mold & Mildew Problems (8:31)
- How Do You Fix Mold & Mildew Problems? (11:23)
- Avoiding These Common Problems Entirely! (16:34)
- Ventilate with the Right Bathroom Fan (17:31)
- Use the Right Paint! Aura Bath & Spa (23:30)
- Let the Paint Dry! (26:16)
Killing Mold and Mildew
Killing mold and mildew isn’t complicated. It just requires a little care! (We don’t want you to wreck your clothes, burn your skin, or blind yourself.) So, wear old clothes. Probably some gloves. And don’t forget safety glasses. (No, you probably won’t look terribly cool, but being able to still see when you’re done is worth the concession.)
Once you’ve got all your safety gear, just mix 1 part bleach to 3 or 4 parts water depending on how bad the situation is. Then wipe the affected areas down. Or, you could put the solution into a spray bottle and spray the mold. Either way, let it sit for about 10 minutes or so and then rinse the areas with clean water.
At that point, in most cases, the mold and/or mildew will be gone and the surface will look as good as new. If not, and you decide you need to repaint, then you’ll want to prime those spots with either B-I-N Primer or RepcoLite’s own ProFlo Alkyd Primer.
For a more thorough discussion of all of that, just click here!
Finding the Right Bathroom Fan
As we mentioned in the episode, a bathroom fan is critical to dealing with (or even avoiding) many paint problems that can occur in there. However, it’s important that you find the right fan. Bathroom fans are rated by Cubic Feet per Minute (CFM’s). Usually, this works out to about one CFM per square foot of bathroom area. Below is a chart to help you determine which fan is right for you, taken from The Home Ventilating Institute (and, judging by their name, they should know!)
| BATHROOM SIZE | MINIMUM VENTILATION (CFM) REQUIRED |
|---|---|
| Less than 50 sq. feet | 50 CFM |
| 50 - 100 sq. feet | 1 CFM per sq. foot of floor space |
| More than 100 sq. feet | Add the CFM requirement for each fixture: Toilet 50 CFM Shower 50 CFM Bathtub 50 CFM Jetted tub 100 CFM |
Aura Bath and Spa: The Perfect Bathroom Paint

Whether you’ve had scary paint issues in your bathroom or not, Aura Bath and Spa is the paint you’ll want to use the next time you paint. In fact, it’s hands-down the first paint we suggest when recommending a bathroom paint. It’s a problem solver and a problem “preventer!” It’s mold and mildew resistant and it will resistant surfactant leaching better than any other product out there! Here’s some more features:
- Optimized for humid environments
- Extreme hide for fewer coats
- Color Lock Technology means no color rub-off
- Zero VOC, low odor
- Stains wash off easily
- Excellent touch up
- Self priming
- Easy application and clean up
- Provides a mildew resistant coating
One note: While Aura Bath & Spa has excellent resistance to surfactant leaching when applied to new substrates, surfactant leaching stains on existing coatings can telegraph through Aura Bath & Spa if they are not removed prior to painting. So make sure you wash the walls well before you paint!
We recorded an interview with our Benjamin Moore Sales Rep, Kevin Hermann regarding Aura Bath & Spa that is worth listening to if you’d like more info. It can be found here!
Click here for more info on Aura Bath & Spa

The Vile Showerhead (or, Finding the Dread-Free Life)
 I’m a “dreader”. That’s not a word–I know that. But that doesn’t change the truth: I dread things. On a regular basis.
For example, I re-decorated my bathroom about a year ago. I put wood planking on the walls, hung some wallpaper, stained and varnished new trim, installed a new (bowed) shower rod and new curtain and finally, to finish the whole thing off, I installed a new shower head.
Which was the biggest mistake I made.
See, right after installing it, my wife marched right in, closed the door and proceeded to take a 45-minute shower. When she was done, the kids all marched through, one after the other.
When the shower marathon ended that day, I opened the bathroom door and it was as if a cloud had localized in that tiny room. I literally couldn’t see the other side through the steam. The little ceiling fan was working overtime, but there was no way it could keep up.
“Fortunately,” I thought, trying to wave away the steam, “this is something that won’t happen everyday. Once the ‘newness’ of the shower head wears off, we’ll go back to having to fight the kids to take baths.”
Nope. Not a chance. Every single day since the installation of that vile shower head, our bathroom is engulfed in steam. Shower after shower, hour after hour: steam, steam, steam.
Well, that went on for a long time and then the inevitable happened: the mold started growing around the edges of the ceiling. The wallpaper started peeling and curling up on all the seams. My beautiful bathroom had gone from a place of despair to a place of beauty and then back again to a place of despair all in about 6 months time. It was depressing to say the least.
And that’s where the “dreading” comes in. Everyday, I’d look at the ceiling and see the mold or the wallpaper and see the peeling and I’d dread the “fix-up” job that was to come.
I dreaded it because it seemed like such a big job: fixing the mold, fixing the paper, repainting the ceiling. I’d just gone through some of this work and now, thanks to that dumb shower head, I had an even bigger mess to fix.
And so I stared at it for a long time. I thought about it. I tried to ignore it. But most of all I dreaded it.
Until finally I got so sick of being depressed and frustrated about it that I actually fixed it.
I took a week and on a Monday night, I sprayed the mold with a bleach solution and scrubbed the ceiling. That took me exactly 17 minutes.
Two nights later I came back with more bleach–no scrubbing this time, just the bleach on the mold. That took about 7 minutes.
On Friday night I went around the room and primed all the previously moldy spots with ProFlo Alkyd primer and then I re-pasted all the peeling paper. That night’s work took about 15 minutes.
Finally on Saturday, I got ready to paint the ceiling and finish the job. I was ready for a big, painstaking job (I hate painting ceilings) but I was surprised to find that the whole thing took about an hour from the time I opened the can of paint to the time I put the paint back on the shelf in the workroom.
In the end, I realized that the job I’d dreaded for the last 6 months or more had taken me less than two total hours to fix. In my mind, I’d exaggerated and inflated and imagined the work to be 10x worse than it was. I imagined the mess, the problems to be 10x less fixable than they were. I imagined the pain to be 10x greater than it was.
I’d spent 6 months feeling bad and frustrated and almost (in a sad and pathetic way) depressed about a room that took me less than 2 hours to fix.
So how does this apply to you? Well, I can’t speak for you, but I’ve talked to many folks in the paint store at RepcoLite who feel the same way I was feeling. They’re frustrated about the seemingly endless amounts of work needed in their homes. They look at the jobs and the work to be done and assume that they’re worse than they really are. And so they do what I did: they put them off and they stew on them, thinking about them and mulling them over in their minds for months until the jobs seem even bigger and more horrible. In short, we dread them and waste our time worrying about them and frowning over them.
But what we really should be doing is “doing” them. The jobs aren’t as bad as we think. They’ll go smoother. They’ll go more quickly. They won’t be as painful. And best of all, once we’re done, you’ll notice what I noticed: a real sense of relief and freedom from the work that had been hanging over my head.
So, bottom line: If you’ve got a project that’s creating that feeling of dread, jump into it. Get it accomplished. And then kick back and enjoy the dread-free life…
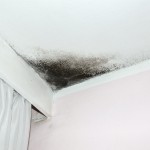
Getting Rid of Mold on Your Ceiling in 3 Steps
 Mold on a bathroom ceiling is a common problem homeowners struggle with on a regular basis. However, the good news is that while it is common and while it can be a pain to get rid of, it CAN be dealt with–you just need to take the right steps.
ASSESS THE PROBLEM
You need to start the process of fixing the mold on your ceiling by remembering that mold is a SYMPTOM of a deeper problem. Somehow, moisture is causing this mold to grow and thrive on your walls or your ceiling. You need to figure out what is causing the moisture. It could be your shower, it could be an ineffective (or non-existent) ceiling fan, it could be a leaky pipe or even a leaking roof. Find the problem that’s causing the mold and fix it. If it’s the roof, repair it. If it’s the shower, cut down on the number or length of showers if possible. If it’s the fan, put a new one in. This is the first part and it’s a critical step. If you DON’T do this, chances are the mold will just continue to be a problem.
KILL THE MOLD
Once you’ve dealt with the root source of the problem, it’s time to deal with the symptoms–the mold. And the first step here is to kill it. This is done by mixing a solution of 1 part Bleach and 4 parts Water in a spray bottle. Once you’ve got this mixed, mist the bleach solution over the affected spots on your ceiling or walls. (TAKE PRECAUTIONS HERE: Wear old clothes, remove rugs, put down drop clothes, wear eye protection and DON’T MIX THE BLEACH WITH OTHER CLEANING AGENTS). After you’ve sprayed the mold spots, allow the bleach about 10 minutes or so to work and then scrub the spots with a sponge or a scrub brush. If necessary, hit the spots with a second misting of bleach.
TOPCOAT
Once you’ve killed the mold and mildew and let the wall dry down, you might be done. Yes, you read that correctly! You might not even need to paint! But if you do, the last step in the process is to roll a couple coats of a high-quality finish on your walls or ceiling. We recommend first and foremost Benjamin Moore’s Aura Bath and Spa. It’s a tremendous product for you bathroom and, in our opinion, the best thing you could use. It’s specially formulated for bathroom and high moisture areas, offering excellent mold and mildew resistance. It’s also available in a matte finish. Which means you can say goodbye to those shiny bathroom walls! On top of that, it’s Aura. Which means excellent hide and coverage!
If you’re repainting, Aura Bath and Spa is a great choice. In fact, there’s really no reason to use anything else!
Mold on a bathroom ceiling is a pain in the neck. My bathroom is living (literally) proof of that right now. But, as I mentioned earlier, the good news is that the problem is fixable and, with effort, even preventable. Follow these steps and you should find your way to a mold-free bathroom in no time!