EP08 – May 27, 2017: An Epic Historic Restoration

Sometimes we look at our homes and don’t know where to begin. The kitchen is a little outdated. Maybe the bathroom needs work. Sometimes we see all that and we find ourselves not sure how to get started. The project just seems too big. Well, if that sounds familiar, Patty Meyer, Director of the Felt Estate near Saugatuck has some inspiring advice for you!

That and much more on today’s episode:

Listen here:

Show notes for episode 008:
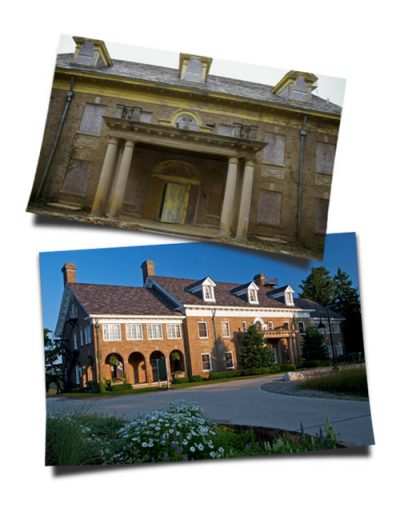
In 1925, Dorr Felt began construction of what the Felt Mansion for his wife, Agnes. The summer home would be large enough to accommodate his married daughters and their families. Completed in 1928, the 12,000+ square foot mansion consists of 25 rooms, including a third-floor ballroom. Unfortunately, Agnes died in August of 1928, six weeks after the family moved in, and Dorr died a year and a half later in 1930.

From there, the home has changed owners multiple times throughout the years. It's been a seminary, a home for cloistered nuns, and even a prison.

After years of neglect, volunteers from Laketown Township and surrounding communities are restoring the mansion and grounds. It's an incredible community project and a remarkable story!

Today, Patty Meyer, Director of the Felt Estate, sits down with us for two segments to talk about the project, what she's learned, and to give all of us the inspiration to dream and to dare to accomplish what seems almost impossible!

Patricia Hoezee Meyer – Director of the Felt Estate

Pat is a former educator who graduated from GVSU and the School of Education in 1990 with a major in English & History, and a minor in Political Science. Her interest in art, history and architecture led to her passion for the restoration of the Felt Estate.

For the last 13 years, Pat has restored the Felt Estate, and as director of the Estate, planned and implemented hundreds of events. Pat and the restoration project she oversees have won numerous awards at the local, state, and national level. Pat speaks around the State at Historic Preservation Seminars, emphasizing the importance of place in our lives, in our communities, in our history, and in our learning. Pat is continuing her education at GVSU, through the Johnson Center, working toward a Master’s Degree in Non-profit Administration.


There are tons of common paint mistakes we all make in an effort to save time. Today we talk about four that we see all the time!

  • Making My Paint Cover In One Coat Whether It Wants to Or Not!
  • Not Washing the Surfaces I'm Going to Paint Adequately!
  • Not Priming After I Strip Wallpaper
  • Painting Out of My Full Gallon Container
Check out or blog post for more info!

How to Properly Load a Paint Brush!

Our dryer and washer can potentially be very destructive if regular maintenance is not performed. Dryer lint is extremely flammable and washer hoses need to be replaced every five years. Fortunately, with just a little maintenance, you can keep your home safe and protected!

Flammable Vent Hoses

We mentioned in the segment that commonly used plastic or vinyl vent tubing is extremely flammable (as is the lint trapped inside!) Here's a video that demonstrates why you want to remove these cheap hoses from your home and replace them with flexible metal tubing.

FloodStop
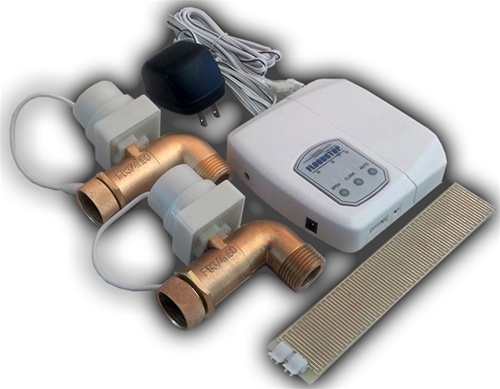
This item is very interesting to me. It's designed to be installed very simply, taking only 10 minutes. But when it's installed, it will detect leaks, sound an alarm, and best of all, automatically turn off your water supply valves to prevent flooding! I haven't tried it, but I'm certainly going to dig into it! You can get more info right here!

Paint and Primer All-In-One: Miracle or Marketing?

By now, we’ve all heard about Paint and Primer All-In-One products. We’ve seen commercials, we’ve heard the promises. And we know that using a two-in-one product is going to save us almost miraculous amounts of time, right? Well….

Brilliant Marketing

To start with, let’s clear something up right away. Paint and Primer All-In-One products aren’t new. The labeling is. The name is. But in all actuality, all high quality, 100% acrylic paints will function as paint and primer all-in-one. There is no inherent difference between a product labeled as a paint and primer all-in-one and a high quality acrylic paint. It is really just a brilliant marketing gimmick revolving around the concept that we all like to save time and skip steps!

RepcoLite carries any number of products like this even though we don’t label them as such. Our Hallmark Ceramic Paints and Carefree Interior Paints are all paint and primer in one products. Benjamin Moore’s Aura, Regal, Natura, and Ben also fall in to this category.

So, in actuality, paint and primer all-in-one products aren’t as “cutting edge” as we may have been lead to believe by the smart tv ads! But are they still great time saving products?

Can We Really Skip the Primer Step?

Yes and no. As we mentioned in the previous post primers are different from paints. Paints are different from primers. When the two are combined into a single product, compromises have to be made. Drywall, for example, is porous and needs to be sealed. Just rolling a finish paint on, especially a finish paint that has a sheen, can result in an uneven finish. The paint is absorbed at different rates into the drywall. In the areas where it lays up on the surface, it will look shinier. In the areas where it penetrates deeply, it will look flatter. Subsequent coats can mask this problem, but not always eliminate it. A drywall primer however is made to seal and provide a uniform surface for your finish paint. And, on top of that, it’s about $15 cheaper a gallon! Why spend all that extra money for lesser results?

Or, if you want to paint a tile backsplash, a paint and primer in one product is likely going to peel right off. You need to use a special bonding primer that is designed to adhere to smooth, glossy surfaces.

Or, let’s say you stripped wallpaper off your walls and want to paint. The paste residue that is often left behind is water soluble. A regular waterbased paint and primer all-in-one will react with this and will result in a texturing problem on your walls. Use an oil-based primer (Benjamin Moore’s Fresh Start Multipurpose Oil Primer or RepcoLite’s ProFlo Primer) and you’ll seal that paste in and you’ll have no problems. (For more information and painting a wall that previously had wallpaper, check out our blog post!)

Bottom line, there are many situations that we run into on almost every painting project where a separate primer and finish paint are going to give you better results than just using a primer and paint in one.

When Can I Use a Paint and Primer All-In-One?

There are certain situations where a paint and primer in one product makes sense:

  • New Coat of Paint (same color)
  • Drastic Color Change
  • Small Repairs

Putting another coat of paint on a wall? Primer isn’t usually needed, so the paint and primer in one products work well. Switching colors? A paint and primer in one will offer better hiding than a cheap paint, so that’s an option. Patched a small area of your wall and you don’t want to buy a separate quart of primer? OK, paint and primer in one makes sense. And there are a number of other situations where paint and primer in one would make sense.

However, remember what we said earlier: Paint and Primer All-In-One products are technically no different from a high quality acrylic latex paint. So, in any of the above situations, do you need to seek out a specific Paint and Primer All-In-One? Absolutely not! If you’ve already got paint, and it’s a high quality acrylic, it’s perfect!

What Do the Professionals Choose?

Professional contractors make their money and build their reputation based on the speed of their projects and the quality of their work. And by an overwhelming margin, they choose to use a separate paint and primer. They know that they will get reliable and consistent results with a separate paint and primer. And they know they’ll get those results at a better price than using the “miracle” paint and primer all-in-one products!

So, why use a lesser system that costs more money when you could use the system the pros consistently choose?

Paint Your Kitchen Cabinets in 6 Steps!

bigstock-Cabinet-detail-13573895_webDid you know that the average cost of remodeling your kitchen is right around $20,000? Yes, $20,000. That’s a significant amount of money. So significant, in fact, that it means I won’t be doing any kitchen remodeling anytime soon. Sure, I’d like new cabinets or a new backsplash or a new floor, but we’re just too attached to having things like groceries and running water. And I don’t think we’re alone. A lot of people like groceries and running water. And yet, many of those same people also wish they had a better kitchen.
And that brings me to the good news: there are many things you can do that will help you update your kitchen without forcing you to give up those little luxuries we all like to have. Like food in the refrigerator. And one of those projects is painting your kitchen cupboards. If the doors and drawers are structurally sound, why rip them out and replace them? With a little elbow grease, some time, and the right products (I’m looking at you RepcoLite and Benjamin Moore), you can brighten them up and, in so doing, completely change the look and feel of your kitchen. And all for very little money!

If you think this project could be perfect for your kitchen, here’s what you need to do:

STEP ONE: Remove the hardware and hinges and label the doors with their location. Removing the hardware and taking the doors down requires no explanation. However, let me stress the importance of labeling the pieces. You definitely want to make sure you do this!  Find a system that will work for you and make sure to mark each door and drawer as well as the place they go in the cabinet. Safe-release (Delicate Surface) painter’s tape works well. Just make 2 tags with a “1” and put one on the back of the door, and the other on the frame of the cabinet where the door goes. It’s a simple step, but will help you when it comes time to put things back together!

STEP TWO:  Closely examine the surface of the cabinets and drawers and be sure to remove any peeling paint by sanding and scraping. Whatever paint remains on the surface of your cabinets must be sound! New paint brushed over a peeling surface won’t make that old layer stick. The old layer will continue to fail and will take the new one with it. So make sure that whatever paint you leave on the doors is adhering well. Also, if you have to scrape or sand off some of the paint, make sure that you spend some time feathering the bare spots into the spots where the paint remains.

STEP THREE: Clean the surfaces thoroughly. After taking care of loose, flaking, or peeling paint, you need to clean the surfaces with a mixture of 1 part TSP to 4 parts water. Kitchens are sources of many different surface contaminants and you need to make sure that the surface you’re painting is clean and free of grease, dirt, and so on. Use a Scotchbrite (“scrubby”) pad with the TSP to thoroughly clean the surfaces. And if you have some really stubborn dirt or grease, use the degreaser Spray Nine.

STEP FOUR:  Scuff-sand the surfaces you’re going to paint. You can use an orbital sander for this, or you can do the sanding by hand. Either way, use either 180 – 220 grit sandpaper. The goal isn’t to sand through the current finish, it’s just to lightly scuff it. And when you’re done, remove all the dust from the cabinets. You can blow them off with an air compressor, vacuum the dust off, or wipe it off with a solvent like Denatured Alcohol or Xylene. However you remove the dust make sure that it’s all removed before moving on to the priming step!

STEP FIVE:  Prime the cabinets with a good bonding primer. We recommend STIX Waterborne Primer. It will bond to the previous coating on your cabinets and will provide an excellent base for your topcoat! Let the primer completely dry and then assess the cabinets for any bleed-through of stain or tannins. This can happen if you’ve cut through the original coating while scuff sanding. If you do see some bleed through, spot prime those areas with an oil based primer or a white pigmented shellac like BIN.

STEP SIX:  Topcoat with a good finish paint in either a satin sheen or a semi-gloss (for washability). If you’re brushing, we recommend giving Benjamin Moore’s Advance a try. It’s a waterborne alkyd which means you’ll get the performance of an oil-based product without the drawbacks. It will flow out remarkably well, providing you with a smooth finish even when you brush or roll the paint on. And, best of all, it cleans up with soap and water and doesn’t have the smell of an oil. Another great option is RepcoLite’s own Hallmark Ceramic. It rolls and brushes well and or can be sprayed. There are also a few other options we may recommend in the store, depending on your situation.

And that’s basically what you need to know. Yes, there is some work involved. Yes, it will take some time. You’ll have to do the sanding and the cleaning, the priming and the painting. But, when you’re done, you’ll be amazed at the difference in your home. And all for as little as $200 – $300 (or less!)

If you’re interested in this project, please email us with your questions or type your questions in the comment boxes on this post!

Concrete Floors: Is My Floor Even a Candidate For Paint?

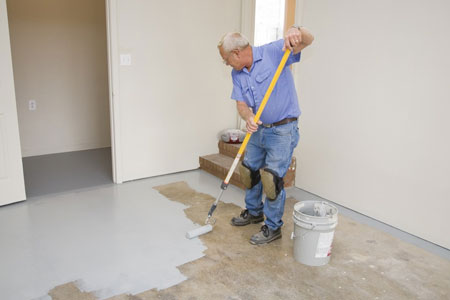
garage_floor_painter_web

All concrete floors are different and many variables are at play. Some floors are composed of bare concrete. Some of this concrete is old, some new. Some old concrete floors are clean, others are dirty. Some are dirty, others are filthy. Still other floors are painted. Of those, some are holding up beautifully and others are peeling like a summer sunburn.

All too often, folks wander into a Big Box Store on a weekend and just happen to spot a gallon or a kit of “Floor Paint”. They read the can and are informed that after applying two simply coats of this paint to their floor, they’ll have a beautiful, showroom basement.

Some buy into this idea and consequently buy the paint. If you’re curious how their project ends, head to the websites of any of these stores and check out the reviews for their floor paint. Eight times out of ten, the reviews are bad. And almost 100% of those bad reviews are the result of people painting floors in the wrong way, without the right prep. Some are even the results of people painting floors that should NEVER have been painted in the first place.

So, all that to say, before you rush into a paint job on your basement floor, be aware that there’s a level of great deal of information and understanding you need to be able to tackle this project successfully. No, it’s not complicated. Yes, anybody can do it. But it DOES take a few extra steps that you’re not likely to be hear about at your average Big Box Store.

Is painting my floor even an option?

As we mentioned above, some floors are simply not cut out for a paint job. There are certain situations that simply preclude the option of painting.

If you’re wondering about your floor, work your way through the following steps for the following scenarios:

1. YOUR FLOOR IS BARE CONCRETE (Old or New)

A. IS IT CURED? The starting point with bare concrete is to determine whether or not the floor has cured for at least 60 days. If it hasn’t, wait until it has. If it has cured for anywhere from 60 days to 50 (or more) years, proceed to “B” below.

B. TEST FOR MOISTURE: Duct Tape a 2 x 2 sheet of plastic to your floor, secure the edges of the tape to ensure a tight bond, and let it sit for 24 hours. After the 24 hour time frame, pull up the plastic and examine it: is there condensation visible? Has the concrete in that spot darkened? If so, you still have moisture in the concrete and should let it continue to dry. If your concrete is old and still exhibits a moisture problem as evidenced by the plastic test, you should reconsider painting that floor. It has a moisture issue and will definitely result in paint failure. In short, if your floor is old and still exhibits a moisture problem, it’s NOT a candidate for a paint job.

2. YOUR FLOOR HAS PREVIOUSLY BEEN PAINTED

A. IS THE PAINT PEELING? Examine your painted floor: is it peeling or flaking off in relatively large quantities? Some peeling or chipping can be expected, but if you’re seeing large scale failure, that is an indication of a deeper problem. The problem could be a surface contaminant that was painted over or, more likely it’s a moisture problem in your concrete.

1. IS IT A SURFACE CONTAMINANT PROBLEM? If the peeling is relatively localized–a few large areas–it COULD be a surface contaminant. One option would be to clean those spots with a household detergent, let them dry and then proceed to painting (we’ll discuss this in a later post). However, be aware, that this is no guarantee. The peeling paint could be caused by a surface contaminant, but it could also be caused by moisture (see below). And, even if it is a surface contaminant, it’s very likely that it’s in more places than just the spots you see now. You could clean up and fix those spots only to find, within a few months, other spots starting to let loose and peel. This is frustrating and is one of those perfect examples of why the proper prep work is so important! If the first steps are done incorrectly–especially on a floor–ALL subsequent work is affected!

2. IS THERE A MOISTURE PROBLEM?  While the peeling you see could be a cause of a surface contaminant, it’s much more likely it’s a moisture problem. Moisture can work through concrete in any number of ways, but the important thing to realize is this: if you’ve got excess moisture coming through your concrete, for whatever reason (unless the floor wasn’t allowed to cure 60 days), it’s virtually impossible to fix. Painting over the cement will temporarily make it look good, but the moisture will eventually (sometimes sooner, sometimes later) push that paint coating off.

3.  CONCLUSION:  If your painted floor exhibits peeling on a large scale, it’s likely not a good candidate for a paint job. However, since it’s painted, you will likely want to at least throw a new coat on there. Go ahead and scrape off as much loose paint as you can, wash the floor and rinse it well (we’ll discuss this step in a later post). Then you’ll be ready to paint. Just understand that your previous paint didn’t bond for a reason and it’s very likely the new paint will eventually peel as well.

B.  THE PAINT IS NOT PEELING AND IS IN GOOD CONDITION: If your previous coating is holding up well, all you’ll need to do is give it a quick wash, a good rinse, and some time to dry. Then it’s time to paint.

As I’ve mentioned multiple times in this post, we’ll dig into the washing, rinsing and drying steps in a later post. This first one was meant to help you determine whether or not your floor was even a candidate for a paint job. If it’s not, think about carpet or tile or maybe just leaving it alone. If it is, look for the next part of the discussion tomorrow.

Paint Screw-Ups Anonymous

meeting-1015291_1920“My name’s Dan and I’m a recovering Prep Work Skipper.”

If there were support groups for those of us who consistently mess up paint jobs, that’s how I’d introduce myself every week.

See, I do a lot of things right when it comes to a paint job.  I take the time necessary to pick the colors I really want (usually).  I amass the necessary tools before I start.  I buy quality materials and paint.  I do many things right.

However, what I routinely screw up is this:  I skip or skimp on the prep work.  Every time.  It’s like an addiction.  An addiction to skipping prep work.  I mean really, that’s got to be one of the dumbest sounding sentences I’ve ever written, but it’s the truth:  I hate prep work when I paint and so I skip it.  And then, inevitably (and by inevitably, I mean ALWAYS) it comes back to bite me.  Inevitably (always).

And so I’m turning over a new leaf. From here on out I’m going to make the following changes to my painting methods and practices:

RESOLUTION NUMBER 1

I will no longer simply roll around or over the nails that are stuck in my wall.  This usually messes up my roller, creating a weird divot that repeats over and over on my wall, frustrating me; or, it creates drips on the wall or floor that I don’t find until after the paint has dried.  And that always makes me profoundly sad.  From now on, I will remove those nails ahead of time.

RESOLUTION NUMBER 2

I will patch the nail holes left in my wall when I implement Resolution Number 1 above.  And I will patch them with the proper spackling compound AND will let that compound DRY before I try to SAND it.  (Because I’ve tried to rush this and sanding only partially dried spackling results in results that make me profoundly sad.)  To give myself the proper time to accomplish these spackling and sanding tasks, I will have to tackle this aspect of the project ahead of the day that I plan to paint. This will require planning and discipline, and I resolve to practice both.

RESOLUTION NUMBER 3

I will no longer tell myself that my walls are clean enough and do not need to be wiped down before I paint.  I will accept the fact that I do not regularly clean the top corners of every room and that even though I style myself as a clean and tidy person, there is a good chance that random cobwebs may be there.  I will take the necessary 20 minutes to wipe away those cobwebs so I don’t end up rolling into them later with paint and then spreading them over my walls.

RESOLUTION NUMBER 4

I will no longer let myself believe that “scuff sanding” is a great idea, but that I really don’t have time to do it right now.  I will take the necessary 10 minutes to scuff sand a dresser before I prime and paint it.  I will scuff sand my woodwork before I paint it.  I will scuff sand all shiny surfaces EVEN IF I’m using a primer that says “no scuff sanding necessary.”  I will remember that there are no shortcuts.

RESOLUTION NUMBER 5

I will no longer do everything else right–buy the right paint, buy the best tools, choose the right colors–only to screw the project up by skipping the prep work.  I will admit that an extra hour or two is worth all the extra work and frustration and money I’ve cost myself through the years by skipping prep work.  I will do the proper prep work, no matter how boring it is, so that my project looks as professional as possible when I finish. In short, I will no longer convince myself that certain prep-work projects are worthwhile, but that I simply don’t have time for them.  I will make time for prep work precisely because it is so worthwhile.

Those are my resolutions.  I’ll probably screw up from time to time, but I’m going to give it my best shot from here on out. How about you?  Anyone else out there who routinely skips the prep work stage only to be burned in the end?  Anyone else out there ready to circle up, admit your addiction to hating prep work, and start the recovery process?  The recovery group is open….

12 Screwdrivers for $1: What Could Go Wrong?

dollars-426023_1920I’m cheap.  I’ve probably written that before, but that doesn’t matter.  I’m so cheap, it’s legitimate to write it again.  But that cheapness has it’s limits.

Several months ago, I learned a tough lesson in the world of Cheapness.  I was working on a project in my kitchen and I needed a small screwdriver to unscrew and remove about 12 tiny screws.  After scrounging in my basement work room and coming up empty, I decided I needed to travel to the tool store.

Reluctantly I did.  My little wad of crinkled dollar bills was in my pocket and I planned to run in, grab the screwdriver and get back home to finish the project so I could go outside and play and have fun with the kids.

However, something happened:  on my way to the tool store, I drove past a dollar store, and my wife announced that we needed to stop there so she could pick up some this or that.  So we stopped.  And as she made a beeline for the different items she needed, I wandered.

And do you know what happened?  I wandered into the tool section.  (I hesitate to call it a “department” because we were, after all, in a dollar store).  Anyway, we wandered into the tool section and I found, sitting on the shelf in a bright, shiny plastic package, a set of 12 screwdrivers.  The price tag?   Exactly 1 U.S. Dollar.  Plus tax.

Well, if you’re me, that 12-pack-for-just-1-dollar-deal is just too good to refuse.  So I snatched it up, dropped it on the counter and promptly paid my $1.06.  All the way home, I bragged up my find to my wife.  Oh, I knew the tools weren’t the best, but all I needed to do was remove 12 screws.  And I had 12 screwdrivers.  It’s impossible that I could fail, right?

Riding on cloud nine, I pulled into the driveway and marched into the house ready to tackle my project.  And of course, you already know what happened.  The first screwdriver broke on the third twist–the shaft separated from the handle.  No problem.  I had 11 more.  And I’d planned on this.   No Sweat.

But then the second and third screwdriver broke before I’d removed that first screw.  And I started to get nervous.  I mean really?  Could I possibly break every single screwdriver in a 12 pack before I’d unscrewed 12 screws?  Could such a think happen?  Surely, no!

Sadly, yes.  They all broke.  I still had 6 or so screws to go when I threw the last screwdriver into the garbage.  Frustrated, I drove to the tool store, dropped $6, came back home, and about 2 hours after I’d started, I finally had everything done.

A project that should have taken 10 minutes max ended up taking a couple of hours (when you add in all the driving and waiting in line and so on).

In the end, it taught me a good lesson:  there’s a time and a place for cheapness.  But there’s also a time and place for purchasing quality materials.  Dropping the extra money right up front is sometimes the best money-and-time-saving decision you can make.  It was that way with those screwdrivers and it’s also that way with paint.

See, so often people think paint is paint.  Good paint isn’t any different from cheap paint.  At least that’s the thinking.  And when people who think there’s no real difference in quality see that quality paint is about $8 more per gallon, well, their decision is basically made for them.  They buy the cheapest paint they can find and then work their way through the project.  In the end, they get the walls covered, but they usually put the brushes and rollers away heaving a sigh of relief that the terrible, horrible job is finally done and they walk away assuming that painting is a pain.

However, it’s not the painting that’s the pain.  It’s the paint.  When you use a cheap paint product, you may not realize there’s a difference between it and a quality product, but that doesn’t change the fact that there is.  High quality materials roll onto your walls easier, with less work.  They don’t drip and spatter all over the place.  They cover and hide much better.  They go farther.  They wash up and hold up better and they don’t need to be touched up as often.

A good paint versus a cheap paint can often take at least 1 less coat and will usually still be looking great on your walls when the cheaper paint is begging for a repaint.

And that’s the point to think about:  buying the better paint right in the beginning is, by far, the better value.  Sure, it may (in an average living room that takes 2 gallons of paint) cost about $16 total dollars more than the cheap paint, but think of the benefits:  the paint will apply easier, cover better, hide more, drip less and last longer.  You’ll apply fewer coats, spend less time, and won’t need to deal with drips and spills.

$16 more on an average room will save you at least an hour or two of work and will provide you with a better product that will wash up, resist wear and need less touch-ups than a cheaper paint.

With the screwdrivers, I assumed there was no way to make a bad screwdriver.  I thought a screwdriver was a screwdriver–why pay $5 for 1 when I could get 12 for $1?  I learned the hard way that all screwdrivers aren’t created equal.  The same is true with paint.  Good paint will make a difference.  Sure, it will cost more up front, but the value in the long run will be worth it.  Try it.  Just once.  Pick up a high quality paint (RepcoLite, of course) for your next project and see what a difference it makes!