

Tag Archives: deck cleaners

EP115: Wallpaper Border Removal Nightmare, Kitchen Appliances with West End Appliance, & Decks
LISTEN HERE:
Segment 1: Wallpaper Border Removal Nightmare
Segments 2 & 3: West End Appliances
Segment 4: Deck Season
How Do I Clean an Old, Gray Deck?
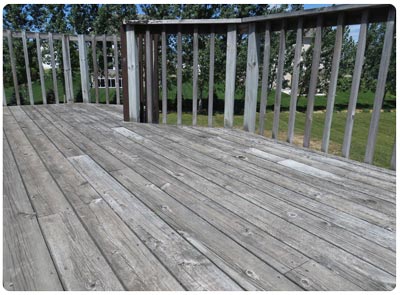 “We just bought a new house and the deck looks terrible! It’s gray and faded. How do we get it ready for a new coat of stain?”
This is a question we hear all the time–in one form or another. Sometimes, it’s about a deck that’s never been stained or protected. Other times it’s about a deck that has been stained, but so long ago that you can barely tell.
In either situation, people are concerned about how to get the deck looking good again. Some even wonder if they can.
Well, the good news is that yes, in most cases, you can completely revitalize your old deck. It’s just a matter of knowing the right steps and using the right products.
So, here’s the scoop:
Step 1: Check for Rotten Boards
The first step in any deck project is easy: look at your deck. Very carefully. Check the wood over. If it’s rotting, splintered, falling apart, or full of knot holes you’ll have to ask yourself a tough question: is it even worth trying to save this?
Stains will protect your wood and give it some water repellancy, but they won’t turn something that’s rotten into something that’s sound! The hard truth is that some decks just aren’t worth trying to save. It’s better and more expedient just to start over.
So check your boards over. If some need to be replaced, do it. If more need to be replaced than not, then consider building a new deck.
Step 2: Sweep it Off
Once you’ve looked it over and either have replaced the boards that needed it or decided that the deck is sound (even though it’s currently gray and ugly!), then it’s time for step 2: Sweep it. Yes, it’s that simple. Brush off the leaves, buds, acorns, branches and whatever else has collected there.
Step 3: Apply the Cleaner
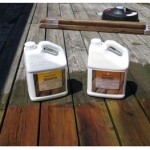
Next, it’s time to start the actual work of cleaning the deck. At RepcoLite, we recommend two different cleaners depending on your situation:
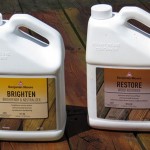
RESTORE from Benjamin Moore: This cleaner’s for old, weathered wood that either has no stain on it or so little as to be completely negligible. This cleaner will restore your old wood to a nearly new look.
REMOVE from BENJAMIN MOORE: This cleaner’s for decks that still have a noticeable amount of stain on them. REMOVE will . . . remove . . . that stain. Now, we want to clarify that REMOVE will work well on transparent and semi-transparent stains. It’s not designed to remove solid color stains from your deck.
Whatever cleaner is appropriate for your situation, the application is the same: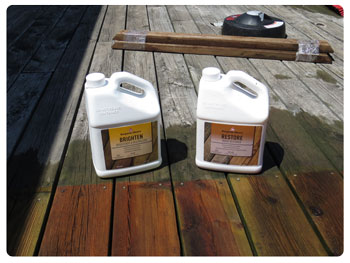
A. Mix it with water according to the label instructions.
B. Mist your landscaping and siding (near the deck) with water to protect them.
C. Spray the cleaner onto the deck with a garden sprayer.
D. Wait 10 – 30 minutes depending on the condition of your deck. And be sure not to let the cleaner dry out in this step! If necessary, mist more cleaner onto the deck to keep it wet.
E. Scrub the boards with a good scrub brush in the direction of the grain. This is an important step! The better you do here, the more effort you put in, the better your end results.
F. After scrubbing the deck, rinse it clean with a power washer or a garden hose. Be sure to give your plants and siding a quick rinse as well!
Step 4: Apply Brighten
Once you’ve rinsed the deck, you’re likely going to be very excited at the results you’re seeing. And you’ll be tempted to quit and wait for the deck to dry. But don’t do that–not just yet. There’s one more step: you need to apply BENJAMIN MOORE’S BRIGHTEN to the boards. This will neutralize the cleaner that you just rinsed off and will also brighten the boards considerably.
Application is essentially the same as the cleaner and should be done immediately after cleaning the deck.
Mix it according to label instructions, mist the landscaping and siding, spray it onto the deck, let it sit, scrub it around, and then rinse it off.
Step 5: Let it Dry
And you’re done! With the cleaning step, that is. All that’s left before you apply a stain is to let the deck dry. We recommend waiting at least 3 good drying days. And by “good drying days” we mean days without rain. Stain needs to be able to penetrate into the wood of your deck to perform. If the deck is damp, the stain can’t penetrate as well . . . and problems usually follow! So let it dry.
And that’s pretty much it. Cleaning an old deck and getting it ready for stain may sound like a complicated process or a long project, but it’s not! The work goes quickly and, on the right day, can actually be a great 2-3 hours spent outside. And the results you’ll get will be more than worth it.
If you’re still not convinced, check out this video we made last summer when we sampled the Benjamin Moore cleaners. And if you’d like more information about decks and what’s required to get them ready for summer, why not give a listen to our Color Me Home Podcast all about decks! You can listen on your computer or download it and listen to it later on your phone or any mp3 player. Check it out!
And here’s our video:
Color Me Home Episode 5: Clean and Protect Your Deck
This week, Betsy and Dan talk about the quintessential Spring/Summer project: cleaning and protecting your deck! Deck projects may seem complicated, but they’re really very straightforward. You just need to arm yourself with a little information. Lucky for you, that’s almost entirely what’s contained in this episode. (Actual information content is roughly around 85%. The other 15% is stuff we have a tough time categorizing…)
Episode Outline
- How long do I have to let a new pressure-treated deck dry before staining? (2:30)
- My deck’s gray and faded! How do I get it ready for stain? (6:37)
- Why is cleaning the deck important? Can’t I just skip this step? (15:00)
- Do I have to protect my wife’s plants around the deck? Or will they be OK? (18:00)
- I don’t understand all the different deck stains that are out there! Can you help? (22:38)
- What tools do you recommend for applying the stain? (30:02)
- How do I apply the stain to my deck? (37:52)
- Is there a best time of day to apply the stain? (43:20)
Pressure-Treated Lumber
Pressure-treated lumber has been chemically treated to resist rot, decay, and termites. And really, it’s an interesting process by which this is all done. See, the lumber is rolled into giant pressurized tanks where the preservative is forced deep into the wood’s fibers. Here’s a video for those of you who want the full “deck experience”!
Getting the Deck Ready for Stain
OK. In the episode, Dan talked about having video of a co-worker, Dave Williams, falling down the stairs while cleaning the deck. As is usually the case, Dan’s memory of the event and the reality depicted in the footage, aren’t necessarily the same. While in his mind, the event was long, drawn out, and utterly hilarious, the video is much less so. Still, it’s someone falling down who’s not Dan. So, that’s cool. And, best of all, Dave was just fine! The big takeaway here is this: these deck cleaning products can create a very, very slippery surface! So be careful!
Other than the video of Dave falling, we also mentioned a very quick video that demonstrates a sample of what Benjamin Moore’s Restore and Brighten can do for a deck that’s old and weathered. The results are remarkable! Check it out:
OnFloor Machine
Here’s a demo of the OnFloor Machine we discussed in the podcast, though we want to note that the situation in this video shows the OnFloor Machine removing nearly 5 layers of freshly applied stain (yikes!). As a result, the speed is dramatically reduced. Still, you can see a great example of how clean the OnFloor Machine will get your deck. It’s a very quick way to get your wood ready for stain without having to do any cleaning or introduce any water to the deck at all. This means you could clean it and stain it on the same day!
We have an OnFloor Machine for rent. You can contact us at 616-396-5213 to check availability and rental rates!
Which Tools are Best?
In the podcast, we discuss 3 recommended tools for staining your deck. For a more in-depth look complete with video of how quickly (or not!) the tools work, look below:
Summary
And that’s it for all the information we covered in the podcast. We knew this was a long one and we debated about the best way to present it. In the end, we decided to present it in it’s entirety and let people pick and choose what parts they wanted to listen to more closely! We hope the information’s helpful. And don’t forget, if you have any questions at all, you can stop out at any RepcoLite Paints, Port City Paints, or Snyder Paints location and let us help! Or, you can email Dan and Besty directly at colormehome@repcolite.com!
Cleaning a Deck is EASY with Benjamin Moore’s RESTORE and BRIGHTEN!
Every now and then I stumble into a project that is easy and remarkably rewarding. This was one of them! We found an old deck that was slated for demolition and we decided to try out some of Benjamin Moore’s wood cleaning and brightening products. I expected the products to work, but the results were amazing!
When It’s Time to Clean Your Deck, Lay Off the Bleach!
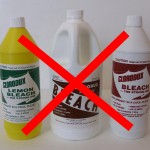
 Well, Spring’s upon us and many of us, because of the rainy start, are still scrambling to get our decks cleaned and protected for the season. If that’s you–if you’re one of those folks looking for a good, dry weekend so you can get your deck cleaned and ready for cookouts and parties, well be sure you read this first. See, one of the tendencies we often notice at RepcoLite is a customer’s desire or plan to use regular household bleach to clean their deck. Since Chlorine bleach does a great job killing bacteria and stuff like that, many of us figure it’ll be perfect for our dirty, moldy or mildewed decks.
But before you go and jump into a job like this, you should be aware that Chlorine bleach has never been proven terribly effective in killing molds on rough, porous surfaces. Also, be aware that it actually destroys
the lignin in your wood deck.
Now, for those of you not quite up to speed on what exactly lignin is, or does, let me explain: Lignin is a naturally occuring “complex polymer that binds to cellulose fibers and hardens and strengthens the cell walls of plants”(1). Basically, when lignin is destroyed by bleach, the way the wood bonds together is disrupted or compromised. When this happens, the wood’s much more likely to exhibit signs of aging, splintering and checking. On top of all of that, Chlorine bleach will effectively remove the natural coloring from the wood of your deck, replacing it with a bland, washed-out appearance.
 Also, not only does Chlorine bleach negatively affect the durability, quality and appearance of the wood of your deck. It also can make your deck restoration project. See, bleach is basically 99% water. And water is largely the reason we see the growth of bacteria and mold on our decks. Now, the nature of Chlorine prevents it from penetrating deep into materials like concrete or wood. However, while the Chlorine won’t penetrate–and instead, just lays on the surface–the water WILL penetrate. And this really only serves to feed the roots of the mold. So, you clean the deck, get it looking great–right away–only to find a few days later that the mold is back with a vengeance. This is all likely to happen when Chlorine bleach is used as a cleaner.
So, with all that said, the answer’s pretty simple: when it comes to cleaning your deck, lay off the Chlorine bleach! Instead, use an oxygenated Bleach cleaner like “Defy’s Safe Oxygenated Bleach Wood Cleaner” available at RepcoLite for $20.95. This powder mix will mix with water to produce 5 gallons of deck cleaning solution–enough to cover 700 – 1000 square feet.
An oxygenated Bleach like Defy’s cleaner will give your deck a clean look without harming the wood, detracting from it’s appearance or endangering the surrounding vegetation. Oxygen bleach give you a clean deck and will not harm vegetation surrounding your deck, which is a huge plus and will save you time from covering your grass and landscaping to protect it. Remember, the healthier your deck wood is, the better the deck’s going to look.
So lay off the Chlorine bleach when it’s cleaning time!