Concrete Floors: Is My Floor Even a Candidate For Paint?

garage_floor_painter_web

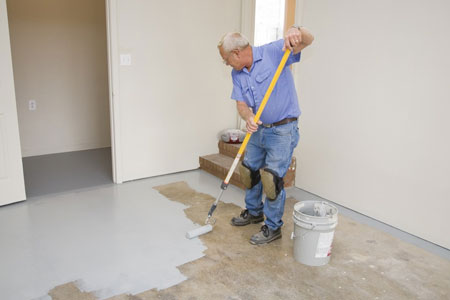
All concrete floors are different and many variables are at play. Some floors are composed of bare concrete. Some of this concrete is old, some new. Some old concrete floors are clean, others are dirty. Some are dirty, others are filthy. Still other floors are painted. Of those, some are holding up beautifully and others are peeling like a summer sunburn.

All too often, folks wander into a Big Box Store on a weekend and just happen to spot a gallon or a kit of “Floor Paint”. They read the can and are informed that after applying two simply coats of this paint to their floor, they’ll have a beautiful, showroom basement.

Some buy into this idea and consequently buy the paint. If you’re curious how their project ends, head to the websites of any of these stores and check out the reviews for their floor paint. Eight times out of ten, the reviews are bad. And almost 100% of those bad reviews are the result of people painting floors in the wrong way, without the right prep. Some are even the results of people painting floors that should NEVER have been painted in the first place.

So, all that to say, before you rush into a paint job on your basement floor, be aware that there’s a level of great deal of information and understanding you need to be able to tackle this project successfully. No, it’s not complicated. Yes, anybody can do it. But it DOES take a few extra steps that you’re not likely to be hear about at your average Big Box Store.

Is painting my floor even an option?

As we mentioned above, some floors are simply not cut out for a paint job. There are certain situations that simply preclude the option of painting.

If you’re wondering about your floor, work your way through the following steps for the following scenarios:

1. YOUR FLOOR IS BARE CONCRETE (Old or New)

A. IS IT CURED? The starting point with bare concrete is to determine whether or not the floor has cured for at least 60 days. If it hasn’t, wait until it has. If it has cured for anywhere from 60 days to 50 (or more) years, proceed to “B” below.

B. TEST FOR MOISTURE: Duct Tape a 2 x 2 sheet of plastic to your floor, secure the edges of the tape to ensure a tight bond, and let it sit for 24 hours. After the 24 hour time frame, pull up the plastic and examine it: is there condensation visible? Has the concrete in that spot darkened? If so, you still have moisture in the concrete and should let it continue to dry. If your concrete is old and still exhibits a moisture problem as evidenced by the plastic test, you should reconsider painting that floor. It has a moisture issue and will definitely result in paint failure. In short, if your floor is old and still exhibits a moisture problem, it’s NOT a candidate for a paint job.

2. YOUR FLOOR HAS PREVIOUSLY BEEN PAINTED

A. IS THE PAINT PEELING? Examine your painted floor: is it peeling or flaking off in relatively large quantities? Some peeling or chipping can be expected, but if you’re seeing large scale failure, that is an indication of a deeper problem. The problem could be a surface contaminant that was painted over or, more likely it’s a moisture problem in your concrete.

1. IS IT A SURFACE CONTAMINANT PROBLEM? If the peeling is relatively localized–a few large areas–it COULD be a surface contaminant. One option would be to clean those spots with a household detergent, let them dry and then proceed to painting (we’ll discuss this in a later post). However, be aware, that this is no guarantee. The peeling paint could be caused by a surface contaminant, but it could also be caused by moisture (see below). And, even if it is a surface contaminant, it’s very likely that it’s in more places than just the spots you see now. You could clean up and fix those spots only to find, within a few months, other spots starting to let loose and peel. This is frustrating and is one of those perfect examples of why the proper prep work is so important! If the first steps are done incorrectly–especially on a floor–ALL subsequent work is affected!

2. IS THERE A MOISTURE PROBLEM?  While the peeling you see could be a cause of a surface contaminant, it’s much more likely it’s a moisture problem. Moisture can work through concrete in any number of ways, but the important thing to realize is this: if you’ve got excess moisture coming through your concrete, for whatever reason (unless the floor wasn’t allowed to cure 60 days), it’s virtually impossible to fix. Painting over the cement will temporarily make it look good, but the moisture will eventually (sometimes sooner, sometimes later) push that paint coating off.

3.  CONCLUSION:  If your painted floor exhibits peeling on a large scale, it’s likely not a good candidate for a paint job. However, since it’s painted, you will likely want to at least throw a new coat on there. Go ahead and scrape off as much loose paint as you can, wash the floor and rinse it well (we’ll discuss this step in a later post). Then you’ll be ready to paint. Just understand that your previous paint didn’t bond for a reason and it’s very likely the new paint will eventually peel as well.

B.  THE PAINT IS NOT PEELING AND IS IN GOOD CONDITION: If your previous coating is holding up well, all you’ll need to do is give it a quick wash, a good rinse, and some time to dry. Then it’s time to paint.

As I’ve mentioned multiple times in this post, we’ll dig into the washing, rinsing and drying steps in a later post. This first one was meant to help you determine whether or not your floor was even a candidate for a paint job. If it’s not, think about carpet or tile or maybe just leaving it alone. If it is, look for the next part of the discussion tomorrow.

Paint Screw-Ups Anonymous

meeting-1015291_1920“My name’s Dan and I’m a recovering Prep Work Skipper.”

If there were support groups for those of us who consistently mess up paint jobs, that’s how I’d introduce myself every week.

See, I do a lot of things right when it comes to a paint job.  I take the time necessary to pick the colors I really want (usually).  I amass the necessary tools before I start.  I buy quality materials and paint.  I do many things right.

However, what I routinely screw up is this:  I skip or skimp on the prep work.  Every time.  It’s like an addiction.  An addiction to skipping prep work.  I mean really, that’s got to be one of the dumbest sounding sentences I’ve ever written, but it’s the truth:  I hate prep work when I paint and so I skip it.  And then, inevitably (and by inevitably, I mean ALWAYS) it comes back to bite me.  Inevitably (always).

And so I’m turning over a new leaf. From here on out I’m going to make the following changes to my painting methods and practices:

RESOLUTION NUMBER 1

I will no longer simply roll around or over the nails that are stuck in my wall.  This usually messes up my roller, creating a weird divot that repeats over and over on my wall, frustrating me; or, it creates drips on the wall or floor that I don’t find until after the paint has dried.  And that always makes me profoundly sad.  From now on, I will remove those nails ahead of time.

RESOLUTION NUMBER 2

I will patch the nail holes left in my wall when I implement Resolution Number 1 above.  And I will patch them with the proper spackling compound AND will let that compound DRY before I try to SAND it.  (Because I’ve tried to rush this and sanding only partially dried spackling results in results that make me profoundly sad.)  To give myself the proper time to accomplish these spackling and sanding tasks, I will have to tackle this aspect of the project ahead of the day that I plan to paint. This will require planning and discipline, and I resolve to practice both.

RESOLUTION NUMBER 3

I will no longer tell myself that my walls are clean enough and do not need to be wiped down before I paint.  I will accept the fact that I do not regularly clean the top corners of every room and that even though I style myself as a clean and tidy person, there is a good chance that random cobwebs may be there.  I will take the necessary 20 minutes to wipe away those cobwebs so I don’t end up rolling into them later with paint and then spreading them over my walls.

RESOLUTION NUMBER 4

I will no longer let myself believe that “scuff sanding” is a great idea, but that I really don’t have time to do it right now.  I will take the necessary 10 minutes to scuff sand a dresser before I prime and paint it.  I will scuff sand my woodwork before I paint it.  I will scuff sand all shiny surfaces EVEN IF I’m using a primer that says “no scuff sanding necessary.”  I will remember that there are no shortcuts.

RESOLUTION NUMBER 5

I will no longer do everything else right–buy the right paint, buy the best tools, choose the right colors–only to screw the project up by skipping the prep work.  I will admit that an extra hour or two is worth all the extra work and frustration and money I’ve cost myself through the years by skipping prep work.  I will do the proper prep work, no matter how boring it is, so that my project looks as professional as possible when I finish. In short, I will no longer convince myself that certain prep-work projects are worthwhile, but that I simply don’t have time for them.  I will make time for prep work precisely because it is so worthwhile.

Those are my resolutions.  I’ll probably screw up from time to time, but I’m going to give it my best shot from here on out. How about you?  Anyone else out there who routinely skips the prep work stage only to be burned in the end?  Anyone else out there ready to circle up, admit your addiction to hating prep work, and start the recovery process?  The recovery group is open….

3M Delicate Surface Tape

3m_tapeEvery now and again, a new product enters the home decorating field and changes the way everything is done.  Today I want to very briefly highlight one such product:  3M’s Delicate Surface Masking Tape.

Now hold on, don’t click away just yet.  I know the very words “masking tape” don’t necessarily instill a feeling of raw, unchecked excitement even in the hardiest home decorating gurus, but this tape is different.  It’s worth a quick read.  Trust me.  You’ll thank me later.

See, 3M’s Delicate Surface tape will give you razor sharp, crisp lines when you paint.  Oh, it can be used on all sorts of delicate surfaces including wallpaper and recently painted walls, but for me, the biggest, most important aspect of the tape is the sharp lines it leaves behind.

After all, I hate taping a room off.  I cannot stress this enough.  I hate it.  It’s time consuming.  It’s no fun (I just want to put paint on, not spend this time taping).  And then, usually, after all that work of taping, I roll my paint on, pull the tape off and discover that there are many areas where the paint leaked under the tape.  My lines aren’t crisp.  It’s depressing.

But that’s where this particular tape changes the game entirely.  The lines are absolutely razor sharp.  They’re perfect.  You can go through all the work of taping your room (which still isn’t fun–even with this tape), but the end results make it all worthwhile–no paint leaking under the tape, no wallpaper or wall paint peeling off when you remove the tape.  Nothing but sharp lines and perfect walls.

Now, of course, the tape is more expensive than regular masking tape–probably a couple bucks a roll more.  But think about it this way:  you’re going to spend all that time masking a room with good tape or with cheap tape.  You’re going to do all that work painting that room.  You’re going to spend all that time pulling the tape off when you’re done.  Isn’t it worth it to do all of that and end up with perfect results?  Isn’t that worth an extra $2?

OK, that’s enough said.  Instead of reading, do a little viewing.  Here’s a video that will give you crystal clear proof that this tape’s worth the money!  Check it out:

The Vile Showerhead (or, Finding the Dread-Free Life)

shower-1027904_640(1)I’m a “dreader”.  That’s not a word–I know that.  But that doesn’t change the truth:  I dread things.  On a regular basis.

For example, I re-decorated my bathroom about a year ago.  I put wood planking on the walls, hung some wallpaper, stained and varnished new trim, installed a new (bowed) shower rod and new curtain and finally, to finish the whole thing off, I installed a new shower head.

Which was the biggest mistake I made.

See, right after installing it, my wife marched right in, closed the door and proceeded to take a 45-minute shower.  When she was done, the kids all marched through, one after the other.

When the shower marathon ended that day, I opened the bathroom door and it was as if a cloud had localized in that tiny room.  I literally couldn’t see the other side through the steam.  The little ceiling fan was working overtime, but there was no way it could keep up.

“Fortunately,” I thought, trying to wave away the steam, “this is something that won’t happen everyday.  Once the ‘newness’ of the shower head wears off, we’ll go back to having to fight the kids to take baths.”

Nope.  Not a chance.  Every single day since the installation of that vile shower head, our bathroom is engulfed in steam.  Shower after shower, hour after hour:  steam, steam, steam.

Well, that went on for a long time and then the inevitable happened:  the mold started growing around the edges of the ceiling.  The wallpaper started peeling and curling up on all the seams.  My beautiful bathroom had gone from a place of despair to a place of beauty and then back again to a place of despair all in about 6 months time. It was depressing to say the least.

And that’s where the “dreading” comes in.  Everyday, I’d look at the ceiling and see the mold or the wallpaper and see the peeling and I’d dread the “fix-up” job that was to come.

I dreaded it because it seemed like such a big job:  fixing the mold, fixing the paper, repainting the ceiling.  I’d just gone through some of this work and now, thanks to that dumb shower head, I had an even bigger mess to fix.

And so I stared at it for a long time.  I thought about it.  I tried to ignore it.  But most of all I dreaded it.

Until finally I got so sick of being depressed and frustrated about it that I actually fixed it.

I took a week and on a Monday night, I sprayed the mold with a bleach solution and scrubbed the ceiling.  That took me exactly 17 minutes.

Two nights later I came back with more bleach–no scrubbing this time, just the bleach on the mold.  That took about 7 minutes.

On Friday night I went around the room and primed all the previously moldy spots with ProFlo Alkyd primer and then I re-pasted all the peeling paper.  That night’s work took about 15 minutes.

Finally on Saturday, I got ready to paint the ceiling and finish the job.  I was ready for a big, painstaking job (I hate painting ceilings) but I was surprised to find that the whole thing took about an hour from the time I opened the can of paint to the time I put the paint back on the shelf in the workroom.

In the end, I realized that the job I’d dreaded for the last 6 months or more had taken me less than two total hours to fix.  In my mind, I’d exaggerated and inflated and imagined the work to be 10x worse than it was.  I imagined the mess, the problems to be 10x less fixable than they were.  I imagined the pain to be 10x greater than it was.

I’d spent 6 months feeling bad and frustrated and almost (in a sad and pathetic way) depressed about a room that took me less than 2 hours to fix.

So how does this apply to you?  Well, I can’t speak for you, but I’ve talked to many folks in the paint store at RepcoLite who feel the same way I was feeling.  They’re frustrated about the seemingly endless amounts of work needed in their homes.  They look at the jobs and the work to be done and assume that they’re worse than they really are.  And so they do what I did:  they put them off and they stew on them, thinking about them and mulling them over in their minds for months until the jobs seem even bigger and more horrible.  In short, we dread them and waste our time worrying about them and frowning over them.

But what we really should be doing is “doing” them.  The jobs aren’t as bad as we think.  They’ll go smoother.  They’ll go more quickly.  They won’t be as painful.  And best of all, once we’re done, you’ll notice what I noticed:  a real sense of relief and freedom from the work that had been hanging over my head.

So, bottom line:  If you’ve got a project that’s creating that feeling of dread, jump into it.  Get it accomplished.  And then kick back and enjoy the dread-free life…

The Least Flashy Job in Every Paint Project: Wall Washing

Caleb Does DishesNot too long ago, the kids helped me do the dishes.  That’s cool right?  I mean really, you walk into the kitchen after dinner expecting to take on the job and you find 2 or 3 kids there already working, placing all the freshly washed and dried dishes on the counter for my wife or I to put them away.  Yes, there’s no way around it:  that’s cool.

Unfortunately, there was a problem.  Being kids, they’d never thought to clean off the counter.  It was still covered with the mess of making dinner–the chunks of hamburger, drops of grease, some lettuce parts, some spilled ketchup . . . all that stuff–the things we’d normally wipe off from the counter BEFORE we piled dishes up on top of it.

They put in all the work, but because they hadn’t thought about the counter, some of the work was wasted and had to be redone.  OK–now, for the paint point.  See, we run into this all the time at RepcoLite–oh, not with counters and dishes, but with walls and paint.

For example, not too long ago, a customer walked into the store frustrated because his new paint wasn’t bonding well to his walls.  He explained that there were places–especially on his wood panelling–where it wasn’t sticking well and he wanted to know what was wrong with the paint.

Turns out, there wasn’t anything wrong with the paint.  The problem, as became clear in the conversation that followed, was that he had never washed the paneling down before painting.  Over the years, he had cleaned it with Endust or some other dusting spray and the waxes in those cleaning agents can remain on the surface for years and will often repel a latex paint.

That’s just one scenario of the many that happen daily.  Remember, nobody washes dishes and then sets them down on a dirty, unwiped counter.  Likewise, we shouldn’t spend all the time and energy and money involved in a paint project only to roll our new paint over unprepared surfaces.

Take some time the night before your intended project to give the walls a good washing.  It’s not a flashy, exciting part of a paint project.  It’s one of those things that we tend to ignore or skip.  But it’s important!  Remember, even if the walls look clean–you don’t see spiderwebs or dirt or dust or other goo stuck there by your kids–take the time to wash over them with TSP.  You’ll be giving yourself a clean palette, a clean foundation to work on and you’ll be much less likely to encounter problems in your project.

Watch Your Back!

grubby_little_hannahOK, Moms and Dads, has this ever happened to you?  It’s happened to me a number of times, but the most recent took place a few Sunday’s ago.  We were getting all 5 kids ready for 8:30 church one Sunday morning.  And, of course, chaos ensued. However, eventually, because we’re such with-it parents, we managed to get everybody, including ourselves, ready.

Breathing a sigh of relief, we started to make our way to the car, but before I did that, my youngest child–Hannah–came trudging over to me and explained that she needed a hug.  Ahh, that’s so cute, isn’t it?  Little kids who still love their dad so much they need a hug?  So I scooped her up, and hugged her.  And she returned the hug–big time–grabbing me tightly and then patting me repeatedly on the back with the overwhelming love only a child can give.

Well, when the hug was over, I ushered her out to the car and decided to give myself a quick once-over in the mirror–just to make sure I looked ok after the hectic morning.  Well, after a glance, I realized I was as good as I was ever going to look and so I jumped into the van and drove to church.

When we got there, we talked to some people, found our seats–this time in the front row of the balcony rather than our normal seats in the back–listened to the service, talked to some people on the way out and eventually came home.  However, changing out of my Sunday clothes and back into a t-shirt and jeans, I made a shocking discovery.  The back of my shirt was completely covered with gooey, dirty, cheeto’s-ee orange hand prints.  The front of the shirt was fine, but the back was filthy.

It only took me a second to put it together.  Hannah had hugged me before we left and rather than patting me on the back out of sheer love–she was just using the back of my shirt as a wash rag.  She cleaned her hands on my good Sunday shirt.  And then I went to church and walked all around, sat in the front row, talked to all kinds of people–lived it up and had a big time–all the while with my back covered over with slime and assorted gunk.

That’s happened to my wife and I many different times.  Sometimes it involves food, sometimes it’s from other things.  But the point is this:  we never catch it because we never think to check out our backs in the mirror.  And that brings me to the paint point that’s hidden away in all of this– see, I never thought to look at my back in a mirror before I went to church–it never crossed my mind.  I looked at myself in a mirror–at the front–to make sure I looked alright, but I never gave the back a second look.  A lot of us do this same thing with our homes.  Hang with me, here–this is profound–but you’ve got to hang in there.

See, we do this in our homes in this regard:  We take good care of our front doors–our main entrances. These are the doors people typically see when they drive up or drive by our homes–so we take care (at least most of the time) and make these entrances visually pleasing. We use flowers, a great door color, little welcome mats . . . all kinds of little things to make the entrance way appealing.

So, we pay a lot of attention to the front–the main entrance.  But you know what most of us completely forget?  The garage.

Now, this seems like a leap in logic, but it’s not.  See, the garage may be, in reality, the TRUE main entrance to our home.  According to a recent US survey, “71% of American homeowners with a garage use the garage to enter their homes.” Another survey stated that “45% of homeowners with garages use their garages as the main entrance to their homes.”

What the numbers are saying is this:  71% of Americans who own garages use the garage to enter their own homes.  45% of Americans who own garages encourage all visitors to enter their homes through the garage.

And yet, even though the garage is used repeatedly as an entrance to our homes, it’s often the last place we really think to do any “decorating”.  We put all our thought and effort into the front doors (and maybe even the garage door), but we don’t give a second though to the garage itself.  It never crosses our minds.

It’s just like my shirt scenario at church–the front was pristine, but anybody watching me walk away realized I was like pig pen of Charlie Brown fame.  I was a filthy mess.

So all that to ask a simple question:  if folks enter your home through your garage, what kind of impression do they get?  Is it a welcoming area?

And even if you’re garage is never used by guests, chances are your family enters the home–at least at times–through the garage.  Shouldn’t you have a nice, respectable entrance into your home?

The answer, of course, since I’m selling paint, is YES–you should have a nice entrance in your garage.  And the good news is, this doesn’t need to be an insanely expensive, complicated project.

THE BASIC STEPS

  • WASH THE WALLS.  If your walls are painted, go ahead and wash them with TSP (Trisodium Phosphate).  This is a great “pre-painting” cleaner that cuts through dirt and grease and rinses clean away.  If the walls are not painted, you might want to choose to use a shop vac and remove as much dust and dirt as you can.
  • FILL THE GOUGES.  After cleaning, go around the room with a good spackling compound.  We recommend Crawford’s Spackling Paste.  It’s a high quality spackle that’s easy to work with.
  • DEGREASE the TROUBLE SPOTS.  Most garages are going to have a couple areas where greasy handprints or smudges stain the walls.  Before you paint, make sure you hit these spots with a specific degreaser.  There are any number of these specialty products at RepcoLite–just stop in and we’ll direct you to the one that will work best.
  • SPOT PRIME.  If you have greasy smudges on your wall that you have to deal with (as in the above step), it wouldn’t hurt to spot prime those areas with BIN stain-blocking primer or RepcoLite’s own Zip Prime.
  • APPLY YOUR FINISH.  Once you’ve done all the prep work, it’s time to roll on your finish.  We recommend a high quality acrylic latex.  It doesn’t need to be an exterior product as most garage walls aren’t exposed to the elements.  However, you would likely want to consider an Eggshell finish at the dullest and possibly even a Satin Sheen or a Semi-Gloss.  The finishes with higher glosses will hold up longer and resist dirt and grime better than a flatter finish.

And there you go!  It sounds like a lot of work (I know), but it’s not as complicated as it seems.  Typically, you’ll find that the whole project will take only a single weekend.