The Future is in Your Bathroom . . . Now!

Toilet-Paper-Holder-Docks-your-iPod-2There are times when I think I’ve seen everything.  I don’t know why I allow myself to think that.  Because whenever I do–whenever that thought crosses my mind–whenever I’m tempted to think that I’ve seen everything . . . I find something like this.

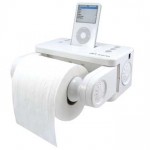
And not only have I never seen something like this–I’ve never even dreamed or imagined something like this.  I mean really . . . who does?  What kind of person dreams up the notion that a super idea would be a toilet paper holder/iPod dock and music system with waterproof speakers?  Who thinks these things up?

I mean really . . . apart from the general “grossness” . . . isn’t there also a lack of aesthetics?  And apart from those things . . . who looks at that thing and thinks it’s going to be extremely functional?  Can’t you just imagine the deep bass tones and crystal clear sounds that will pump through those (I’m sure) high tech waterproof speakers?  And think about the iPod dock part of it.  It’s supposed to charge your iPod . . . but using what?  I don’t think it’s probably hardwired into the wall.  It probably runs off batteries.  So you’re using regular double A batteries to charge your iPod.  How do you think that’s going to work?

Yeah, I only have to look at it to pretty much guarantee you it’s not going to be a good iPod dock.  It won’t be a very good sound system.  It’s an ugly, over-complicated and soon to be gross (just look at all those buttons that will soon be coated with gunk) toilet paper holder.

It has three purposes:  hold toilet paper, recharge iPods and play music.  And, undoubtedly, it will do all three.  But how well?  Wouldn’t you be better off to just buy a regular toilet paper holder?  One that is only designed to hold . . . you know . . . toilet paper?  Wouldn’t that make more sense?  Then, go ahead and buy another gadget to dock your iPod and play your music.  Why try to combine all those things into one?  When you do, you end up with a product that WILL do all the things promised–it just won’t do any of them well.

And that kind of reminds me of that new Primer and Paint all combined in one product.  Oh, the analogy isn’t perfect–paint and primer in one product DOES work well on certain situations.  But really, for many projects, using a primer that’s also a paint can be just as dumb as buying this toilet paper holder.

When you’re painting bare wood . . . inside or outside . . . skipping the primer step is as dumb as buying this toilet paper holder.  When you’re painting over unknown stains that are on your walls–water spots, smoke stains, crayon, ink or marker stains . . . .painting over those stains without priming is as dumb as buying that toilet paper holder.  Painting over tough-to-stick-to surfaces like plastics and laminates without using a primer is . . . .well, you get it.

There are certain times when the primer/paint all in one product (which is really just a high-quality latex paint) is fine.  But there are other times when skipping that primer step is going to fill your home improvement life with misery.  Knowing the difference between the two is the tough part.  And that’s why we’re here.

Just stop out at RepcoLite and tell us what you’re doing.  We’ll help you figure out what you should use, how you should do it and whether or not you should go with the black, white or chrome model of that toilet paper holder thingy.

More Job Application Screw-Ups and a Clever Tie-In to Exterior Primer

"Peel" by Will Keightley is licensed under CC BY 2.0

“Peel” by Will Keightley is licensed under CC BY 2.0

Yesterday, I wrote about getting off on the right foot–you know, starting well.  Because really, that’s one of the most critical things in life isn’t it?  Starting well?  If you start poorly in any endeavor, chances are you’re not going to bring it around and end up with great results.  It’s just one of those rules of life:  we need to make good first impressions, we need to get off to a good start . . . we need to start on the right foot . . . or we’re not going to go very far.

And let me prove it.  See, I’m going to breeze through a few real-life lines from some job applications and you decide if these people went terribly far after making this kind of first impression.

OK, first off, here’s a lady who wrote, in the SKILLS section of her job application, that, and I quote, “My twin sister has an accounting degree.”  End quote.  Yeah. Her TWIN sister.  Not just a little sister or an older sister.  It’s her TWIN.  And we all know how twins are supernaturally or magically or whatever bonded to each other, right?  I mean really, there are those stories about twins raised in different homes with no knowledge of each other who end up marrying similar people and naming their children the exact same names.  So, having a twin sister with an accounting degree is just like having one yourself.  I mean, it’s almost a scientifically proven fact.

Or, what do you think about the first impression this guy made when he wrote in the section called “negative traits”, and I quote “I am very bad about time and don’t mind admitting it. Having to arrive at a certain hour doesn’t make sense to me. What does make sense is that I do the job. Any company that insists upon rigid time schedules will find me a nightmare.”  Yeah, I know if I were looking for help, he’d be on my “must-call” list.  Because I like his gritty honesty.  And his carefree, artist’s disposition.

Anyway, life’s all about first impressions, right?  And neither of those folks made terribly good ones.  Yeah, life’s all about starting well.  And the reason is simple:  it’s tough to finish well if you don’t start well.

And that applies to everything from job applications to dating relationships to job interviews to home improvement projects.  Starting well can make all the difference in the long-run.

Now yesterday, we talked about specific stain-blocking primers that should be used in some cases.  How certain jobs you might tackle might need one of these specialty primers to ensure long-lasting results–like we said, it’s all about starting well.  Start well and you won’t struggle with your project.  Start poorly and you’ll have a mess.

Today we’re going to talk about another scenario when primers make good sense:  exterior wood surfaces.  Now, if these are stainable woods . . . that’s another topic for another day.  What I’m talking about here are the exterior woods that you would typically paint.

And right now, as I mentioned yesterday, there’s ad on TV that claims you can basically quit using primers as long as you buy this apparently new and amazing paint product.  However, there are a couple things to note here.  First off, it’s not a new product or new technology–it’s been around for years–it’s just good marketing that’s making it seem new and exciting.  Secondly, remember that those ads are 30 second spots.  You can’t say everything you should say in a 30 second spot.  Sure, there are times when primers can be skipped–and I’ve got products at RepcoLite that you can use just like that apparently new and amazing paint we see on TV.  However, there are times when you can’t skip them–or at least you shouldn’t–not if you want to get your project started on the right foot.

And one of those times when primers really pay for themselves in the long run is when you’re painting bare exterior wood.  A high quality latex paint over top of bare wood–with no primer–may lay on nicely and look great.  But the problem is that it really can’t penetrate into the wood–it’s latex and that’s just not how latex products work.  It’ll sit on the surface.  Before long, the moisture that penetrates the wood from rain or even dampness in the air, will start to cause that paint to chip and peel.  And once that starts, you’ll have a mess.

But, if you prime that wood with a high-quality oil based product, you’ll have much less failure. Primers are specifically MADE for these situations.  They have characteristics that are DIFFERENT from paint–think about that for a minute.  Primers are fundamentally different in make up from paint for a reason–they have a different job to do.  Primers act as an intermediary between the wood and the topcoat.  Primers will seal, hide and bind wood fibers to make the surface more uniform.  And this allows the paint to adhere better.  A quality primer will also improve your paint’s ability to resist surface moisture.  As a result, you’ll have less peeling, less mess, longer lasting results and a better, happier ending.

So take a lesson from those folks we talked about earlier.  Remember to get off on the right foot–no matter what it is you’re doing:  meeting someone new, interviewing for a job, or painting your exterior trim.  Get off on the right foot and you’ll end up happy at the finish line.

I Enjoy Long Walks, Donating Blood and Stain-Blocking Primers

bigstock-closeup-of-a-blood-bag-with-a--92288108_smallerThere’s nothing more important at the beginning of a relationship–whether it’s a personal relationship or a professional one–whether it’s a girl you’re meeting for the first time . . . or a potential employer your interviewing with, or even a resume your creating, or a job application you’re filling out–nothing’s more important at the start of any potential relationship than making a good first impression–you know, getting off on the right foot.

And yet, even though it’s absolutely critical to start well . . . so many times we bomb out.  So many times, we just say the wrong things . . . we do the wrong things . . . we write the wrong things.  For example, I found a number of true, real-life mistakes people actually wrote down on their  job applications.

Yeah, under the category of personal interests . . . on a job application . . . somebody wrote:  “I enjoy donating blood and have managed 14 Gallons so far.”  You probably like long walks on the beach and long, meaningful conversations, too.  I mean really, who writes that down?  It’s creepy?  14 gallons of blood.  So far?  I mean, I guess that implies real commitment . . . but think about it . . . he never says it’s his own blood he’s donating . . . .   Makes you wonder.

Or, there are these–under the category of REASONS I LEFT MY LAST JOB:  Number 1:  “I left my last job because the company made me a scapegoat – just like my three previous employers.”  Yeah . . . no deep-rooted issues bubbling just under the surface there . . . .

Or, number 2:  “I left my last job because they insisted that all employees get to work by 8:45 every morning and I couldn’t work under those conditions.”  Yes, those 8:45 am start-times are grueling.  I suppose you probably had to limit yourself to 1 hour lunches, too?

Or there’s this one:  Number 3:  “I left my last job because responsibility makes me nervous.”   Again, who writes stuff like that down?  And really, what job doesn’t involve at least some responsibility?  What employer would advertise:  Great starting pay, great benefits and best of all . . . job requires no responsibility at all.  Heck, you don’t even need to wear pants most of the time if you don’t want to?”  Yeah . . . every job requires at least some responsibility . . . and even if there is one out there that doesn’t, chances are no employer likes to think of it that way.

Anyway, I could go on and on–and I will in another post because these are so good–but the point I want to make today is that none of these people made a good first impression.  They didn’t get off on the right foot.  They crashed and burned right out of the gates.  They never got running . . . they never had the chance to  hit their stride . . . .  They tripped over their shoelaces the minute the race started and that was it.  They were out.  The guy giving all the blood probably never got to an interview . . . at least not with the employers, maybe with the police . . . but certainly not for the job he was hoping for.

Anyway, starting on the right foot is critical to success.  Absolutely critical.  And it’s not just that way in the search for a job . . . it’s also that way in pretty much anything else we do.  And since my line of work involves paint . . . I’ll apply it to that.

See, one of the big things right now sweeping through the paint world . . . thanks to some very effective ads . . . is the notion that you don’t need primer anymore.  Just go out and buy that special paint that primes and paints all in one and you can skip a whole step.

Yeah, it sounds great . . . and, in some cases, it’s true–though we’ll talk more about that another time.  But in other cases, if you follow their advice and skip the primer, you’re going to find yourself getting off on the same wrong foot that all those people we just talked about did.  You’re project will crash and burn before you even got into your stride.

See, there are certain situations that NEED a primer.  One of those–today’s focus–involves stains that might be on your walls.  And these stains could be anything from ink to markers, to crayons to grease.  Or, maybe they’re stains where water leaked in once–you know those brown, yellow rings–or maybe it’s a smoke stain.   And, honestly, the stains don’t have to be visible.  It could be that your walls stink.  Literally.  Charred wood, kitchen odors, even the overpowering smell from years of cigarette smoking.

All of those stains–in fact, most stains on your walls–are water-based or water-soluble stains.  If you topcoat them with a water-based paint or primer . . . that stain–or the stink–that stain is going to bleed right through.  It may take a few days, a few months, or it could happen within a few minutes, but however long it takes, those stains will bleed through.

In order to prevent that from happening, you need to make sure you use a very specific stain-blocking primer.  We’ve got a couple different ones at RepcoLite that will seal these trouble spots in with one coat.  Remember that.  If you’re trying to coat over any unusual stain or mark or smell . . . stop in at RepcoLite and explain to us what you’re seeing.  Don’t screw up your project right from the beginning.  Avoid the mistakes and start strong.  And seriously . . . watch out for that 14 gallon blood donor guy . . . he’s probably really pale and tired . . . but he may be dangerous.

Paint Lessons from the Leaning Tower of Pisa

"The Leaning Tower of Pisa" by McPig

“The Leaning Tower of Pisa” by McPig is licensed under CC BY 2.0

I’m sure most of you have heard of the Leaning Tower of Pisa . . . you know that tower, in Italy?  That leans?  Yeah.  Anyway, I’m sure you’ve heard of that tower, but I dug into it a little bit recently and learned some things I didn’t know . . . things that are, in the end, extremely paint-related!

Originally, the tower was built in 1173 and was supposed to be a work of art.  That’s important to remember.  It was meant to be something people marveled at–something stunning, astonishing, breath-taking.  It was art!

With that goal in mind, construction continued for the first 5 years, until it halted in 1178, after completion of the third floor.  It was at this time, during this pause in the construction, that the tower started to sink.  Now, we’ve all heard in elementary school about the reason for the sinking:  the tower was built with a thinner than usual foundation that was set in a weaker than normal substrate.  Basically . . . it’s that classic object lesson about how a poor beginning will produce sketchy results.  (You can almost smell the paint-related info!)

However, there’s more to the story–nothing groundbreaking–but something I didn’t know until recently.  See, after the tower started to sink, construction was halted–mainly because wars kept breaking out.  But after all the fighting was finally over, construction again resumed in 1272–nearly 100 years after the first three floors had been built.

When engineers started this continuation of the construction process, they analyzed the situation and came up with a solution:  to compensate for the tilt, they would build the new floors with one side lower than the other.  I never knew this, but it’s true.  If you look at the tower, you can see that it’s actually curved.  It leans to one side and then kind of starts to curve back the other way because of the goofball construction techniques.  In the end, this didn’t fix the problem entirely but it helped.

The tower existed like that for another chunk of time and then, in the 1990’s, another attempt was made to fix it.  Cables were attached to strengthen the tower and some excavation work was done to try to straighten it as much as possible.  This worked to some extent and the tower went from a 5.5 degree angle to a 3.9 degree tilt.

And that was about the best they could do.  Apparently, after that work was completed, engineers looked at it and determined that it’d last another couple hundred years or so.

Now, I bring all that up to build on the obvious point–and it’s something that’s definitely paint-related.  See, the obvious point is all about the foundation.  If the foundation’s bad, you’re going to have sketchy results.  Yeah, that’s the obvious point, but I thought the rest of that story was interesting because it continued to hammer home this point, expounding on it.  See, not only will you get sketchy results when you start with a poor foundation . . . but you’ll also find yourself doing all sorts of crazy stuff to get things back to good.

Think about it . . . the original designer of the tower would probably have been rolling in his grave if he knew that the people continuing his project were building floors with one side shorter than the other.  This was supposed to be a work of art–not something I built in my basement.  (And really, come over sometime–that’s how I build.  I start something and if it’s not level, I just make the next part a little crooked, too until everything kind of balances out in the end).

Now, I’m not saying the tower of Pisa isn’t cool–it is–and honestly, the leaning thing is really what makes it cool.  But that still doesn’t mean that it’s a great example of engineering.  It’s a mistake followed by a bunch of bizarre fixes that never really end up fixing the original problem.

And the reason they don’t fix the original problem . . . is that you can’t.  Not when your foundation is poor.

In construction and in painting and in most of life . . . the first steps you take in almost any project–the groundwork you lay–is going to determine the outcome.  If you start the project correctly, use the right tools and the right supplies and take the time necessary to do things the right way . . . your end results will look great.

If you take shortcuts, skip steps, don’t prime when you should or don’t sand or wash a wall down when it’s recommended . . . you’ll probably get your initial work done faster, but it won’t be long before things start to look shoddy.  Your work will start to lean, so to speak.  And when that happens, you’ll be in the same boat as those folks who were tasked with adding on the additional floors to an already leaning structure:  you’ll have to get creative.  And chances are, no matter how creative you get . . . you’ll never be able to fix the original problem.

So the lesson–the paint related lesson, the life-related lesson is this:  start with a good foundation.  Use the right tools, take the time necessary and start on the right foot.  Use primer when you should.  Wash the surfaces when it’s recommended.  Do a light sanding when you’re in doubt.  Doing these things will take more time, but they’ll save you grief down the road.  Think about it!  And call us with any questions!

Steel Doors Revisited: Surface Prep on a New Door

bigstock-Blue-Doors-7834138

Yep. It’s probably a wooden door. But use your imagination…

In an earlier article, we talked about painting your old steel doors.  And while all that information was absolutely flawless (!) in it’s delivery, it’s probably important that we take a second here and attach an addendum.

See, we often talk to people in the store at RepcoLite about their new doors and we usually discover there’s a misconception as to what needs to be done.  Most people tend to think that since their steel or fiberglass door is NEW, they need to do no prep work.  It’s one of the perks of buying a new door, right?

Unfortunately . . . wrong.  New doors, even if they’re pre-primed, need to be prepped correctly.  Even if they’re new, they can be covered with surface contaminants that can affect the adherance of your finish coat.  So, even though your door may be new, it still will need to be prepped correctly before you move on to the paint.

Here are the steps:

  • SCUFF SAND:  Do a light scuff sanding of the door with some 120 – 150 grit paper.  Even though the door is pre-primed, it never hurts to dust over it lightly with some sandpaper to level out any bumps in the primer coat.
  • WASH THE DOOR:  After you’ve sanded the door, be sure to wash over it with TSP (TriSodium Phosphate).  This will remove the dust you created while sanding AND it will remove any contaminants that could be on the surface (body oils from installation, airborne dirt and grime, etc.)

Doing those simple prep steps will help ensure that the paint job on your new door will look great for years to come!

Painting a Steel Door

bigstock-Blue-Doors-7834138

Yes. This is probably a wooden door. But we bought the picture, so we’re going to use it! Just use your imagination…

Painting a steel door is one of those projects that can make a big impact on the exterior appearance of your home.  And if you do the project the right way, you’ll be enjoying that color for years to come.

If you’re thinking about sprucing up your front door any time soon, follow these tips and steps to make sure the project goes as easily as possible:

  • REMOVE THE DOOR and THE WEATHER STRIPPING:  If possible, you’ll have your best success if you can completely remove the door from the frame and set it in your garage or your basement on saw horses.  If you can’t remove the door, don’t sweat it–you can still do a good job, though you’ll need to be a little more cautious with paint runs, etc.  Also, many doors allow you to remove the weather stripping.  This is ideal.  Remove it (paying attention to how it will go back on) and store it somewhere safe.
  • REMOVE THE HARDWARE:  Whether or not you can remove the door from the frame, the next step is to remove the hardware.  Remove the hinges, the door knobs, and the kick plates.  You can paint around them or tape them off, but leaving them on makes all the subsequent steps more complicated and more time consuming.  So, remove them if at all possible!
  • SURFACE PREP:  As with any painting project, failure or success is usually determined before you even open a can of paint.  If you’re painting over a previously painted door, you need to make sure that you sand and scrape at all the paint to ensure that what remains on the door is stuck down well.  Sand the door with 120 grit paper (you’re lightly sanding it–not trying to leave visible grooves).  And then, after sanding and scraping, wash the door down well with a solution of TSP (TriSodium Phosphate).  Quick Tip:  When using the TSP, scrub the door down with a 3M Scotchbrite pad (a little green scrubby pad you might use on dishes).  This will serve to dull and etch your previously painted surface and will aid with the bonding of the new paint!
  • PRIME (if necessary):  After you’ve sanded and washed the surface, you should prime any bare metal spots with RepcoLite’s 449 Grey Metal Primer.  This is an oil-based, rust-inhibitive primer, that’s perfectly suited for these situations.
  • BRUSH or ROLL YOUR DOOR:  Either using a high-quality brush or a small, quality 4″ or 7″ roller, apply your paint to the door.  We recommend applying RepcoLite’s Endura Acrylic Latex Paint for the most durable, longest lasting finish.  Work evenly and quickly, starting with the inserts and then finishing up with the remaining flat surfaces of the door.  Apply coats as needed.
  • LET IT DRY and RE-INSTALL:  Let the door dry at least 8 – 12 hours (longer if possible) and carefully re-install it.  UNDERSTAND:  Latex paint will dry to the touch in a matter of hours, but it doesn’t reach it’s full hardness for about 30 days.  You don’t need to leave the door off the hinges for 30 days, but keep in mind that just because it’s “dry” that doesn’t mean it’s as strong or durable as it’s going to be . . . so go easy!
  • RE-INSTALL WEATHER STRIPPING LATER:  If you can leave the weather stripping off for 10 – 30 days, that’d be in your best interests!  As mentioned earlier, the latex paints will dry quickly, but if you close the door and press it against the weather stripping too soon, it’s entirely possible that the paint will peel around the edges when you next open the door!  If you can leave that stripping off for a couple weeks or so before re-installing it, you’ll minimize your risks.

FINAL TIPS and PARTING THOUGHTS

  • COLOR MATTERS:  Dark colors fade quickly.  Red can be especially bad.  Also, reds can cover poorly.
  • NO SHORTCUTS:  One of the worst things you could do when painting a door is try to make a coat of paint cover in 1 coat when it probably needs 2 or 3.  The best advice we can give you on this one is to apply EVEN coats.  If you’re color needs 2 – 3 coats of paint, then resign yourself to applying 2 – 3 coats of paint.  If you try to make it cover by applying it too heavily, you will have all sorts of problems on your hands.  The paint will run and sag; it won’t cure or dry well and you’ll find it sticking to your weather stripping and causing all sorts of other problems!  So, don’t rush it.
  • GIVE IT TIME TO DRY:  Latex paints dry to the touch very quickly, but don’t let that fool you into applying too many coats too soon.  Apply a coat and let it dry for an hour or two before trying the second one.  Sometimes you could apply those coats as quickly as 15 – 20 minutes after each other (it dries that fast), but in the end, you’ll only run into problems.  So give it the dry time the can recommends.
  • LATEX IS BETTER THAN OIL:  Latex Acrylics (like RepcoLite’s Endura) will outperform oil based products.  They’ll hold their color better and they’ll endure the constant expansion and contraction a steel door experiences much better as well.
  • PAINT IN THE SHADE:  Paint when the sun isn’t directly on the door.  And ideally, paint before or long after the door’s been exposed to the sun.  Steel doors will heat up significantly on a summer day and if you get on it and start painting too soon, or when it’s too hot, you’ll have trouble with your latex paint.  It will dry much too quickly and you’ll end up with streaks and roller marks.

I could go on and on, but you get the idea.  This is a project that usually can be accomplished in just a few hours.  It’s not complicated–and if you take the steps we’ve outlined (and check with any RepcoLite store for more information if you have questions) you’ll be fine!