Paint and Primer All-In-One: Miracle or Marketing?

By now, we’ve all heard about Paint and Primer All-In-One products. We’ve seen commercials, we’ve heard the promises. And we know that using a two-in-one product is going to save us almost miraculous amounts of time, right? Well….

Brilliant Marketing

To start with, let’s clear something up right away. Paint and Primer All-In-One products aren’t new. The labeling is. The name is. But in all actuality, all high quality, 100% acrylic paints will function as paint and primer all-in-one. There is no inherent difference between a product labeled as a paint and primer all-in-one and a high quality acrylic paint. It is really just a brilliant marketing gimmick revolving around the concept that we all like to save time and skip steps!

RepcoLite carries any number of products like this even though we don’t label them as such. Our Hallmark Ceramic Paints and Carefree Interior Paints are all paint and primer in one products. Benjamin Moore’s Aura, Regal, Natura, and Ben also fall in to this category.

So, in actuality, paint and primer all-in-one products aren’t as “cutting edge” as we may have been lead to believe by the smart tv ads! But are they still great time saving products?

Can We Really Skip the Primer Step?

Yes and no. As we mentioned in the previous post primers are different from paints. Paints are different from primers. When the two are combined into a single product, compromises have to be made. Drywall, for example, is porous and needs to be sealed. Just rolling a finish paint on, especially a finish paint that has a sheen, can result in an uneven finish. The paint is absorbed at different rates into the drywall. In the areas where it lays up on the surface, it will look shinier. In the areas where it penetrates deeply, it will look flatter. Subsequent coats can mask this problem, but not always eliminate it. A drywall primer however is made to seal and provide a uniform surface for your finish paint. And, on top of that, it’s about $15 cheaper a gallon! Why spend all that extra money for lesser results?

Or, if you want to paint a tile backsplash, a paint and primer in one product is likely going to peel right off. You need to use a special bonding primer that is designed to adhere to smooth, glossy surfaces.

Or, let’s say you stripped wallpaper off your walls and want to paint. The paste residue that is often left behind is water soluble. A regular waterbased paint and primer all-in-one will react with this and will result in a texturing problem on your walls. Use an oil-based primer (Benjamin Moore’s Fresh Start Multipurpose Oil Primer or RepcoLite’s ProFlo Primer) and you’ll seal that paste in and you’ll have no problems. (For more information and painting a wall that previously had wallpaper, check out our blog post!)

Bottom line, there are many situations that we run into on almost every painting project where a separate primer and finish paint are going to give you better results than just using a primer and paint in one.

When Can I Use a Paint and Primer All-In-One?

There are certain situations where a paint and primer in one product makes sense:

  • New Coat of Paint (same color)
  • Drastic Color Change
  • Small Repairs

Putting another coat of paint on a wall? Primer isn’t usually needed, so the paint and primer in one products work well. Switching colors? A paint and primer in one will offer better hiding than a cheap paint, so that’s an option. Patched a small area of your wall and you don’t want to buy a separate quart of primer? OK, paint and primer in one makes sense. And there are a number of other situations where paint and primer in one would make sense.

However, remember what we said earlier: Paint and Primer All-In-One products are technically no different from a high quality acrylic latex paint. So, in any of the above situations, do you need to seek out a specific Paint and Primer All-In-One? Absolutely not! If you’ve already got paint, and it’s a high quality acrylic, it’s perfect!

What Do the Professionals Choose?

Professional contractors make their money and build their reputation based on the speed of their projects and the quality of their work. And by an overwhelming margin, they choose to use a separate paint and primer. They know that they will get reliable and consistent results with a separate paint and primer. And they know they’ll get those results at a better price than using the “miracle” paint and primer all-in-one products!

So, why use a lesser system that costs more money when you could use the system the pros consistently choose?

Paint Your Kitchen Cabinets in 6 Steps!

bigstock-Cabinet-detail-13573895_webDid you know that the average cost of remodeling your kitchen is right around $20,000? Yes, $20,000. That’s a significant amount of money. So significant, in fact, that it means I won’t be doing any kitchen remodeling anytime soon. Sure, I’d like new cabinets or a new backsplash or a new floor, but we’re just too attached to having things like groceries and running water. And I don’t think we’re alone. A lot of people like groceries and running water. And yet, many of those same people also wish they had a better kitchen.
And that brings me to the good news: there are many things you can do that will help you update your kitchen without forcing you to give up those little luxuries we all like to have. Like food in the refrigerator. And one of those projects is painting your kitchen cupboards. If the doors and drawers are structurally sound, why rip them out and replace them? With a little elbow grease, some time, and the right products (I’m looking at you RepcoLite and Benjamin Moore), you can brighten them up and, in so doing, completely change the look and feel of your kitchen. And all for very little money!

If you think this project could be perfect for your kitchen, here’s what you need to do:

STEP ONE: Remove the hardware and hinges and label the doors with their location. Removing the hardware and taking the doors down requires no explanation. However, let me stress the importance of labeling the pieces. You definitely want to make sure you do this!  Find a system that will work for you and make sure to mark each door and drawer as well as the place they go in the cabinet. Safe-release (Delicate Surface) painter’s tape works well. Just make 2 tags with a “1” and put one on the back of the door, and the other on the frame of the cabinet where the door goes. It’s a simple step, but will help you when it comes time to put things back together!

STEP TWO:  Closely examine the surface of the cabinets and drawers and be sure to remove any peeling paint by sanding and scraping. Whatever paint remains on the surface of your cabinets must be sound! New paint brushed over a peeling surface won’t make that old layer stick. The old layer will continue to fail and will take the new one with it. So make sure that whatever paint you leave on the doors is adhering well. Also, if you have to scrape or sand off some of the paint, make sure that you spend some time feathering the bare spots into the spots where the paint remains.

STEP THREE: Clean the surfaces thoroughly. After taking care of loose, flaking, or peeling paint, you need to clean the surfaces with a mixture of 1 part TSP to 4 parts water. Kitchens are sources of many different surface contaminants and you need to make sure that the surface you’re painting is clean and free of grease, dirt, and so on. Use a Scotchbrite (“scrubby”) pad with the TSP to thoroughly clean the surfaces. And if you have some really stubborn dirt or grease, use the degreaser Spray Nine.

STEP FOUR:  Scuff-sand the surfaces you’re going to paint. You can use an orbital sander for this, or you can do the sanding by hand. Either way, use either 180 – 220 grit sandpaper. The goal isn’t to sand through the current finish, it’s just to lightly scuff it. And when you’re done, remove all the dust from the cabinets. You can blow them off with an air compressor, vacuum the dust off, or wipe it off with a solvent like Denatured Alcohol or Xylene. However you remove the dust make sure that it’s all removed before moving on to the priming step!

STEP FIVE:  Prime the cabinets with a good bonding primer. We recommend STIX Waterborne Primer. It will bond to the previous coating on your cabinets and will provide an excellent base for your topcoat! Let the primer completely dry and then assess the cabinets for any bleed-through of stain or tannins. This can happen if you’ve cut through the original coating while scuff sanding. If you do see some bleed through, spot prime those areas with an oil based primer or a white pigmented shellac like BIN.

STEP SIX:  Topcoat with a good finish paint in either a satin sheen or a semi-gloss (for washability). If you’re brushing, we recommend giving Benjamin Moore’s Advance a try. It’s a waterborne alkyd which means you’ll get the performance of an oil-based product without the drawbacks. It will flow out remarkably well, providing you with a smooth finish even when you brush or roll the paint on. And, best of all, it cleans up with soap and water and doesn’t have the smell of an oil. Another great option is RepcoLite’s own Hallmark Ceramic. It rolls and brushes well and or can be sprayed. There are also a few other options we may recommend in the store, depending on your situation.

And that’s basically what you need to know. Yes, there is some work involved. Yes, it will take some time. You’ll have to do the sanding and the cleaning, the priming and the painting. But, when you’re done, you’ll be amazed at the difference in your home. And all for as little as $200 – $300 (or less!)

If you’re interested in this project, please email us with your questions or type your questions in the comment boxes on this post!

From Bottle to Vase in 6 Easy Steps

paintedbottles_030716_4If you’re into decorating and if you’ve got even the slightest amount of creativity, you’re always looking for a project. Something outside the norms, something a little different, little things that will set your home and your decorating apart from everyone else.
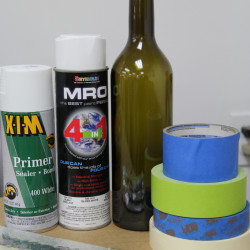
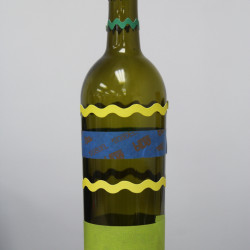

Well, if that’s you–if you’d love a quick project with a huge payoff–then read on!

Betsy Thompson, at our 17th Street Store, came up with the following project. And I’ve got to admit, when I walked by and saw her working on this in the store, I was intrigued. In my opinion, it’s one of those perfect projects: easy, inexpensive, and there’s no limit to what you could do with it.

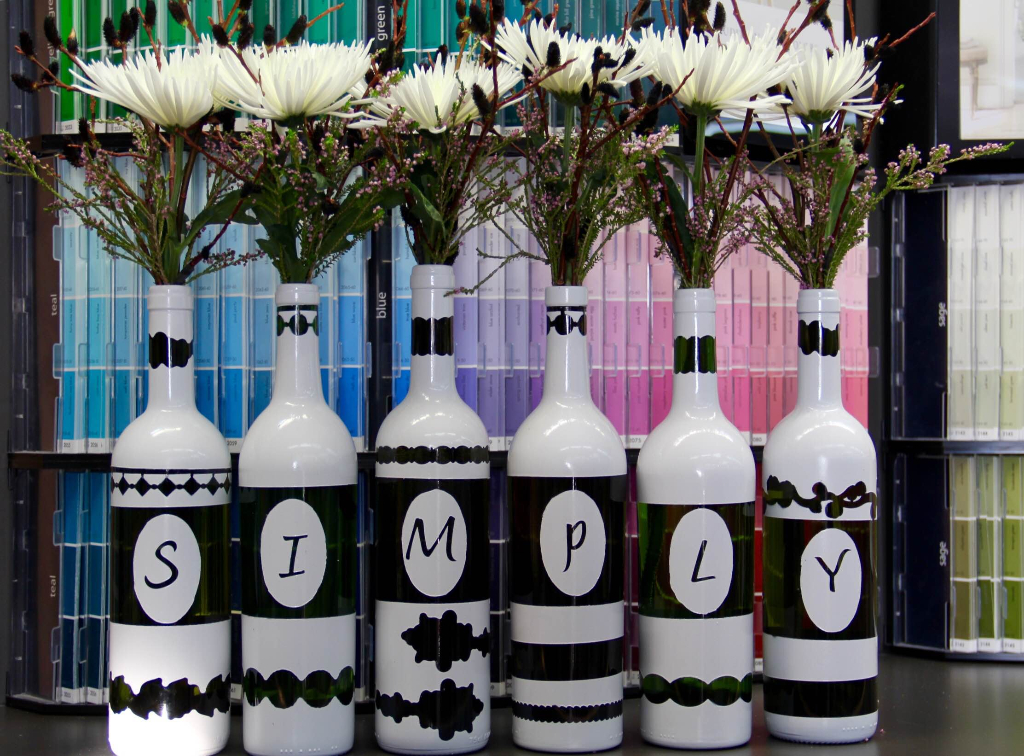
Now, the concept behind this project is simple. Betsy taped off or masked off sections of the bottles and then painted them. Once the paint was dry, she removed the tape or masking to reveal areas that received no paint, thus creating the designs.

To do this on your own, all you need to do is follow these simple steps:

1. OBTAIN SOME BOTTLES

The bottles Betsy used for our project are a dark green. Any color glass would work, but clear glass might not provide you with quite the same contrast in the finished look.

2. CREATE YOUR DESIGNS

To create your designs, you can use tape, stickers, or whatever else you can come up with! In her project, Betsy used a combination of masking tape and scrapbooking border stickers. Simply apply the stickers and tape over the bottles in whatever patterns you would like to create. Get creative here and don’t be afraid to experiment with a few different looks!

3. IT’S TIME TO PRIME

Glass is a tough surface to get paint to bond to, so it’s necessary to use a special primer. Betsy used XIM primer to solve this problem and to give the finish paint a good surface to adhere to. XIM is what we call a “bonding primer” and is designed to bond to tough-to-paint surfaces like porcelain, tile, glass, plastics, and more. So it’s the perfect primer for this project.

4. SPRAY ON THE FINISH PAINT

When the primer is dried (typically anywhere from 20 – 40 minutes), it’s time for your finish paint. Betsy used white spray paint. She applied a couple coats to ensure solid coverage and then left it to dry.

5. REMOVE THE STICKERS

This can be somewhat tricky and requires a little patience to do it well. You may want to carefully run an X-Acto knife along all the edges to cut through any paint film that might have formed over both the bottle and the tape. Failing to do this could result in peeling paint off the bottle when you remove your tape. At any rate, carefully remove the tape, the stickers, or whatever it was you used to mask the bottle off.

6. A LITTLE CLEANUP and then ENJOY!

Once that’s all done, you’re basically finished! You may need to clean up any areas where the paint bled under your tape or stickers, but you can do that with your X-Acto knife or, if you start soon enough, a little of the proper cleanup solvent on a Q-tip.

This is a simple project with a huge payoff!  You create a very unique piece that’s perfect for displaying cut flowers, dried flowers, or just sitting empty on a shelf.

Give it a try and see what you can come up with. Experiment with different designs and paint colors. Get creative and post your projects in the comments section below! We’d love to see what you’re working on.

Chalkboard Paint Tags in 5 Easy Steps!

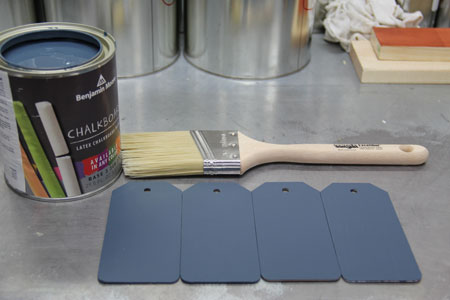
Benjamin Moore’s Chalkboard Paint is a versatile product that can really bring out the “creative” in us! Here’s an interesting project by Betsy Thompson from our 17th Street Store that might get you thinking about some different ways you can use Chalkboard Paint in your own home!

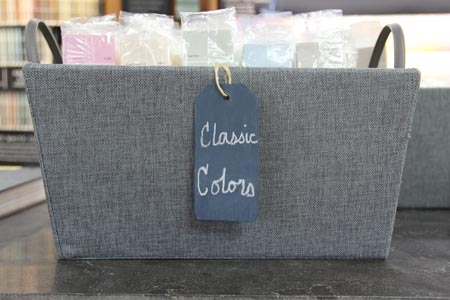
Chalkboard Storage Tags

chalkboard_paint5

STEP 1

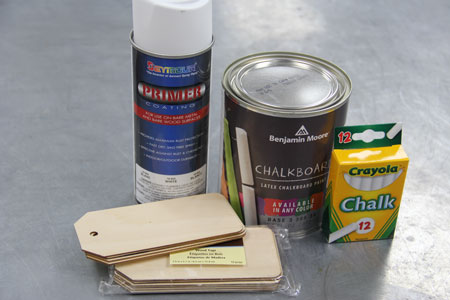
The first step is to gather all your supplies. You’ll need some wooden tags from a local art supply store as well as some light-colored chalk designed specifically for chalkboards. Finally, you’ll want to stop at RepcoLite for some primer, a quart of Benjamin Moore’s Chalkboard Paint (in whatever color you want!), and a sheet of 180 grit sandpaper.

chalkboard_paint4

STEP 2

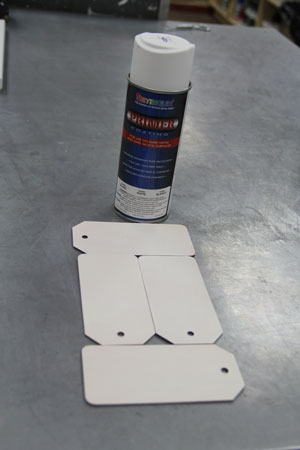
The second step is to apply primer to the wooden tags. In our project, we used a spray primer to minimize brush strokes or roller marks on the tags and because it’s a little quicker!  Now, even though “Primer-and-Paint-in-one” products are very popular, we still recommend the primer step in a project like this. The reason is that bare wood can be exceptionally porous. The helps fill in the wood grain and creates a smooth surface for the Chalkboard Paint.

STEP 3

The third step involves a light sanding of the primed tags. Depending on how quickly your particular primer dries, you might be able to do this quite soon after application. At any rate, when the primer is sufficiently dry, lightly sand the surface to knock down any raised wood fibers. When finished, wipe the tags clean with a damp cloth. Don’t introduce a lot of water to the surface. We’re only talking about using a damp rag to get the dust that you created from the sanding step off of the surface.

chalkboard_paint3

See Corona Excalibur Brushes in our Shop!

STEP 4

The fourth step is to apply the Chalkboard Paint. Once the tags have dried from step four, apply one or two coats of Benjamin Moore Chalkboard Paint. In our project, we used a high quality Corona Excalibur Brush for application. However you accomplish it, Whether rolling or brushing, make sure you use a high quality applicator. Cheap brushes will be more likely to leave brush strokes (or release bristles into your finish). Cheaper roller covers will provide you with a rougher, orange-peel, texture.

chalkboard_paint2

STEP 5

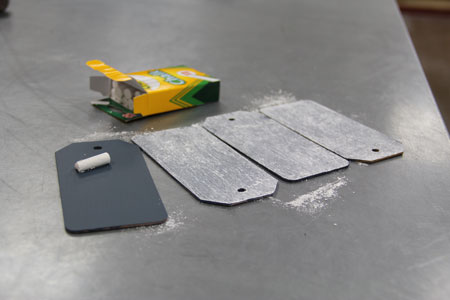
The final step is to condition the chalkboard surface. After allowing the painted area to cure for at least 3 days, rub the entire chalkboard surface with a piece of white chalk. After you’ve erased that, you’re chalkboard surface is ready for use!

chalkboard_paint1

Benjamin Moore’s Chalkboard Paint is available in any color in the Benjamin Moore spectrum. So, get creative! Think outside the box and see what you can come up with!

Some Hints:

  • For erasing, we recommend using a clean, damp cloth or paper towel. We do not recommend using a chalkboard eraser.
  • You’ll acheive the best results when using light-colored chalk designed for use on chalkboards.


The Great Flaking Paint Disaster of 2016

Peeling paint. Pattern of blue grunge material. Damaged paint. Scratched old plate

Photo courtesy of bigstockphoto.com

In our home, the previous owners painted a 4” wide border around the ceiling in the living room. On that border, there were a few small spots where the paint was flaking off. On a Saturday morning a couple of weekends ago, my wife was out of the house for a couple of hours, so I thought I’d surprise her by touching those spots up.

I grabbed some sandpaper and set out to accomplish what I should have been a 5 minute job only to find that wherever I touched the sandpaper to that border, the paint fell off. In huge patches. It was terrifying. Everywhere the sandpaper touched, a silver-dollar-sized section of paint came loose from the ceiling and fell to the floor like huge a snowflake. I would sand in ever expanding circles, expecting (hoping) to find some section of paint that was still stuck to the ceiling, but no. No matter where I sanded more and more flakes started falling. At that point, the kids came in, saw the mess on the floor and all the missing paint on the ceiling, and said “Mom’s going to kill you when she gets home….”

Oh, of course my wife wasn’t going to kill me. Probably. I was concerned, however, about the problem that I now had on my hands. If you’ve ever dealt with peeling paint issues, then you know the frustration and anxiety I was feeling.

See, these are problems that have to be fixed the right way. There are no shortcuts. There are no quick fixes. Fixing it the wrong way, the quick way, usually ends up creating bigger problems down the road. Instead, fixing a problem like this takes patience as well as some blood, sweat, and tears. Here’s how you do it:

STEP 1: FIND OUT WHY IT FAILED

The first step to fixing anything at all is finding out why it needs fixing in the first place. You can treat the symptoms, but it’s likely the problem will recur until you actually address the problem that caused the failure in the first place. In my instance, with the peeling paint on my ceiling, the problem was caused (as is usually the case) by poor surface prep. When I examined the paint chips I found that the backs were gritty and chalky. That means the grit or powder was there before the paint was applied. The paint stuck to that rather than the ceiling itself and thus came off easily when bumped or stressed.

When it comes to peeling paint, surface contamination of one kind or another is typically the cause. Sometimes it’s drywall dust, sometimes it’s due to cleaning agents, soap films, or other contaminants like that.

Surface contamination is the one of the typical causes of many paint peeling problems. The other main cause is due to the painted surface simply being too smooth or hard. Sometimes we paint over a glossy, hard enamel finish and the new paint peels right off when bumped or scratched. Without scuff-sanding or priming surfaces like that with primers like BIN primer from Zinsser, you’re just asking for the paint to fail.

So all that to say, if you’ve got a peeling paint problem of your own, the place to start is by doing a little detective work. Figure out why it peeled. From there, you’ll be able to plan the next step in the repair process.

STEP 2: LET THE SCRAPING and SANDING BEGIN!

Once I figured out the reason my paint failed, now all that was left was to do the work and fix it the right way. Sadly, that’s easier said than done.

See, when it comes to peeling paint, the only solution is to get all of the loose paint off. All of it. If paint is left on the surface, it’s absolutely necessary that it’s left there only because it’s stuck so well it wouldn’t come off!

So, to get the paint off that border section of my ceiling, the only fix is for me is to get out a paint scraper, some sandpaper, and go to work. It’ll take some time and it’ll create a fair amount of mess, but any shortcut I take will only result in bigger problems down the road.

For example, on my ceiling, with the paint peeling as badly and easily as it is, if I were to paint over that old paint–even though some areas seem to be adhering quite well–the surface tension of the new paint as it dries would likely be enough to pull loose new sections. Soon, that paint I’d left on the ceiling would be coming off and taking all of my new paint with it!

To avoid that, the right solution is to get all of the loose paint off. Once that’s done, a second part of this step is to go around and give some attention to all the areas of paint that remain on the surface. Most likely, when you examine these spots, you’ll see rough edges where the remaining paint meets bare spots on the wall. These spots will not be filled and disappear when you apply your new paint. In most cases you can minimize the visual appearance of these spots by sanding all the edges of the remaining paint. Sand the spots smooth in order to create a smooth transition from the bare surface to the remaining paint.

Also, if you determine that the reason your paint is flaking is because the surface you painted is too shiny or smooth, then you need to make sure you scuff sand the surface with a 150 – 180 grit sandpaper.

STEP 3: GET THE DUST OFF

Once the sanding/scraping process is complete, it’s absolutely imperative that the surface be as dust-free as possible. That may mean wiping it down with a damp rag or it may mean vacuuming it with a shop-vac. Either way, that surface needs to be dust-free or the problem will just repeat.

Likewise, if the paint failed because of an oily residue left by a cleaning agent or something else, the surface needs to be washed well with a degreasing agent like TSP (Tri-Sodium Phosphate) before any new painting is done. Remember:  without eliminating the source of the failure, the problem will only repeat.

STEP 4: ROLL ON THE NEW PAINT

When the surface is completely clean (and I can wipe it with your hand and not have a chalky, dusty residue come off on my palm), then it’s time for my new finish paint. (In certain situations, a primer might be recommended. You’ll probably want to talk to someone at RepcoLite if you have any questions about whether you need a primer or not.)

I’ll probably apply a primer coat to my ceiling just to be safe. After that, I’ll roll on two coats of finish and finally, after all of that, I should be done and the living room will be better than before. And, best of all, it should look good and resist flaking or peeling for years to come!

Peeling paint can be a very frustrating situation. And when it happens to us, we may find ourselves tempted to take a shortcut or an easy way out. However, in a situation like this, shortcuts just don’t produce good results. Instead, take the time to do the project the right way. It’s a lengthier, more time-consuming fix, but it will give you much better results (and save you a lot of repeat work) in the long run!

The Vile Showerhead (or, Finding the Dread-Free Life)

shower-1027904_640(1)I’m a “dreader”.  That’s not a word–I know that.  But that doesn’t change the truth:  I dread things.  On a regular basis.

For example, I re-decorated my bathroom about a year ago.  I put wood planking on the walls, hung some wallpaper, stained and varnished new trim, installed a new (bowed) shower rod and new curtain and finally, to finish the whole thing off, I installed a new shower head.

Which was the biggest mistake I made.

See, right after installing it, my wife marched right in, closed the door and proceeded to take a 45-minute shower.  When she was done, the kids all marched through, one after the other.

When the shower marathon ended that day, I opened the bathroom door and it was as if a cloud had localized in that tiny room.  I literally couldn’t see the other side through the steam.  The little ceiling fan was working overtime, but there was no way it could keep up.

“Fortunately,” I thought, trying to wave away the steam, “this is something that won’t happen everyday.  Once the ‘newness’ of the shower head wears off, we’ll go back to having to fight the kids to take baths.”

Nope.  Not a chance.  Every single day since the installation of that vile shower head, our bathroom is engulfed in steam.  Shower after shower, hour after hour:  steam, steam, steam.

Well, that went on for a long time and then the inevitable happened:  the mold started growing around the edges of the ceiling.  The wallpaper started peeling and curling up on all the seams.  My beautiful bathroom had gone from a place of despair to a place of beauty and then back again to a place of despair all in about 6 months time. It was depressing to say the least.

And that’s where the “dreading” comes in.  Everyday, I’d look at the ceiling and see the mold or the wallpaper and see the peeling and I’d dread the “fix-up” job that was to come.

I dreaded it because it seemed like such a big job:  fixing the mold, fixing the paper, repainting the ceiling.  I’d just gone through some of this work and now, thanks to that dumb shower head, I had an even bigger mess to fix.

And so I stared at it for a long time.  I thought about it.  I tried to ignore it.  But most of all I dreaded it.

Until finally I got so sick of being depressed and frustrated about it that I actually fixed it.

I took a week and on a Monday night, I sprayed the mold with a bleach solution and scrubbed the ceiling.  That took me exactly 17 minutes.

Two nights later I came back with more bleach–no scrubbing this time, just the bleach on the mold.  That took about 7 minutes.

On Friday night I went around the room and primed all the previously moldy spots with ProFlo Alkyd primer and then I re-pasted all the peeling paper.  That night’s work took about 15 minutes.

Finally on Saturday, I got ready to paint the ceiling and finish the job.  I was ready for a big, painstaking job (I hate painting ceilings) but I was surprised to find that the whole thing took about an hour from the time I opened the can of paint to the time I put the paint back on the shelf in the workroom.

In the end, I realized that the job I’d dreaded for the last 6 months or more had taken me less than two total hours to fix.  In my mind, I’d exaggerated and inflated and imagined the work to be 10x worse than it was.  I imagined the mess, the problems to be 10x less fixable than they were.  I imagined the pain to be 10x greater than it was.

I’d spent 6 months feeling bad and frustrated and almost (in a sad and pathetic way) depressed about a room that took me less than 2 hours to fix.

So how does this apply to you?  Well, I can’t speak for you, but I’ve talked to many folks in the paint store at RepcoLite who feel the same way I was feeling.  They’re frustrated about the seemingly endless amounts of work needed in their homes.  They look at the jobs and the work to be done and assume that they’re worse than they really are.  And so they do what I did:  they put them off and they stew on them, thinking about them and mulling them over in their minds for months until the jobs seem even bigger and more horrible.  In short, we dread them and waste our time worrying about them and frowning over them.

But what we really should be doing is “doing” them.  The jobs aren’t as bad as we think.  They’ll go smoother.  They’ll go more quickly.  They won’t be as painful.  And best of all, once we’re done, you’ll notice what I noticed:  a real sense of relief and freedom from the work that had been hanging over my head.

So, bottom line:  If you’ve got a project that’s creating that feeling of dread, jump into it.  Get it accomplished.  And then kick back and enjoy the dread-free life…