For those of us who paint everyday, there are little things we learn along the way–little things we do that makes the work go quicker, easier. Here are a collection of 8 of those tips–check them out and make use of any of them that make sense to you!
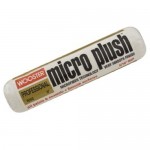
ALWAYS START EVERY PROJECT with a NEW ROLLER COVER
People often try to save money by re-using an old roller cover. The problem is, those old, washed-out roller covers never work well. The fibers get clumpy after a good washing and typically they never return to a condition that applies a finish paint well. So don’t compromise your paint job–the money you spent on paint and the time you spent working–only to end up with a poor finish. Instead, spend the extra $4 or so and get a new cover for a new project!
ALWAYS PICK the RIGHT ROLLER for the JOB
A 3/8″ roller cover is ideal for most interior surfaces and most paint finishes. 3/8″ covers work for standard textured ceilings and yet they’re smooth enough for your walls. These covers carry enough paint to be easy to use, but they typically don’t carry so much that they spatter and drip everywhere. However, bear in mind that there are shorter-napped and longer-napped covers that are specific for certain situations. Before you buy any cover, we recommend that you explain your project to the expert in the paint store and let him or her steer you to the right cover.
DON’T FORGET there are SMALL ROLLERS for the LITTLE JOBS
RepcoLite carries a wide assortment of small, specialty rollers. These are perfect for painting everything from the panels in a paneled door, to reaching those tight areas behind your radiators or inside your cabinets. When you find yourself in a tight spot, don’t forget that these options are available!
DON’T MIX and MATCH ROLLER COVERS
Building on the idea just mentioned, it’s important to point out that the finishes left by those little roller covers can be different from the finish left behind by your standard roller cover. This can potentially make a difference in the appearance of your overall project. The difference can be minor–and it can be severe. The best way around it is to remember that all of those little rollers–at least the ones we have at RepcoLite–match up in nap and finish with their larger counterparts. If you used a 3/8″ roller for your walls, make sure you pick up a 3/8″ roller cover for your small roller.
ROLLER FRAMES MATTER
So far, we’ve only talked about roller covers, but a big part of the ease and functionality of a roller cover is the frame you put it on. If you buy the best roller cover, but then mount it on the cheapest frame you can get your hands on, chances are the experience will be less than stellar! Roller frames are not disposable–they last from job to job. Add to that the fact that a good, high quality frame is typically about $4 – $6 more than a cheapo and it’s really a no-brainer. Drop the extra $4 once and you’ll reap the rewards of your decision every single time you paint!
REMOVE LINT from the NEW COVER
Folks don’t always realize this, but brand new roller covers are typically covered with lint and cut-off fuzzies. It happens during the manufacturing process and, if you don’t remove these fuzzies before you start painting, you’ll typically find yourself removing them from your wall after you’ve rolled them on in a coat of paint. To remove them, simply tape some painter’s tape down on your counter–sticky side up–and roll your cover over the tape. Do this several times to make sure all the lint and loose fibers have been removed.
USE WATER to PREPARE YOUR ROLLER COVER for PAINT
Sometimes, filling a new roller cover up with paint can be a pain. You roll it in the tray but the second it hits the paint, it stops rolling. You end up with a bunch of paint on one half of the cover and nothing on the other. Oh, you can get the whole thing covered, but it takes some work. To avoid that hassle, try this: moisten the roller cover with water (for latex paint) ahead of time. Either run it quickly under a tap or mist it with a spray bottle of clean water. Once it’s wet, roll it out on a dry rag to remove the excess moisture before moving it to your paint. (Don’t roll it out on newspaper as the newsprint could come off on the cover!)
USE SARAN WRAP to STORE YOUR COVERS OVERNIGHT
If you get done painting for a night, but plan to start again the next morning, don’t waste time cleaning out your cover. Simply pull it off your roller frame and then wrap it tightly in Saran Wrap. Once it’s wrapped, store it on your counter or in your refrigerator. DON’T STORE IT IN YOUR FREEZER (unless it’s oil-based paint). This process should keep your roller ready for use for a day or so.
Be aware that if you leave it much longer, it runs the risk of drying out and–especially in humid situations–getting a little moldy.


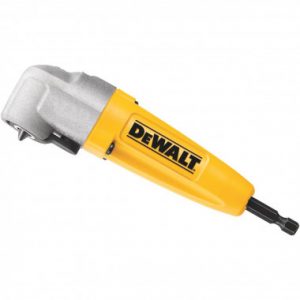 The first thing we tested was a right angle attachment. It's great for tight spots where you would normally have to angle the drill and still not have a straight shot at drilling a hole or tightening a screw. It's made for an impact driver, but can be used with a regular drill.
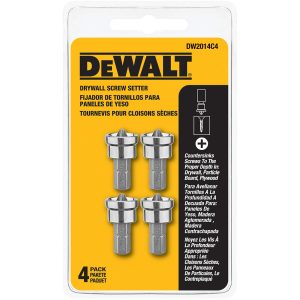 These drywall screw setters are great for setting drywall screws to just the perfect depth. You don't have to worry about a giant crater in the drywall or going through the paper. They help you achieve professional looking results every time.
 This drill and driver combo is a huge time saver! Many people alternate between a drilling holes and driving screws. They take one tool out, set it aside, and replace it with a new one. This often leads to missing tools. This eliminates that. Basically, it’s a bit that has a drill bit on one end and a driver bit on the other that you flip , depending on your task. It saves a lot of time searching for missing drill bit!
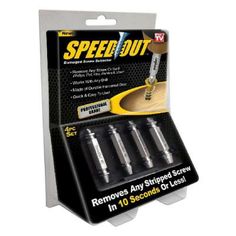 These are Betsy's favorite drill accessory! No tool box should be without a set of easy outs. They make fast work of removing screws the have stripped heads. Betsy tried the "rubber band trick" and it didn't work, so she has been a fan of these every since.
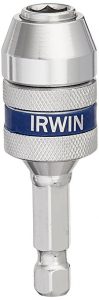 We are aware that keyless chucks have made accessory changing a lot faster than keyed chucks. But we have found the even faster way. This quick change adapter will have you changing out tools in a flash.
And finally, we tried out the new Hyde Stir Whip. It made quick work of mixing paint, and the fact that it can mix grout and concrete as well, makes it a must have accessory in our book!
Watch the Hyde Stir Whip in action!
We are aware that keyless chucks have made accessory changing a lot faster than keyed chucks. But we have found the even faster way. This quick change adapter will have you changing out tools in a flash.
And finally, we tried out the new Hyde Stir Whip. It made quick work of mixing paint, and the fact that it can mix grout and concrete as well, makes it a must have accessory in our book!
Watch the Hyde Stir Whip in action!