Old Shutters Headboard

Picture from M.E. Beck Design, Inc. at mebeck.com

Picture from M.E. Beck Design, Inc. at mebeck.com

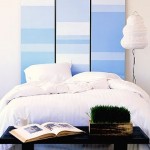
In keeping with some earlier posts about headboards, here’s another idea worth your time and attention:  what about using old shutters?

This idea works especially well if you’re interested in a distressed look (as we see in the picture at the left).  If that’s the look you’re going for, it doesn’t matter if the shutters are old, chipping, faded or even broken (note the second white shutter).  All of those things play into “the look.”

So, whenever you’re wandering through a large flea market or a mission store . . . keep your eyes open for little treasures like these!

VARIATIONS

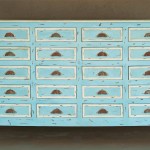
  • BUILD YOUR OWN.  Now, if you can’t find some plantation shutters like the ones above, don’t worry–you could still imitate the look with some very simple exterior shutters.  And if you can’t find any wooden ones for sale, you could easily build your own.  Just take a look at the picture to the right for inspiration.  The shutters don’t need to be complicated.  Just create some shutters, finish them in whatever style appeals to you and mount them.
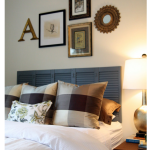
  • MIX and MATCH.  Don’t be afraid to combine headboard ideas into one.  For example, an obvious combination would be to start with 1 old window and then install a shutter on either side of it.  Go crazy and complete the look by building a small flower box underneath the window with greens or real potted plants.

Whatever you do, as with all these ideas, have fun.  Don’t jump at the first idea that crosses your mind.  Think about it for a while . . . turn it over in your brain . . . and you’ll be surprised how creative you really can be!

Tri-Fold Door Headboard

In an earlier post, we talked about using a standard paneled door as a headboard.  Here’s another take on the “door as a headboard” idea that really offers you a ton of creative opportunity:  create a headboard from a set of tri-fold closet doors.

Now, admittedly, this is maybe a bit more expensive than some of the other ideas–you would need to pick up a set of doors if you don’t have them–but the project will produce a very unique and interesting result that’s probably worth the expense.

Here’s how to achieve what you see in the picture, as well as some other variations you could try:

Stripes, Stripes, Stripes

As we see in the picture, stripes can create a calm, soothing, clean and somewhat modern feel in a room.  And the good news is that accomplishing a look like this is much easier than you may think.

However, before we spell out the “how-to’s” regarding this project, let me start by saying that the biggest, most important tool you’ll need (besides the doors and the paint) is the right tape.  Trying a project like this with the wrong masking tape is going to be disappointing and frustrating.  So don’t go cheap on the tape if you’re going to try this!  I strongly recommend picking up a role of 3m’s “Orange Core” safe-release masking tape at RepcoLite.  This is a specially formulated “safe-release” tape that will both leave sharp, clean lines while at the same time come off freshly painted surfaces without pulling up the paint.  Using a tape like this will prevent any bleed-through or “bumpy” paint lines.  You’ll get sharp, crisp lines and (trust me) you’ll be happy!

OK, start with the right tape and the rest of the project is easy.

Prime and paint the doors with a white (or the predominant color in your scheme) Eggshell finish.  Preferably RepcoLite’s Hallmark Eggshell.

After the doors have dried for 24 hours, carefully measure off and tape the different section that you want to apply the different color stripes to.

Roll your colors onto these areas using a small roller and allow to dry for 20 minutes to an hour before carefully removing tape.

Continue in this manner, filling in the doors with the differently sized and colored stripes until the doors look the way you want.

Once you’ve accomplish this, let the doors completely dry and mount them.  (Remember this, though:  Latex paint dries to the touch in hours, but doesn’t reach it’s full cure or full hardness until about 30 days later.  This means the doors/headboard won’t be as durable as possible for the first month or so–so go a little easy on them!)

Variations on this One

Don’t stagger the stripes–run them from one end to the other.

Skip the stripes entirely and paint each door a separate color.

Paint the doors a solid, consistent color–all three of them–and then run 1, 2, maybe 3 narrow stripes (1″, 2″ or so) across the doors from left to right.  Clump these narrow stripes or spread them out.

Run the stripes from top to bottom rather than left to right.

Apply wallpaper to the doors instead of paint.

The variations are basically endless.  It’s only a matter of the limits of your creativity.  Above all things:  have fun!

Little Changes, Big Impact: Paint Some Second Hand Furniture

bigstock-Classic-Wooden-Dresser-6102291_smallerContinuing in our series about small paint projects that will have a big payoff, we’re going to talk today about painting furniture. But before we start by throwing out some examples, I want to first take a second and acquaint (or reacquaint) you with the creative home decorator’s greatest friend: the junk shop.

Lining the shelves in countless junk shops and mission stores throughout the country are treasures: unique dressers, end tables, lamps, flower stands . . . you name it. Sure, they’re not in the best condition all the time, but that’s the beauty of paint: it doesn’t matter what it looks like now; it only matters what it WILL look like with a coat of paint.

So, find the junk shops, the flea markets, the mission stores in your area and make a habit of swinging through them from time to time. Look for bargains and look with a vision for what’s possible. Remember that the piece doesn’t need to be flawless. Paint will cover over a multitude of sins. Look for interesting pieces, unique pieces, unusual pieces. And look for bargains.

And once you find them . . . snatch them up and start getting creative. To give you some food for thought, consider the following examples:

DISTRESSED TABLE

Here’s little table that’s easy to duplicate. It’s just a matter of stripping and staining the table top with a standard wood stain. After that, just apply a water based paint in your color of choice to the rest of the piece. Once it’s dry, do a little scuff-sanding to distress it and bring out the wood beneath the paint and you’re set. It’s easy to do and you end up with a furniture piece that could be a highlight in any room.

OLD DESK

Finding a piece like this at a junk shop is exciting as it gets. But putting the right colors on it and turning it into an interesting, exciting piece in your home is even better.  The desk in this example illustrates the point that you don’t need bold, bright colors to make an impact. The colors used on this are very neutral, very natural tones. The highlights on the rings of the legs are simply a slightly darker paint than the rest. Remember: it’s not always about being bold and daring. It’s about choosing the right piece and the right colors–whether they’re bold . . . or muted and neutral.

BOLD, CRAZY FLOWER STANDS

Now, while bold, bright colors aren’t always necessary to make an impact, they sure do get the job done!

Maybe these are too bright for your particular taste . . . but don’t write the idea immediately off. The value of painting bright colors on something like this is that it gives you an easy way to bring a certain color into your decorating that you’d otherwise struggle to use. For example, look at the reddish orange on the stands. It’s not an easy color to work with. It’s hard to paint an entire wall that color and get away with it. But if the rest of the room is painted in a washed-out yellow or a chalky blue . . . introducing that orange in small doses–as is the case with these pedestals–can be a great way to use it in the room without overpowering the room.

The basic point is this: look for ways to bring some color and interest into your rooms via furniture you may have purchased at a discount or at a mission store or junk shop. It’s the perfect way to infuse your home with color, without going overboard or biting off too big a project. And, when you need a change, it’s as easy as a quick repaint . . . or moving the piece to your basement!