EP14 – July 8, 2017: It’s Toilet Talk Time!

We know, it’s something people don’t normally talk about in social circles. It’s a topic left for the privacy of our own homes. But we’re breaking the mould and asking all the toilet questions you may have pondered. Mark DeVisser from The Plummer Is Here stops by to answer our questions and walk us through the options when buying a new toilet. The subject matter makes us uncomfortable, but the information is worth the discomfort!

Listen here:

Show notes for Episode 014:

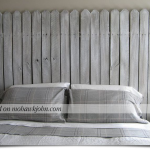
Kitchens are the most commonly redone room in a house. They are also some of the most costly. And there are some things you can do to change the look, without spending a ton of money. We've all heard of painting the cabinets and replacing the hardware. But there is one more project that is often overlooked, but dramatically changes the look of your kitchen.

Painting a tile backsplash can really change the look and feel of your kitchen. It can make a dated kitchen feel current. And, with a little creativity, you can make your backsplash a one-of-a-kind. Check out our Backsplash Ideas Pinterest board to see what inspired us!

Figuring out the perfect lighting for your home can be a challenge. But it can be more difficult as we get older. Our eyes go through drastic changes as we age and most people will require more and different types of light.

Renee Huff from The Lighting Corner in Grandville stops by to discuss how eyes change as we age and some things that we can implement to help us, or our loved ones, see better as we gracefully age.

Outdoor living spaces are the fastest growing segment of home improvement. Everyone is trying create that backyard spaces that every neighbor wants. And all may be perfect until it comes to the furniture.

There are three general issues that come up when it comes to patio furniture:

  1. It looks terrible from sitting in the weather.
  2. It's the wrong style. You bought log furniture, but now hate it!
  3. It's an eclectic collection of yard sale finds.

When people find themselves in one of the above situations they generally do one of two things: they either live with it, or they toss it (for the eclectic collector to find!) and buy new. But there is a third option that we like a lot better! It will save you money over replacing and you can make it something the neighbors will envy! You can find amazing ideas on our Outdoor Furniture Pinterest board.

Yes, we have finally come to Dan's favorite segment of this episode! He has been dying to have all of his hard-hitting toilet questions answered by an expert plumber. And lucky for us, The Plumber Is Here!

Mark DeVisser from The Plumber Is Here! stops by to answer all Dan's questions and add a few laughs.

Mark DeVisser is a Master Plumber and Owner of  Great Lakes Plumbing Services, LLC (or, as it is more commonly known, The Plumber Is Here!). The plumber Is Here can take care of all your plumbing needs including water heaters, faucets, tubs and showers, water and sewer hookups, drain cleaning and so much more! They service residential, commercial and new construction in all areas around Saugatuck, Holland, Zeeland, Grand Haven, Grandville, Jenison, Hudsonville, and beyond. 

Color Me Home Episode 18: Eliminate Mistakes When Buying New Furniture!

In today’s episode, we sit down with Sara Vander Molen from UBU Home Furnishings in the Rivertown Crossings Mall. Sara applies the top 3 New Year’s Resolutions to your home. And Dan makes a terrible, terrible mistake in the very beginning and digs a hole so deep there’s not a ladder big enough for him to crawl out!

Episode Outline

  • Dan’s Terrible, Terrible Mistake (0:27)
  • FIRST RESOLUTION: Lose Weight, Get Healthier (2:06)
  • SECOND RESOLUTION: Get Organized (4:09)
  • THIRD RESOLUTION: Save Money by Avoiding Mistakes! (6:21)
    • Get Help from Experts! (7:13)
    • Measure, Measure, Measure! (8:43)
    • Buy Quality Products (11:01)
  • BUY QUALITY PAINT b (Dan’s Brilliant Paint Tie-In) (12:50)

Contact Info

We were so grateful to Sara Vander Molen from UBU Home Furnishings in the Rivertown Crossings Mall for taking time out of her day to be with us in the studio and share her expertise. Remember, as Sara mentioned, UBU Home Furnishings offers color consulting and design help. It’s free in-store and is available for a nominal hourly fee for in-home consultations.


Color Me Home Episode 13: 3 Surefire Decorating Fails

In this episode, Betsy and Dan discuss 3 Surefire Decorating Fails (and, of course, how to avoid them!). In every decorating project there are certain things that can trip us up, wreak havoc with our plans, or just complicate everything we’re trying to accomplish. These are common pitfalls. But the good news is that they’re remarkably easy to avoid!

Check out all the projects we discussed on this episode!

Episode Outline

  • Mistake 1: Choose Your Paint First! (0:50)
  • Mistake 2: Go All “Matchy-Matchy” With Your Colors (6:06)
  • Mistake 3: Keep Something That Doesn’t Fit With Your Style! (13:40)
    • Fix 1: Paint It! (16:03)
    • Fix 2: Strip It! (19:54)
      • Tip: Use a Heat Gun (23:33)
      • Tip: Strip Painted Hardware in a Crock Pot! (23:58)
    • Fix 3: Repurpose It! (27:16)

Choose Your Paint Last!

We were pretty clear about the importance of choosing your paint last. Still, we have a number of resources on our blog that speak to this point. And here they are for your reading pleasure!

The Crockpot Solution!

At one point, Betsy referenced a Crockpot solution for removing paint from painted hardware. And, of course, there was a bit of a discussion as to the right methods to use: is it plain water brought to a boil? Or do you add vinegar. Dan thought vinegar made sense. Betsy thought just water. Turns out, Betsy was more right (which, by contract, Dan is forced to admit).

Anyway, the process is simple:

  • Get an OLD Crockpot that you intend NEVER to use again for food!!!
  • Put water and a little liquid laundry detergent in along with the hardware and set the Crockpot to medium.
  • Let it “cook” overnight.
  • In the morning, you should be able to peel the layers of paint off with your fingers.


Color Me Home Episode 8: Repurposing Your Furniture

This week, Betsy and Dan talk about repurposing furniture. Specifically, we focus on a variety of uses for those old entertainment centers that don’t fit modern HDTVs. We also highlight some interesting uses for old dressers. (And if you’re really interested, check out the BONUS CONTENT feature below. So many of the projects we talked about involved removing the drawers from the dressers. Well, what do you do with those extra drawers? Is there a creative way to use them? Of course! We talk about 4 different projects in the BONUS CONTENT, so check it out!)

View our Pinterest Board for Episode 8!

Episode Outline

  • Repurpose Your Entertainment Center (1:07)
    • Diaper Changing Station (2:00)
    • Potting Station (for you gardeners out there!) (4:58)
    • Coffee Bar (7:15)
    • Betsy’s Shoe Display Center (10:04)
  • Repurpose Those Old Dressers (14:57)
    • Storage Shelves (15:10)
    • Kitchen Islands (17:25)
    • Dan’s Little Throne (or Seating and Storage and Things Like That) (19:50)
      • Dan’s Voice Breaks while saying “Bop” and Betsy Makes Fun (24:16)

Bonus Content and Outline

  • Repurpose Those Drawers
    • Under-the-Bed Storage (0:35)
    • Drawer Dollhouses (4:15)
    • Shelves and Shadow Boxes (6:08)
    • Make Tables (9:31)

Anaglypta Wallpaper

anaglypta2 
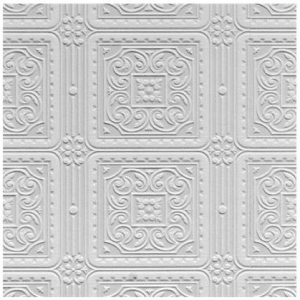
Anaglypta wallpaper is a textured, paintable wallpaper. In this episode, we talk about using it on the backers of entertainment centers to provide a unique, interesting backdrop.

However, these papers can be used anywhere. They are reasonably priced and look great on walls, on furniture, on stair risers . . . and on and on and on.

Be sure to check out our Pinterest page for this episode for a variety of photos showing painted and faux-finished anaglypta paper. We have books you can look through in our Lakewood, Plainfield, and 17th Street RepcoLite locations. If you have any questions at all, please stop out, email, or give us a call!

Stenciled Dresser Project

green_furniture_web_030816
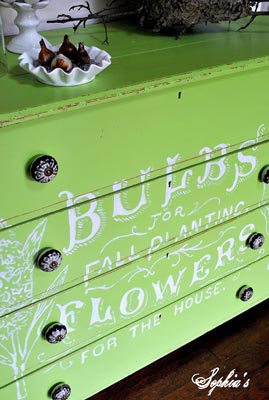
Finding and old piece of furniture–something that’s seen it’s better days–and breathing new life into it with a little paint and some creativity is easily one of my favorite do-it-yourself projects. I love it because it’s usually inexpensive (if you’re a smart shopper), doesn’t take much time, and the results can be dramatic.

Today, I want to highlight and recommend a simple project we discovered on a great decorating blog called “Sophia’s Decor“.  (Check it out sometime–you’ll thank us later!)

This is a simple project that anyone can accomplish.  Please head to Sophia’s Decor for some great pictures and more detailed comments about the project.  But to quickly summarize:

Here’s What You Need:

  • A piece of furniture to paint (this is important)
  • Paint (main color and stencil color)
  • TSP
  • Sandpaper
  • Paint Supplies
  • Stencil or Projector

Here’s What You Do:

1 Start by scuff sanding your furniture piece with some 120-150 grit sandpaper.  This doesn’t need to be a complicated, lengthy, arm-breaking, sweat-producing sanding job.  You’re basically just dusting over the piece to dull the previous finish so your paint will bond.
2 After the scuff-sanding, wash the piece down with a TSP and water mixture.  This will remove the sanding dust and will also help to clean away any surface contaminants that might be left from cleaners and so on.
3 When the piece is completely dry, apply your main color.  Brush or roll it directly onto the furniture piece without a primer.  (If you plan to distress it, it’s important to skip the primer step.)
4 Once the piece is painted (it may take one or two coats depending on your color), go ahead and distress it.  This is a bit of an art project and takes a little bit of thought.  It’s not complicated, but you want to be careful to create an authentic distressed look without going too far.  Carefully run your sandpaper over the edges of the drawers and the top and the legs and you’ll notice that very quickly you cut through to the wood beneath.  Work around the spots that would see normal wear over the years:  the drawer pulls, edges and so on. Continue like this until you’ve achieved the look you desire and then wipe the piece clean with a damp rag.
5 When it’s dry, it’s time to apply the stencil.  This part will take some planning and some thinking and some searching to find just the right graphic.  In this case, the blogger at Sophia’s Decor used a projector to display the image on the dresser and then she traced it with a pencil, using an off white paint to fill in the lines.  You could also accomplish the same affect if you found a stencil to your liking.
6 However you put the design on, let it dry a couple days.  Once it’s dry, the last step is a light sanding over the letters.  (Don’t work too hard with this sanding or you’ll remove too much of the lettering!)  The goal here is to lightly distress the lettering and give the piece an aged look.
7 At that point, you can leave the piece as is, or, if you prefer, you could apply a light, single coat of polyurethane in a low-gloss or flat finish.  A solvent-based polyurethane will yellow slightly over time, so be aware of that before you top-coat anything that’s white!

Overall, this project will take you a couple days from start to finish–though most of that time will be just letting it dry in between paint coats. It’s fun, easy and, because the furniture piece is small compared to the room it is eventually placed in, you can experiment with colors that might be too strong for the walls.

If you try something like this, or have a project you think turned out really well, please post a pic on our Facebook page here.  We love to see what you’ve come up with!

More Unique Headboards

I’m kind of frustrated.  See, I would love to try some of these headboard ideas I’ve been writing about in my own home–but I can’t.  Or really, to be more accurate, there’s no point.  The beds we already own are adequate and they don’t lend themselves to this project.  So I’m kind of frustrated.  But, I take some comfort in the fact that I can still write about these and get you thinking about them and hopefully convince some of you to give the ideas a try.

Anyway, I’m going to breeze through a few ideas today with only brief descriptions or information.  I think these particular ideas are pretty basic and don’t need too much explanation.

picket_fence_headboard

PICKET FENCE HEADBOARD

It’s just like it sounds.  Buy either a section of Picket Fence at the lumber yard, or build one specifically.  Since you’re using it inside, you could easily build it out of regular pine and then simply prime and paint it for that clean white look.

If you opt for this . . . don’t let yourself leave the motif without completing it.  You’ve installed a picket fence in your bedroom . . . that means you need lots of greenery and “outdoorsy” stuff.  Possibly sky blue walls, possibly (in a kids room) a tree mural.  Maybe you need to wind some “greens” or “vines” through the slats of the fence.  Whatever you do, have fun with the theme and build on it.

CHANGING SCREEN HEADBOARD

Here’s another idea that I think has a ton of potential.  Buy or get your hands on (lawfully, of course!) one of those changing screen things you see at home decor stores and then it’s up to you how creative you can get.

Some of these screens are frames with scrolling and winding metalwork.  That’s fine.  They can be mounted directly behind the bed as is.  I’ve seen other screens that are like the screen on the right.  This one had a uniform brown canvas backer that was removed and replaced with the black and white fabric.

Again, whatever you do is up to you . . . the point is . . . think beyond what you immediately see!

WOOD SHIM HEADBOARD

shim_headboard

I don’t know exactly how this one was done, but it seems to be more about patience than skill.  It’s made entirely of those little wood shims can pick up at any lumber yard.  They were probably sanded (though not necessarily) and varnished when the look was completed.

However they were put together, the look is a weird combination of modern . . . and warm and woodsy . . . you could really go any direction with something like this.

And there you go . . . a bunch of ideas for headboards.  And the point, above all, is to remember to think creatively when a need arises.  When you need a new headboard for a bedroom, you could jump in the car and drive to the home decor store, pick one out, and call it good.  Or, you could get creative.  Maybe you’ve already got everything you need for the perfect piece.