3M Delicate Surface Tape

3m_tape
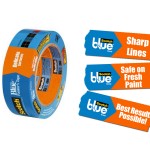
Every now and again, a new product enters the home decorating field and changes the way everything is done.  Today I want to very briefly highlight one such product:  3M’s Delicate Surface Masking Tape.

Now hold on, don’t click away just yet.  I know the very words “masking tape” don’t necessarily instill a feeling of raw, unchecked excitement even in the hardiest home decorating gurus, but this tape is different.  It’s worth a quick read.  Trust me.  You’ll thank me later.

See, 3M’s Delicate Surface tape will give you razor sharp, crisp lines when you paint.  Oh, it can be used on all sorts of delicate surfaces including wallpaper and recently painted walls, but for me, the biggest, most important aspect of the tape is the sharp lines it leaves behind.

After all, I hate taping a room off.  I cannot stress this enough.  I hate it.  It’s time consuming.  It’s no fun (I just want to put paint on, not spend this time taping).  And then, usually, after all that work of taping, I roll my paint on, pull the tape off and discover that there are many areas where the paint leaked under the tape.  My lines aren’t crisp.  It’s depressing.

But that’s where this particular tape changes the game entirely.  The lines are absolutely razor sharp.  They’re perfect.  You can go through all the work of taping your room (which still isn’t fun–even with this tape), but the end results make it all worthwhile–no paint leaking under the tape, no wallpaper or wall paint peeling off when you remove the tape.  Nothing but sharp lines and perfect walls.

Now, of course, the tape is more expensive than regular masking tape–probably a couple bucks a roll more.  But think about it this way:  you’re going to spend all that time masking a room with good tape or with cheap tape.  You’re going to do all that work painting that room.  You’re going to spend all that time pulling the tape off when you’re done.  Isn’t it worth it to do all of that and end up with perfect results?  Isn’t that worth an extra $2?

OK, that’s enough said.  Instead of reading, do a little viewing.  Here’s a video that will give you crystal clear proof that this tape’s worth the money!  Check it out:

Paint Colors, Light Bulbs and John Boomsma

boomsma2The other day, I received a call from the Manager at our Jenison RepcoLite, John Boomsma (see inset).  He had just run into a crazy situation in the store and figured I could make use of the information on our blog.

John explained that he had received a phone call earlier in the week from a customer who was extremely frustrated.  She was at a loss–didn’t know what to do.  See, she had just painted two rooms in her home.  As most people do when getting ready to paint, she had agonized for a few days or weeks over colors.

Finally, after much effort and after asking her family 100 times which color they liked the most (and then opting for the color she liked the best despite what they said), she painted both rooms.

And that’s when things got weird.

In room 1, she loved the color.  It was perfect.  It blended with the fabrics, the carpet, the trim and so on.  It was exactly the look she had wanted.

However, she was shocked to discover that she hated room 2.  The color looked terrible with the fabrics, the carpet, the trim, and so on.

The weird thing?  The color was the same in both rooms.  So was the fabric.  And the carpet.  And the trim.  Identical rooms painted with the exact same color out of the exact same gallon and room 1 looked beautiful and room 2 looked terrible.

So she called RepcoLite in Jenison where she bought the paint, wanting to know what was going on.

Now, I’ll admit that while John was telling me this story, I was a little intrigued.  These things are sometimes like mysteries and it can be fun and rewarding to puzzle them out and find a solution.  However, I have to be honest:  I wasn’t sure, from what I was hearing, what the problem could possibly be.

I assumed maybe a paint color problem.  Maybe the roller she used had paint in it from another job.  Maybe the previous color on the wall was showing through, making the color in room 2 look different.

I had a number of different theories, but then John said “you know what the problem was?  You know what went wrong?”

I waited.  He waited.  (Turns out he wanted me to say “no, I don’t know what the problem was” before he’d continue.)  So I admitted ignorance (which made him happy), and he explained, in a single, compound word:  “lightbulbs!”

He went on to explain that the customer had an incandescent lightbulb in room 1–the room she loved.  In room 2, the lightbulb was one of those fluorescent, energy-saving bulbs.  The tone of the light coming from each of those bulbs was enough to visually alter the color on her walls.

The fix?  Simple:  change bulbs.

The customer tried the fix and was back in the store a day or so later to report that everything turned out well.  Instead of repainting a room–going through all that work and spending that extra money–all she had to do was change a lightbulb.

So the point of the story, if it’s not obvious, is this:  lighting matters!  Check out your colors in your room, in your lighting before you buy and before you paint.  And likewise, before you give up on a color that you thought you liked but find that you really hate when you see it on your wall, give some thought to the lighting in your room.  Could a simple changing of a lightbulb make all the difference?  It’s at least worth a try!

5 Tips to Help With Touch-Up Painting

bigstock-Couple-painting-home-5695270I received a question in my email the other day regarding touching up some paint on a wall. The question was a good one and I thought I’d spell out a few simple tips here that will help make your next touch-up job go a little easier.

1. MAKE SURE IT’S THE RIGHT COLOR

It happens often: you paint the walls a certain color and then pick up another gallon of paint in a slightly darker color. It looks great. Until 2 years later when you grab that darker color by accident and use it to touch up spots on your lighter walls. Suddenly a quick touch-up project becomes a repaint. If you’ve worked with multiple shades of similar colors, never assume that the gallon you grabbed is the right color. Always test a sample in an inconspicuous spot before proceeding!

2. EVEN IF YOU’RE “SURE” IT’S THE RIGHT COLOR, CHECK IT

What I mean is this: even if you never used multiple shades as described above and you’re absolutely, 100% positive that you are holding the can of the paint you originally used on your walls, you should still check that color. Yes, it was originally the right color, but things have changed. The paint on your walls typically darkens and deepens over time. And even in the most immaculate households, it can sometimes get a little dirty. What that all adds up to is that the paint on your walls may no longer match the paint in that original can. So don’t do what so many folks do and touch up 27 silver-dollar-sized spots on your wall only to find out the next morning that every single one of them is lighter than the wall paint. Instead, sample a small area first, allowing the paint to dry down adequately, before you begin touching up.

3. IF THE PAINT’S TOO LIGHT, FIND A SWITCH PLATE

This tip is pretty self-explanatory but sometimes folks don’t realize just how many options are truly open to them. If you check your color before touching up and discover that it’s too light–don’t panic. All you need to do is look for something in your room that has your wall color on it. This can be a switchplate, a piece of trim, a picture frame or anything along these lines. If you can’t find anything like that, another option is to simply cut a small, shallow hole in your drywall and remove a quarter-sized sample. Take this sample and bring it to RepcoLite and we’ll custom match a color for you so you can accomplish your project.

4. PAINT CORNER TO CORNER IF POSSIBLE

OK, once you have your color figured out, it’s time to actually do the work. And the ideal way to do any touch up is to look for an obvious breaking point in a room and paint a larger section. What I mean is this: ideally, don’t touch up 25 quarter-sized spots on your walls. Rather, paint that one wall corner to corner with your new color. Or paint from your built in cabinet to the doorway. Basically, look for a breaking point and paint a larger section. This will help your new paint blend in visually much better and makes the whole process of touching up much easier.

5. APPLY SMALL AMOUNTS OF PAINT USING THE ORIGINAL APPLICATION TOOL!

Sometimes, you just don’t want to paint corner to corner. Sometimes you simply want to do the little touch-ups. When that’s the case, here’s the best way to tackle it: First, make sure you use the application tool you used to originally applied the paint. If you brushed the paint onto the surface originally, then use a brush to do your touch-ups. If you rolled the paint onto your walls, then use a small roller of similar nap to do your touch-ups. And, when you’re doing these, use small amounts of paint and put some care and effort into feathering them out.

Touching up our walls doesn’t need to be complicated. But it does take a little effort to do it well. If you follow these tips, you should have no problem pulling it off!

3 Paint Storage Methods that Don’t Work!

vicks
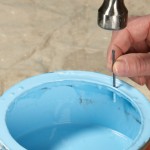
Have you ever noticed that when you’re sick, everybody is suddenly a doctor.  Everyone has an opinion and a cure for what ails you.  And while some of the cures are very common–chicken soup cures, we could call them–others are anything but.

For example, one older gentleman I know–who will remain nameless–uses Vicks VapoRub whenever he has a cold.

Now, you may say:  “What’s so strange about that?  Many folks use Vicks VapoRub when they’ve got a cold.”

And of course, you’re right.  Many folks do.  But the older gentleman I know uses it (and has recommended that I use it) in a very unusual manner:  He eats it.  By the spoonful.

Yes.  Whenever he’s sick or feels that “under-the-weather” feeling starting up, he heads straight to the medicine cabinet with a teaspoon and downs a spoonful of Vicks VapoRub–that greasy, Crisco-ish paste.  Somehow he swallows it down and, “almost instantly” (he says) the soothing Vicks vapors make him feel better.

Needless to say, I’ve never tried it.  Nor do I recommend that anyone else ever try this.  Yes, my friend is 80+ years old, but I certainly do NOT attribute that age to eating Vicks.  I believe he’s achieved a fine old age in spite of Vicks.

At any rate, when you’re sick, everybody comes out of the woodwork with suggestions and recommendations to make you feel better.  Some make sense, others are of the “eat-a-spoonful-of-Vicks” variety.

Well, the same thing happens whenever you paint:  There are tons of different tips and tricks people recommend for everything from opening the lid to applying the paint to storing it on your shelves.  Today I want to focus on several common methods recommended for paint storage but which, in fact, actually do more harm than good.

Pound Some Nails in the Rim!

The first method I want to debunk is the Pound Some Nail Holes in the Rim Method.  Now, technically, this isn’t nails in rima paint storage tip.  It’s actually a painting application tip, but I’m including it here because it can radically affect your ability to store paint when you finish the job.

Now, the point of the method is to pound nail holes in the rim of your paint can so that all the paint that collects there as you paint, actually drips and drains back into the can.  Oh, it sounds like a great idea and many, many folks (me included at one point) have tried it.

However, the problem with the method is this:  those holes (as well as the process by which they’re created in the rim), can actually damage the rim of the paint can, dramatically reducing the ability of that rim to create a good seal with the lid.  That’s just a fancy and long way of saying:  pound holes in the rim of your can and you’ll find that you can’t seal the can very well later.  Oh, the lid may go on and may look tight, but you’ll often find, when you open it later, that the seal was very poor and your paint has dried out significantly.

So, all that to say:  don’t pound nail holes in the rim.  Instead, simply keep that rim clean of paint.  Or, if you happen to get paint into it, clean that paint out before trying to affix the lid.

Store the Can Upside Down!

upside downThe second method I’d like to address is the common Store the Paint Can Upside Down method.  The theory behind this concept is that air will leak in through the lid.  If you turn the can upside down, the air will not be able to sneak in and therefore, your paint will stay good longer.

The problem with this theory is that often, the bigger problem in a can–the reason paint can dry out so often in a closed container–isn’t so much that the air is leaking in.  It’s because the air’s already in the can when you close it.

If you’ve got a half-full gallon of paint and you pound the lid on and store it–upside down or rightside up–the air that fills up that empty half of the can will start drying the paint that remains.  If you leave the can rightside up, this air will cause a thick coating to form on the surface of the paint and on the exposed sides of the can.  If you turn the can upside down, the same thing will happen, only on the bottom.

This is frustrating enough when the can is rightside up, but at least that way, the skin is on the surface of the paint and you can see it and easily remove it before you do any stirring or shaking of the paint.  However, if you stored the paint can upside down, the skin forms on the bottom side of the can.  All the clumpy stuff, the junk, the bad, unusable paint is at the bottom of the can where you can’t see it when you open it up.

At first, you’ll turn the can over, pop the lid, see good paint and think your “upside-down storage” method worked.  But when you drop a stick in and start stirring (and break up and spread the clumped paint all through the good paint) you’ll realize the flaw inherent in the system.  Unfortunately, by then, it’s not very easy to get the clumped, dried paint out of the good paint without straining it.

So, we recommend simply storing the paint can rightside up, but taking precautions (as we wrote about here) to make sure the can is as full as possible before storage.

Use Plastic Wrap!

The third storage recommendation that is often tossed around is the Place Some Plastic Wrap in the Gallon andplastic then Pound the Lid on method.  This is supposed to create an extra seal between the rim and the lid and prevent air from seaping into the can.

That’s the idea anyway, but unfortunately this method usually fails because most often the plastic, rather than augmenting the natural seal between lid and rim actually compromises that seal.  With the plastic in there, the lid can’t seal as tightly as it could without the plastic and the result is air leaking into the container.

You’re much better off to do as we recommended above and simply clean the excess paint out of the rim before pounding the lid on.  That way you won’t need the plastic at all.

And there you go:  3 different methods recommended on the internet and home improvement shows that just don’t work all that well.  For my money, avoid these crazy solutions (and of course, avoid the earlier solution regarding eating a spoonful of Vicks) and stick to the ideas we recommended here!

4 Simple Tips for Perfect Paint Storage

paint_cans_on_shelfThe search for the perfect method to properly store paint is one of those Holy Grail-type quests in the painting world.  Everybody everywhere has an idea (or two) as to the best ways to ensure that your paint doesn’t dry out in the can as it sits on your shelf.

Some people argue that the ideal thing to do is to store your can upside down–because it will prevent air from seeping in.  Others claim that the best thing to do is to lay a sheet of plastic wrap over the opening before pounding the lid on: this will provide an extra seal, again preventing air from seeping in. Some folks pour water into their paint before they store it, others coat the rim with vasoline, others vacuum seal the can little plastic bags.

The ideas are endless, but really, most of them either don’t work or simply aren’t necessary.  (We’ll deal with some of these methods and discuss why they don’t work and should be avoided in a later blog entry).

For now, instead of focusing on all the novelty ideas out there, here are 4 tips–solid, reality-based tips–that will help you make sure that the paint you store today will still be ready to use in a few years.

1. Transfer your paint to a smaller container you can fill to the top.

If your paint gallon or quart is half full or less, don’t just pop the lid on and store it that way–it will dry out quickly.  Instead, move it to a smaller, sealable container that you can fill to the top. This will keep it in liquid form much, much longer.  A variety of different containers will work in these situations–the key is that you’re able to fill the container AND that it will seal well.

2. Keep the rim of your container free from built-up paint.

Many people use the rim of their can as a “wipe off” point for their brush.  As a result, paint accumulates in the rim and can often be dried and hardened by the time you’re ready to put the lid back on.

Avoid this by using a pour spout (available for less than $1 at any RepcoLite store) and working out of a secondary container (this is important for other reasons as well–see here).  This way you can keep the rim of your paint can clean and free of paint.

When you’re finished painting, take a couple extra minutes, before storing your paint on your shelf, to wash and clean out the rim so that your lid can achieve a good, tight seal.  If there’s paint in the rim you can’t clean out because it has hardened, use a rag and some hot water.

thor-861755_1920

A relatively bored-looking Thor.

3. When putting the lid on your container, use restraint!

You may have the power, the rage, the enthusiasm of Thor (see inset and then imagine more power, more rage, and more enthusiasm), but please, don’t use those superpowers when pounding on the lid.  It will only result in sorrow, misery and a bad seal that will cause your paint to dry out prematurely.

See, pounding the lid on with extreme force (some might say ‘brutality’) never works.  We’ve all done this.  We’ve all thought “if I just hit it hard enough, it will go on.”  Well, it doesn’t.  It just bends the can, warps the lid and prevents the can from ever sealing well again.

So use restraint.  If you follow Step 2 and keep the rim clean and free from paint, you should be able to tap the lid gently on with a small rubber mallet.

4. Store your paint in an area that is not subjected to extreme temperature changes.

This rules out most of our Michigan garages.  Once latex paint freezes and thaws, it’s usually unusable–so find a good storage place in an area with controlled temperatures.  (Think basement or lower level storage area!)

Do these things, take these precautions and you’ll find that 5 years from now, when you need to do a couple touch-ups, your paint is still usable and in perfect shape.

The Vile Showerhead (or, Finding the Dread-Free Life)

shower-1027904_640(1)I’m a “dreader”.  That’s not a word–I know that.  But that doesn’t change the truth:  I dread things.  On a regular basis.

For example, I re-decorated my bathroom about a year ago.  I put wood planking on the walls, hung some wallpaper, stained and varnished new trim, installed a new (bowed) shower rod and new curtain and finally, to finish the whole thing off, I installed a new shower head.

Which was the biggest mistake I made.

See, right after installing it, my wife marched right in, closed the door and proceeded to take a 45-minute shower.  When she was done, the kids all marched through, one after the other.

When the shower marathon ended that day, I opened the bathroom door and it was as if a cloud had localized in that tiny room.  I literally couldn’t see the other side through the steam.  The little ceiling fan was working overtime, but there was no way it could keep up.

“Fortunately,” I thought, trying to wave away the steam, “this is something that won’t happen everyday.  Once the ‘newness’ of the shower head wears off, we’ll go back to having to fight the kids to take baths.”

Nope.  Not a chance.  Every single day since the installation of that vile shower head, our bathroom is engulfed in steam.  Shower after shower, hour after hour:  steam, steam, steam.

Well, that went on for a long time and then the inevitable happened:  the mold started growing around the edges of the ceiling.  The wallpaper started peeling and curling up on all the seams.  My beautiful bathroom had gone from a place of despair to a place of beauty and then back again to a place of despair all in about 6 months time. It was depressing to say the least.

And that’s where the “dreading” comes in.  Everyday, I’d look at the ceiling and see the mold or the wallpaper and see the peeling and I’d dread the “fix-up” job that was to come.

I dreaded it because it seemed like such a big job:  fixing the mold, fixing the paper, repainting the ceiling.  I’d just gone through some of this work and now, thanks to that dumb shower head, I had an even bigger mess to fix.

And so I stared at it for a long time.  I thought about it.  I tried to ignore it.  But most of all I dreaded it.

Until finally I got so sick of being depressed and frustrated about it that I actually fixed it.

I took a week and on a Monday night, I sprayed the mold with a bleach solution and scrubbed the ceiling.  That took me exactly 17 minutes.

Two nights later I came back with more bleach–no scrubbing this time, just the bleach on the mold.  That took about 7 minutes.

On Friday night I went around the room and primed all the previously moldy spots with ProFlo Alkyd primer and then I re-pasted all the peeling paper.  That night’s work took about 15 minutes.

Finally on Saturday, I got ready to paint the ceiling and finish the job.  I was ready for a big, painstaking job (I hate painting ceilings) but I was surprised to find that the whole thing took about an hour from the time I opened the can of paint to the time I put the paint back on the shelf in the workroom.

In the end, I realized that the job I’d dreaded for the last 6 months or more had taken me less than two total hours to fix.  In my mind, I’d exaggerated and inflated and imagined the work to be 10x worse than it was.  I imagined the mess, the problems to be 10x less fixable than they were.  I imagined the pain to be 10x greater than it was.

I’d spent 6 months feeling bad and frustrated and almost (in a sad and pathetic way) depressed about a room that took me less than 2 hours to fix.

So how does this apply to you?  Well, I can’t speak for you, but I’ve talked to many folks in the paint store at RepcoLite who feel the same way I was feeling.  They’re frustrated about the seemingly endless amounts of work needed in their homes.  They look at the jobs and the work to be done and assume that they’re worse than they really are.  And so they do what I did:  they put them off and they stew on them, thinking about them and mulling them over in their minds for months until the jobs seem even bigger and more horrible.  In short, we dread them and waste our time worrying about them and frowning over them.

But what we really should be doing is “doing” them.  The jobs aren’t as bad as we think.  They’ll go smoother.  They’ll go more quickly.  They won’t be as painful.  And best of all, once we’re done, you’ll notice what I noticed:  a real sense of relief and freedom from the work that had been hanging over my head.

So, bottom line:  If you’ve got a project that’s creating that feeling of dread, jump into it.  Get it accomplished.  And then kick back and enjoy the dread-free life…