A Little Color Here, A Little Color There

Many times, people think that in order to create a room with some “visual pop”, they’re going to need to pop open a gallon of Safety Orange paint and roll it all over their walls.

We tend to view that big transition from the world of “neutral” to the world of “color” as being . . . for lack of a better word . . . violent.  And not everybody is up to the challenge.  Not everybody has the intestinal fortitude to make such a bold shift.  And so, as a result, there’s often a feeling of frustration that builds in the home decorator who’s trying to make the change.

There’s the desire to step out into the world of color, but there’s the fear they will go too far, lose control of the color and  let it overpower their room.

And so, in the end, what often happens is this:  the people on the verge . . . the ones who’d like to bring in color, but who are a little nervous, usually end up reverting to whatever was on their walls in the first place.  Maybe they try for a darker tan than they had before, but typically, they stay in the same, safe color range.  When the room is finished and the new paint is dry, they often feel a little sense of disappointment–it doesn’t look terribly different from the original.  It’s safe.  It feels boring and blank.  And yet the alternative–walls splashed with Fuschia and Teal and Turquoise and Lime Green–seems too crazy, too schizophrenic.  And so, they come to despise home decorating projects.

Well, if you’ve ever found yourself in that place–if you’ve ever wanted to step out boldly with color, but have been too nervous to try it . . . well, I’ve got good news:  It can be remarkably easy and, most importantly, SAFE.  All you need to do is this:  bring your color in with accessories.

It’s a simple solution and it’s used by Designers and Professional Decorators all the time.  It’s the ideal way for those just stepping into the world of color to get their feet wet.  You simply find a nice, calm, reasonable, safe neutral tone for your walls and then spice it up with accessories.

Paint some of your boring picture frames bright pink and green.  Maybe stripe a couple of them and mount them.  Or maybe, take a look at your dresser.  Maybe you don’t want to paint the whole thing, but what would happen if you painted two of the drawers?  Or, what if you’d paint just the top?

green_roomPick up some simple shelves and splash them with a bright color and you’ll be amazed how much character they display.  These simple, boring, run-of-the-mill shelves suddenly look like designer pieces when we see them in a pink or a bright yellow.

And what about that boring lamp on the desk?  What if you’d paint the base white or neutral and then pick up a bright lampshade?  Or, reverse that:  keep the lampshade white and simple and paint the base a bright color.

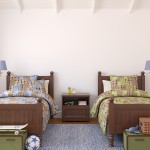
One of the most impressive uses of color in a small room that I’ve ever seen is pictured above.   They made perfect use of this concept:  the walls are a light, neutral green.  They’re safe.  Simple.  Dangerously boring.  But then, the designers added the dark brown bedspread and the brown picture frames.  These constituted another earthy color, another safe choice, but they added to the overall effect.

The bench with the darker green stripes goes even farther towards adding some visual interest, but I think it’s easy to see that even then, the whole room has a very safe feel to it.

And then there’s the bed.  The bright green on the bed suddenly gives the room a shot of life.  It makes it vibrant, exciting . . . the kind of place you walk by and then walk back to so you can take a longer look.

And the reason it works so well is twofold:  first, the green is so bright and bold that it instantly grabs your attention.  Secondly (and more importantly), the green is in the last place we’d normally think to look.  In a normal situation, the bed might be brown and the frames might be lime green along with the legs of the bench.  And if that were the case, I don’t think the room would have it’s flair . . . it wouldn’t make the statement that it does here.

But instead of doing that, these designers “messed with” our expectations and, in so doing, by putting the color in the last place we’d expect to see it, they created something that really stands out. The color in the room isn’t overpowering, but the intelligent, controlled use of the bright green pumps vibrant life into the setting.

And that’s what I’m talking about.  You don’t need to go crazy and cover your walls with  circus colors in order to spruce up your rooms and infuse them with energy.  You can do it through accessories, through the compelling choices of bright colors and interesting items, through the intelligent, well-thought out placement of these colors in areas we might not usually expect them.  Remember, you don’t need a room full of color to make a statement.  You just need the right colors in the right locations.

Quick Project: Striped Frames

striped_frames
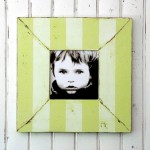
I found the picture frame at the left when I was cruising around the internet.  It was pretty much the type of frame I needed for a particular project I had in mind.

However, there were two problems:  first off, the frame I found, the one in the picture here, came in that color green.  And that’s the wrong color green.  I needed a slightly darker, less olive green than what’s pictured here.

But that’s not important.  Color’s not important, because the second problem with this frame was that the asking price was . . . wait for it . . . $120.  Yes.  Apparently, the child in the photo comes with the frame.

Needless to say, when I saw the $120 price tag, I quite naturally backed off and closed the computer down for fear that I might mistakenly bump a couple of keys and put that obscenely-expensive frame into “my cart.”

A couple days later, I was back, looking for more frames.  And I found them.  And this time, they were a real bargain:  only $40.  They looked nice and were mostly (again) what I wanted . . . though the colors weren’t perfect and the price was still (in my opinion) high.

I was just about to toss them into “my cart” when inspiration hit me:  I work at RepcoLite.  I deal with paint all day long.  Why in the world would I buy a frame like that for $120 or even for $40 when I could turn a frame I already own into the same thing for free?

See, I’ve got the perfect frame at home–it’s just got a gold-leaf look to it and I don’t want that anymore.  I also have a couple quarts of two different greens at home because I painted a dresser earlier this year for the same room.  From there, I put it all together and came up with a great, quick, simple, money-saving project that I’m going to pass along to you as today’s “Quick Hitter.”

What You’ll Need:

  • 2 quarts Hallmark Ceramic paint in your desired colors (check your basement shelves or stop out at RepcoLite!)
  • 1 can of flat black spray paint
  • 1 picture frame
  • Sandpaper
  • Brush
  • 3M Safety Release Blue Painter’s Tape
  • Old newspaper or a plastic dropcloth to protect your work area.

How to Do It:

This project is about as simple as it gets.  Just start by doing a light scuff sanding of your picture frame (with the glass removed, of course).  Just dust over it to take some of the shine down–you’re not trying to bring it down to bare wood!

Once you’ve done that, wipe it clean with a dry rag.

After wiping it down, place the frame on a large sheet of plastic and spray paint it lightly with your FLAT black spray paint.  Don’t try to make the first coat cover if it doesn’t seem to want to.  Multiple light coats are much better than a single heavy coat.

Once the frame is coated solidly black and is completely dry, take your lighter color of Hallmark paint and apply it to the entire frame.  If you need a second coat, apply it when the first coat has finished.

Now, once that initial color has dried (overnight to be safe), take your special 1″ Safe Release 3M Painter’s Tape (you’ll notice it should have an ORANGE cardboard core) and apply it in straight lines down your frame.

To mimic the look of the frame above, just run the tape down the parts or areas of the frame where you want the original color–the lighter color you first painted–to show through.  Leave the other areas untaped and  paint over them with your darker color.  As soon as you’ve finished, carefully remove the tape.  You don’t want to pull it too quickly or it could lift your original coat of paint off.  (And, just a quick note:  that’s why we recommend using 3M’s Safe Release Blue Tape.  Any other tape is lightly going to cause problems).

Once you’ve removed your tape (and have let the frame dry), you should have a chic, hip and happening striped frame that you can incorporate into your decorating.  If you want to get fancier yet, go ahead and scuff the frame slightly to distress it, bringing out the undercoat of black along the edges.

Conclusion and Suggestions

Now, possibly, this project sounds complicated and long, but let me assure you:  it’s not.  You should be able to easily accomplish it with a total work time of about 1 hour per frame (at the very most).  Doing multiple frames at the same times will also save you a fair amount of time.

And finally, if you decide to give this project a try, go ahead and get creative beyond the scope that I’ve already described: Alternate the color patterns on multiple frames, vary the sizes of the stripes.  Run the stripes up and down on some frames and side to side on others.   Overall, just have fun with it and realize that with the right paint and a little creativity and energy, you can duplicate almost anything you see at a home decor store–for pennies on the dollar!

Quick Project: Framed Handprints

blueframe_handprint

If you’re looking for a quick project that can make a huge impact in a room, check this one out!

What You’ll Need:

  • 1 Quart Hallmark Ceramic Matte Paint from RepcoLite (it’s the best, afterall!)
  • 1 Quart RepcoLite’s Prime-All Waterbased Primer
  • 1 picture frame
  • 1 scrap of wallpaper (or decorative paper) big enough to fit in frame
  • A few sheets of heavy-duty artist paper
  • Some old newspapers (to protect your work area)
  • An old paper grocery bag
  • Double-sided tape or photo adhesive

How to Do It:

This is a great project that will take you very little time, but that will pay off big in terms of visual “pop” in your home.

Just start with a standard picture frame. If it’s already stained and finished, then do a light sanding with some 150 grit paper and prime with RepcoLite’s Waterbased Prime-All primer. Once it’s dry, apply the Hallmark Ceramic Matte finish paint in whatever color you selected using either a roller or a brush.

Set the frame aside to dry (with Hallmark, it will only take about 30 minutes or so to dry).

While the frame is drying, take your scrap of wallpaper or your decorative paper (picked up cheaply at any hobby store with scrapbooking supplies) and cut it to fit inside the frame.  (A simple way to do this is to save the paper insert that came with your frame.  Use this as a template).

Anyway, cut the wallpaper or decorative paper to fit the frame and set it aside.

Once you’ve got these things accomplisblackframe_handprint2hed, it’s time to create the handprint in the center.  Now, this is not a difficult process, but there are a few things to know that will make your results turn out well.  First, you’ve probably seen this done before (at school) where the handprint is “globby” and, well, for lack of a better word…ugly.  The reason this happens is because kids usually mash their hands down on the paper while they’re covered with way, way, WAY too much paint.

The easy way to fix that is this:  carefully brush the paint you used to paint the picture frame onto your child’s hand (if you’ve used Hallmark Ceramic, it’s perfectly harmless–though you will want to supervise for obvious reasons).  Making sure your child doesn’t touch everything in site or eat the paint, help your child press his or her hand onto a paper grocery bag.  Do this a number of times until you start to see a clearly defined handprint.  Once you get to that point, shift from the paper bag to the sheets of heavy duty white artist’s paper.  Help them firmly press their hand onto the paper and then help them lift their hand off without smudging the print.

Maybe make a couple just to be sure you get a good one and, while those are drying, wash your hands and clean up your supplies.

When everything’s dry, cut the handprint paper down and tape it or affix it using photo adhesive to the center of the wallpaper scrap.  Mount everything in your frame, hang it up and there you go:  something cool, something unique, something that will serve as a great memory and something that will add some visual pop and interest to your room!

A New Room in a Gallon Can

bigstock-Bedroom-For-Two-Children--95587847_smallerRemodeling projects can get expensive. Quickly. Start tearing out flooring and knocking down walls and before you know it, you’ll find that a little re-do project has grown into an expensive, all-encompassing home remodel.Continue reading

More Unique Headboards

I’m kind of frustrated.  See, I would love to try some of these headboard ideas I’ve been writing about in my own home–but I can’t.  Or really, to be more accurate, there’s no point.  The beds we already own are adequate and they don’t lend themselves to this project.  So I’m kind of frustrated.  But, I take some comfort in the fact that I can still write about these and get you thinking about them and hopefully convince some of you to give the ideas a try.

Anyway, I’m going to breeze through a few ideas today with only brief descriptions or information.  I think these particular ideas are pretty basic and don’t need too much explanation.

picket_fence_headboard

PICKET FENCE HEADBOARD

It’s just like it sounds.  Buy either a section of Picket Fence at the lumber yard, or build one specifically.  Since you’re using it inside, you could easily build it out of regular pine and then simply prime and paint it for that clean white look.

If you opt for this . . . don’t let yourself leave the motif without completing it.  You’ve installed a picket fence in your bedroom . . . that means you need lots of greenery and “outdoorsy” stuff.  Possibly sky blue walls, possibly (in a kids room) a tree mural.  Maybe you need to wind some “greens” or “vines” through the slats of the fence.  Whatever you do, have fun with the theme and build on it.

CHANGING SCREEN HEADBOARD

Here’s another idea that I think has a ton of potential.  Buy or get your hands on (lawfully, of course!) one of those changing screen things you see at home decor stores and then it’s up to you how creative you can get.

Some of these screens are frames with scrolling and winding metalwork.  That’s fine.  They can be mounted directly behind the bed as is.  I’ve seen other screens that are like the screen on the right.  This one had a uniform brown canvas backer that was removed and replaced with the black and white fabric.

Again, whatever you do is up to you . . . the point is . . . think beyond what you immediately see!

WOOD SHIM HEADBOARD

shim_headboard

I don’t know exactly how this one was done, but it seems to be more about patience than skill.  It’s made entirely of those little wood shims can pick up at any lumber yard.  They were probably sanded (though not necessarily) and varnished when the look was completed.

However they were put together, the look is a weird combination of modern . . . and warm and woodsy . . . you could really go any direction with something like this.

And there you go . . . a bunch of ideas for headboards.  And the point, above all, is to remember to think creatively when a need arises.  When you need a new headboard for a bedroom, you could jump in the car and drive to the home decor store, pick one out, and call it good.  Or, you could get creative.  Maybe you’ve already got everything you need for the perfect piece.

Old Shutters Headboard

Picture from M.E. Beck Design, Inc. at mebeck.com

Picture from M.E. Beck Design, Inc. at mebeck.com

In keeping with some earlier posts about headboards, here’s another idea worth your time and attention:  what about using old shutters?

This idea works especially well if you’re interested in a distressed look (as we see in the picture at the left).  If that’s the look you’re going for, it doesn’t matter if the shutters are old, chipping, faded or even broken (note the second white shutter).  All of those things play into “the look.”

So, whenever you’re wandering through a large flea market or a mission store . . . keep your eyes open for little treasures like these!

VARIATIONS

  • BUILD YOUR OWN.  Now, if you can’t find some plantation shutters like the ones above, don’t worry–you could still imitate the look with some very simple exterior shutters.  And if you can’t find any wooden ones for sale, you could easily build your own.  Just take a look at the picture to the right for inspiration.  The shutters don’t need to be complicated.  Just create some shutters, finish them in whatever style appeals to you and mount them.
  • MIX and MATCH.  Don’t be afraid to combine headboard ideas into one.  For example, an obvious combination would be to start with 1 old window and then install a shutter on either side of it.  Go crazy and complete the look by building a small flower box underneath the window with greens or real potted plants.

Whatever you do, as with all these ideas, have fun.  Don’t jump at the first idea that crosses your mind.  Think about it for a while . . . turn it over in your brain . . . and you’ll be surprised how creative you really can be!