Steel Doors Revisited: Surface Prep on a New Door

bigstock-Blue-Doors-7834138

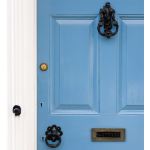
Yep. It’s probably a wooden door. But use your imagination…

In an earlier article, we talked about painting your old steel doors.  And while all that information was absolutely flawless (!) in it’s delivery, it’s probably important that we take a second here and attach an addendum.

See, we often talk to people in the store at RepcoLite about their new doors and we usually discover there’s a misconception as to what needs to be done.  Most people tend to think that since their steel or fiberglass door is NEW, they need to do no prep work.  It’s one of the perks of buying a new door, right?

Unfortunately . . . wrong.  New doors, even if they’re pre-primed, need to be prepped correctly.  Even if they’re new, they can be covered with surface contaminants that can affect the adherance of your finish coat.  So, even though your door may be new, it still will need to be prepped correctly before you move on to the paint.

Here are the steps:

  • SCUFF SAND:  Do a light scuff sanding of the door with some 120 – 150 grit paper.  Even though the door is pre-primed, it never hurts to dust over it lightly with some sandpaper to level out any bumps in the primer coat.
  • WASH THE DOOR:  After you’ve sanded the door, be sure to wash over it with TSP (TriSodium Phosphate).  This will remove the dust you created while sanding AND it will remove any contaminants that could be on the surface (body oils from installation, airborne dirt and grime, etc.)

Doing those simple prep steps will help ensure that the paint job on your new door will look great for years to come!

Painting a Steel Door

bigstock-Blue-Doors-7834138

Yes. This is probably a wooden door. But we bought the picture, so we’re going to use it! Just use your imagination…

Painting a steel door is one of those projects that can make a big impact on the exterior appearance of your home.  And if you do the project the right way, you’ll be enjoying that color for years to come.

If you’re thinking about sprucing up your front door any time soon, follow these tips and steps to make sure the project goes as easily as possible:

  • REMOVE THE DOOR and THE WEATHER STRIPPING:  If possible, you’ll have your best success if you can completely remove the door from the frame and set it in your garage or your basement on saw horses.  If you can’t remove the door, don’t sweat it–you can still do a good job, though you’ll need to be a little more cautious with paint runs, etc.  Also, many doors allow you to remove the weather stripping.  This is ideal.  Remove it (paying attention to how it will go back on) and store it somewhere safe.
  • REMOVE THE HARDWARE:  Whether or not you can remove the door from the frame, the next step is to remove the hardware.  Remove the hinges, the door knobs, and the kick plates.  You can paint around them or tape them off, but leaving them on makes all the subsequent steps more complicated and more time consuming.  So, remove them if at all possible!
  • SURFACE PREP:  As with any painting project, failure or success is usually determined before you even open a can of paint.  If you’re painting over a previously painted door, you need to make sure that you sand and scrape at all the paint to ensure that what remains on the door is stuck down well.  Sand the door with 120 grit paper (you’re lightly sanding it–not trying to leave visible grooves).  And then, after sanding and scraping, wash the door down well with a solution of TSP (TriSodium Phosphate).  Quick Tip:  When using the TSP, scrub the door down with a 3M Scotchbrite pad (a little green scrubby pad you might use on dishes).  This will serve to dull and etch your previously painted surface and will aid with the bonding of the new paint!
  • PRIME (if necessary):  After you’ve sanded and washed the surface, you should prime any bare metal spots with RepcoLite’s 449 Grey Metal Primer.  This is an oil-based, rust-inhibitive primer, that’s perfectly suited for these situations.
  • BRUSH or ROLL YOUR DOOR:  Either using a high-quality brush or a small, quality 4″ or 7″ roller, apply your paint to the door.  We recommend applying RepcoLite’s Endura Acrylic Latex Paint for the most durable, longest lasting finish.  Work evenly and quickly, starting with the inserts and then finishing up with the remaining flat surfaces of the door.  Apply coats as needed.
  • LET IT DRY and RE-INSTALL:  Let the door dry at least 8 – 12 hours (longer if possible) and carefully re-install it.  UNDERSTAND:  Latex paint will dry to the touch in a matter of hours, but it doesn’t reach it’s full hardness for about 30 days.  You don’t need to leave the door off the hinges for 30 days, but keep in mind that just because it’s “dry” that doesn’t mean it’s as strong or durable as it’s going to be . . . so go easy!
  • RE-INSTALL WEATHER STRIPPING LATER:  If you can leave the weather stripping off for 10 – 30 days, that’d be in your best interests!  As mentioned earlier, the latex paints will dry quickly, but if you close the door and press it against the weather stripping too soon, it’s entirely possible that the paint will peel around the edges when you next open the door!  If you can leave that stripping off for a couple weeks or so before re-installing it, you’ll minimize your risks.

FINAL TIPS and PARTING THOUGHTS

  • COLOR MATTERS:  Dark colors fade quickly.  Red can be especially bad.  Also, reds can cover poorly.
  • NO SHORTCUTS:  One of the worst things you could do when painting a door is try to make a coat of paint cover in 1 coat when it probably needs 2 or 3.  The best advice we can give you on this one is to apply EVEN coats.  If you’re color needs 2 – 3 coats of paint, then resign yourself to applying 2 – 3 coats of paint.  If you try to make it cover by applying it too heavily, you will have all sorts of problems on your hands.  The paint will run and sag; it won’t cure or dry well and you’ll find it sticking to your weather stripping and causing all sorts of other problems!  So, don’t rush it.
  • GIVE IT TIME TO DRY:  Latex paints dry to the touch very quickly, but don’t let that fool you into applying too many coats too soon.  Apply a coat and let it dry for an hour or two before trying the second one.  Sometimes you could apply those coats as quickly as 15 – 20 minutes after each other (it dries that fast), but in the end, you’ll only run into problems.  So give it the dry time the can recommends.
  • LATEX IS BETTER THAN OIL:  Latex Acrylics (like RepcoLite’s Endura) will outperform oil based products.  They’ll hold their color better and they’ll endure the constant expansion and contraction a steel door experiences much better as well.
  • PAINT IN THE SHADE:  Paint when the sun isn’t directly on the door.  And ideally, paint before or long after the door’s been exposed to the sun.  Steel doors will heat up significantly on a summer day and if you get on it and start painting too soon, or when it’s too hot, you’ll have trouble with your latex paint.  It will dry much too quickly and you’ll end up with streaks and roller marks.

I could go on and on, but you get the idea.  This is a project that usually can be accomplished in just a few hours.  It’s not complicated–and if you take the steps we’ve outlined (and check with any RepcoLite store for more information if you have questions) you’ll be fine!

Tri-Fold Door Headboard

In an earlier post, we talked about using a standard paneled door as a headboard.  Here’s another take on the “door as a headboard” idea that really offers you a ton of creative opportunity:  create a headboard from a set of tri-fold closet doors.

Now, admittedly, this is maybe a bit more expensive than some of the other ideas–you would need to pick up a set of doors if you don’t have them–but the project will produce a very unique and interesting result that’s probably worth the expense.

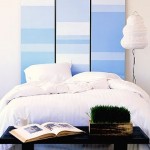
Here’s how to achieve what you see in the picture, as well as some other variations you could try:

Stripes, Stripes, Stripes

As we see in the picture, stripes can create a calm, soothing, clean and somewhat modern feel in a room.  And the good news is that accomplishing a look like this is much easier than you may think.

However, before we spell out the “how-to’s” regarding this project, let me start by saying that the biggest, most important tool you’ll need (besides the doors and the paint) is the right tape.  Trying a project like this with the wrong masking tape is going to be disappointing and frustrating.  So don’t go cheap on the tape if you’re going to try this!  I strongly recommend picking up a role of 3m’s “Orange Core” safe-release masking tape at RepcoLite.  This is a specially formulated “safe-release” tape that will both leave sharp, clean lines while at the same time come off freshly painted surfaces without pulling up the paint.  Using a tape like this will prevent any bleed-through or “bumpy” paint lines.  You’ll get sharp, crisp lines and (trust me) you’ll be happy!

OK, start with the right tape and the rest of the project is easy.

Prime and paint the doors with a white (or the predominant color in your scheme) Eggshell finish.  Preferably RepcoLite’s Hallmark Eggshell.

After the doors have dried for 24 hours, carefully measure off and tape the different section that you want to apply the different color stripes to.

Roll your colors onto these areas using a small roller and allow to dry for 20 minutes to an hour before carefully removing tape.

Continue in this manner, filling in the doors with the differently sized and colored stripes until the doors look the way you want.

Once you’ve accomplish this, let the doors completely dry and mount them.  (Remember this, though:  Latex paint dries to the touch in hours, but doesn’t reach it’s full cure or full hardness until about 30 days later.  This means the doors/headboard won’t be as durable as possible for the first month or so–so go a little easy on them!)

Variations on this One

Don’t stagger the stripes–run them from one end to the other.

Skip the stripes entirely and paint each door a separate color.

Paint the doors a solid, consistent color–all three of them–and then run 1, 2, maybe 3 narrow stripes (1″, 2″ or so) across the doors from left to right.  Clump these narrow stripes or spread them out.

Run the stripes from top to bottom rather than left to right.

Apply wallpaper to the doors instead of paint.

The variations are basically endless.  It’s only a matter of the limits of your creativity.  Above all things:  have fun!

Old Window Headboard

old_window_headboardLast time we looked at a simple way to create a unique headboard for your bed using an old wooden paneled door.  Today, we’re going to move ahead with this topic (headboards) and give you another idea:  old windows.

For this project you need to once again scour your basement and your attic.  Call your friends and ask around.  And if you can’t get your hands on any old windows that way, then head out to the mission stores, the junk shops and even the antique malls (though watch out that you don’t pay too much money for somebody’s old window!)

However you (lawfully) acquire them is your business, but once you have them, you’ve got any number of ways to turn them into unique, bold, inspiring and interesting headboards for your bed.

Here are just a few ideas and tips:

Distressed Windows for that “French Country” Look

Take a look at the windows after you’ve finally found them.  Take into account the condition of the paint.  Is it pealing and flaking off?  Or does it just look worn and old?  If it’s currently flaking, you might do well to remove it entirely (trust me…leaving it on is just an invitation for it to continue flaking off all over your furniture and floors).

If you decide to remove it entirely, remember to exercise care–understanding that the paint used on the window could be lead-based.  Get an N-100 respirator which is available at any hardware or paint store and then either heat the paint up with a heat gun (less than 1,100 degrees F) and remove it that way or mist it with water (to minimize sanding dust) and power sand it off.

If you’re going for that distressed look, don’t worry too much about removing everything down to bare wood.  Just get the loose and peeling stuff off and then dust over it with a single coat of RepcoLite’s Hallmark Ceramic Matte Finish.  This will produce a very low sheen and it applies and covers very well.

Coat your windows with a single coat of this and then scuff sand them with some 120 grit paper, paying special attention to the edges and corners.  Sand them until they look sufficiently distressed and then hang them.

An option for greater durability and washability would be to topcoat them with a single coat of RepcoLite’s Flat Polyurethane Enamel Varnish.  This will keep the sheen down to a minimum while providing you with some durability down the road.  (This is only recommended over colors since it will yellow over time.  If you put it over white windows, they will look “cream” very quickly).

Neutral Windows, Colored Panes

Another way to turn these old windows into a unique headboard is to keep them simple and plain, but use colorful inserts in place of the window glass for interest.

To accomplish this, follow the original steps above to clean and prepare the windows, but rather than painting them with a bright or interesting color, paint them white or cream or some other neutral color.  Then head to the craft store and pick up either some heavy duty foam board or some small artist canvas boards (not the standard artist canvas that is stretched over a frame, but artist canvas that is glued to a thin, heavy duty board).

Pick up one of these types of materials and cut it to size to fit the openings where the window glass would normally be.

Once you’ve done that, you’ve got an almost unlimited number of options.  You could paint them solid colors–colors that coordinate or accent your room.  You could rag paint them or use any number of faux-finishing techniques to create an interesting look on the boards.  You could cover them with scraps of fabric or even leftover scraps of wallpaper.

Basically, the point is to cover these inserts with color–whether it’s paint or paper or fabric or even photos of your family.  Cover them with somethig interesting and then mount them in the windows.

Experiment with positioning and determine whether or not you want all the window openings filled with color or only several of them.

Other Variations to Consider

Clean the windows up and paint them a solid color and don’t distress it–leave it clean and simple.

Use the windows as picture frames.  If there’s no glass, you can mount new glass.  If there is glass (and if it’s old and wavy and dirty) LEAVE IT!  Mount black and white pictures behind it for a very cool and interesting look.

Fill the window openings with “Stained Glass”.  Your local craft store will usually contain small, 8×10 or so pieces of the glass that artisans use for crafting stained glass windows or mosaics.  Buy a few sheets of this and either cut it (carefully) yourself or have a hardware store cut it to size.  Then mount it in your frame.

Mount the windows and then finish the look by installing curtains around them.

Paneled Door Headboard

Creating an interesting, colorful or unique headboard for you bed is a fun and potentially easy way to completely change the look and feel of a bedroom.  Over the next couple entries, we’re going to look at some of the best ideas out there on the web–along with a little how-to steps from RepcoLite to make sure these projects go easily for you if you try to tackle them.

The first one I want to talk about is pictured at the left.  It’s the “Old Paneled Door” headboard and really can be a highlight or focal point of your room if you do it the right way.

The main thing you need to tackle this project is . . . obviously . . . and old paneled wood door.  Possibly you’ve got one sitting around in your basement or attic (like me!), or maybe you’ll need to scour some junk shops and mission stores.  Another thing to try is this:  call your friends and family.  Many people have all kinds of extra junk sitting around in their homes that they don’t know what to do with.  They hate to throw certain things away, but they also have no use for them.  As a result, people “sit on” items like old doors and they end up just taking up space.  It never hurts to ask….

Anyway, once you get your door, the steps are easy from that point on to achieve the look in the picture:

Install some trim (or crown molding) around the edge of the door that will be the top of the headboard (see top edge of door in photo above).  This will give it a finished look on the top and will also cover up the notches cut in the door for the hinges!

Clean it up and scuff sand it (if you’re going to paint it).

Apply your latex paint without primer (if you’re going for a distressed look as we see in the photo).

After the paint has dried for a couple days, take some 120grit sandpaper and dust lightly over the entire painted door.  Spend some extra time on edges and the panels to completely remove the paint in those areas and expose the original wood beneath.

Once the door looks sufficiently distressed, wipe it clean with a damp rag and let it dry.

After it’s dried you can either leave it and hang it, or for a little extra durability, you could top-coat it with 1 coat of RepcoLite’s Flat Polyurethane Varnish.  (If it’s white, you might want to leave it unvarnished as the varnish will yellow over time!)

After it’s dried for 24 hours, you just need to mount it sideways on the wall (door knob removed and hole down so it’s hidden behind the bed) and you’re done!

This is one of those projects that you should be able to accomplish relatively quickly and without too much effort.  The part that will require the most DIY’er skill will be the installation of the crown or trim around the top edge.  Other than that, it’s all pretty straightforward and simple.  But best of all, the impact is huge.

VARIATIONS on the IDEA

Leave the door with a “stained” look.  Either scuff sand it and apply a “freshen-up” coat of stain over the whole door (along with a couple coats of Polyurethane) to create a new, finely finished look; or, leave the stained door completely “as-is” for a more rustic look.

Don’t distress the door.  Skip the roughed-up look and go for a nice, even, solid coat of paint.  If you do this, I’d strongly recommend RepcoLite’s Prime-all Primer as a great basecoat.

Use those old wallpaper scraps!  Cut squares of wallpaper that will fit the panels of the door and install them.  Cut them from scrapes left over in your own home, or call RepcoLite and ask about discontinued wallpaper books you can grab for free!

Little Changes, Big Impact: ABC Blocks on the Wall

OK, for the last little bit, we’ve been talking about small projects you can tackle in your home that will have a big impact on your decorating.  We understand that the idea of repainting a couple rooms in the home isn’t always the most exciting thought to everybody out there. Some of us just don’t feel like going nuts on a paint job–we don’t have the time or the energy right now.

Others of us like the color of our rooms already.  We think they look nice, but still feel they’re missing something.  They’re a little plain or boring and we’re not sure what we can do to spruce them up, to infuse some life into them, without completely overhauling them.

That’s been the point for the last few entries: small projects that will hopefully  infuse some life into your home without giving you a project that’s going to take you weeks to accomplish.

Well, today I’ve got one that’s really suited for a kids room  or maybe a back entry–some small room where you can branch away from the norm for a little bit without throwing off the decorating scheme of your whole home. Anyway, if you’ve got a room like that, think about this: what if you’d paint some shapes onto the wall?

Now, I know (I know, I know) that sounds boring.  But I’m not just talking about basic squares or circles or geometric shapes.  I’m talking about being a little more creative than that (though I’d still argue that geometric shapes on walls can be tremendously creative and interesting if done right!)

Anyway, even though those basic shapes can be creative, that’s not exactly what I’m talking about today.  See, I’ve never had the right room to do this in, but I’ve imagined a cool kids rooms where you take some stencils of letters and combine them with some square shapes to create letter blocks on the wall–you know those little wood ABC blocks kids play with and chew on? Anyway, paint the blocks in a corner–make them large (1-2 foot square)–and stack them. Stagger the stack or paint them in a tumbled heap in a corner. You could spell out ABC’s on the letters or a child’s name. You could craft some other message:  Family or Faith or pretty much anything you want.

All it takes is a little time, a small amount of paint, and a helping of creativity.