Easy DIY Stenciled Headboards

headboard5Here’s a great idea from a blog we follow called Simply Sjostedt.  It’s a simple way to create an entirely unique, interesting, headboard using only some planks, a stencil and some paint.

Here you can read about how it was done and see pictures that chronicle every step.  But before you click the link, remember the Cardinal Rule of any project:  don’t be afraid to tinker with the idea.

What I mean is this:  the plank background here is a great “blank canvas”.  Sure, you could stencil it–as we see in the picture at the left–but don’t be afraid to make this project your own.

For example, you could paint the boards a solid color and distress them.  Or, you could go a different route and stain and varnish the planks.  The stain job could be done with an eye toward a rustic finish or, if you prefer, a fine wood finish.  Both results would be easily achievable–you just need to figure out which would work better for you.  Really, the possibilities are endless.  Use your imagination and your creativity and see what you can come up with!  (And, if you come up with something really cool, let us know in the comments!)

Dental Neglect and Home Improvements

toothbrush-571741_640The other night, we–my family and I–were sitting in the living room, watching the Tigers.  The kids were running around, driving us a little nuts and eventually there came a point when I stood up and put my hands on my hips.  (Which really, is something I wish I didn’t do because my wife and kids always mock me and laugh and say that I think I’m a Super Hero.  Which I don’t, the picture below notwithstanding.  I just happen to stand like one.)

At any rate, I stood up, put my hands on my hips and said, “Alright!  It’s time to brush your teeth!”

Caleb, my 10-year-old son, just snickered, nudged Andrew, his younger brother, and whispered in a too-loud whisper:  “Look, Dad acting like he’s Superman again.”

I looked down and realized my hands were on my hips and my chest (or stomach) was all puffed out.  All I really

Proof that I have a tendency to stand like a superhero.

Proof that I have a tendency to stand like a superhero.

lacked was a cape and tights.  And muscles.  And height.

I thought for a second about how sad a Super Hero I would actually make before returning to the issue at hand:  “Go!  Go brush your teeth.  It’s time for bed.”

Well, they scampered off–all 5 of them–like a small heard of domesticated beasts.  But amidst the thundering of their stampede, I heard something I couldn’t believe:  I heard Andrew–in confidential and extremely boastful tones–say the following:

“I haven’t brushed my teeth in four days!”

To which Caleb responded with:  “Wow.  How do you get away with it?”

To which Andrew replied, “I fake it.”

Well, at that point, I’d heard enough.  The last thing I need with 5 kids is for Andrew to start promulgating a gospel of dental neglect.  I stomped into the room, stood with my feet shoulder-length apart, straightened my back, puffed out my chest (or stomach), put my hands on my hips and said:

“Andrew Peter!  You will brush your teeth at least twice a day or…or…” I searched and searched for the right threat, the right punishment, the right ultimatum to level at this hygiene-negligent son of mine.  Ah, yes, that will do.  “Or, you will pay your own dental bills!”

Andrew’s face clouded over and he looked down in defeat.  Then, he looked back up.  “Where am I going to get money for all of that?  I’m just a kid.”

What?  Money for…?  He was trying to get me off-topic.  “It doesn’t matter where the money comes from,” I said.  “I’m saying you’ll have to find it and pay the dentist for all the bills that you rack up because you don’t brush your teeth.”

There.  A definitive closing argument.  Now, we should be able to move on.

“You mean ‘pay him’ like when I pay at the restaurant?  When you give me money and I pay?  Like that?”

His eyes were big and innocent and I couldn’t tell if he was really curious or if he was messing with me.

“No.  Not like that.  You’ll have to earn the money yourself.”

He paused.  Looked down, thinking.  Then his face brightened:  “Dad, the only money I get comes when I get Tooth Fairy money.  So if I’d lose all my teeth, I’d have enough money to pay the dentist, right?”  I started to respond that that didn’t make any sense, but he kept rolling.  “But then, I wouldn’t have any teeth to brush or any teeth to have to pay the dentist to drill, right?”  He was picking up steam now, the clear end of his logical masterpiece in sight.  “So then, I’d have all the money and I wouldn’t have anything to pay the dentist for and, I wouldn’t have teeth to brush.  I’d be rich.”  He finished with a flourish and I half-expected the other kids to rise to their feet, clapping.

I needed to end this and I needed to end it now.  I puffed out my chest one more time, struck my pose and said, “Brush your teeth” in a very no-nonsense kind of way.

Caleb, who’d watched the whole exchange, snickered and said, “Superman has spoken–we must obey.”

Well, that kind of broke the ice and we all laughed a little bit.  But I couldn’t shake Andrew’s desire to not brush his teeth.  I mean really, who intentionally tries to avoid brushing their teeth?  Who else but a kid would ignore such a simple project–especially when ignoring that project is only going to lead to expensive and painful work down the road?

I was just thinking those thoughts when the home improvement point hit me (yes, I’ve written enough blogs and radio segments about paint to see paint-related points in everything):  I’m doing the same thing he is–with the exact same consequences.

See, there are all sorts of little projects around my home.  A hallway ceiling that should be painted.  Kitchen cupboards that need to be touched-up.  Some peeling edges on my wallpaper that should be stuck back down.

I’ve got all kinds of little projects.  Some are bigger than others, but most are really, just 10 and 15 minute jobs.  In the grand scheme of things, they take no time at all.  They cost almost nothing and they don’t require loads of expertise or special tools.

And yet I routinely ignore them.  I do.  I don’t know why.  I guess I’m like Andrew–I don’t want to take the time to do these little fixes.  I just keep telling myself that it’s not a big deal, that I’ll get to it later.

But the problem with that line of thought is that failure to act now only causes bigger problems later.  Just like Andrew and his teeth, I’m saving time now, but I’m going to have to pay the piper, later.  And I’ll have to use my own money to do it.

For example, the peeling wallpaper is a perfect case in point.  The spot I needed to fix was about 3 inches long all along a seam.  Nothing.  It wouldn’t have taken any time or money or effort at all.  (Notice I’ve shifted to past-tense to talk about this).  A little dab of paste, some safe-release tape to hold it down for a few hours and it would have looked like new.  But I left it and didn’t do it.  I ignored it.

But Tessa didn’t.  She found it and, of course, figured it should be picked at, peeled, pulled at.  Well, one thing led to another and before long, she’d created a much bigger problem that took much longer to fix.  On top of it all, the fix I managed to come up with wasn’t nearly as effective as the easier, cheaper one would have been.

So now, that’s me and my family–what’s your’s like?  Are your kids brushing their teeth?  If not, do they brag about it, too?  Is that just a kid-thing?  Or do I have bad-hygiene kids?  And how about you?  Not so much your teeth, but do you have projects at home like I do?  Easy, quick projects you keep ignoring?

Well, maybe it’s time to tackle them.  Maybe it’s time to cross them off your list and deal with them on a more regular basis–before they become bigger, more expensive problems down the road.

Give it some thought!

Get Creative! Projected Images, Stencils, and Silhouettes

jenison
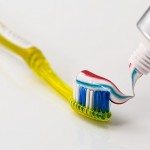
By Guest Writer, Shannon VandenBosch

When it comes to creativity, I need some inspiration.  So I go to a few decorating magazines and/or peruse my “Favorites” list of websites for design ideas.  When I feel I have found a few pictures representing the style, image, or technique I would like to achieve, it becomes my muse.  This is when I breathe a sigh of relief because the mental work is done and I can begin the process of tweaking the look I have found in order to make it my own style statement.

Recently, I was challenged to take a blank wall in our recently remodeled RepcoLite store in Jenison, Michigan, and create interest, and hopefully, inspiration.  This empty wall space was located directly above the counter area where customers would sit and contemplate their own design decisions by beginning to choose a color or palette of coordinating colors.

Immediately, I liked the concept of stenciling or projecting an image on the wall to create a mural.  I recalled seeing a large, abstract, flower in a Benjamin Moore color brochure.  Aha!!  The inspiration, my muse!

I began by taking measurements of the wall space and calculated the size of a single petal needed to make the flower, the length the stem needed to be, and the size of a single circle.  Color choices were made to compliment the store’s interior decor.  The single petal and circle were cut out of cardboard and then stenciled or traced onto the wall.  The stem was drawn free-hand in proportion to the flower. Then the image was painted with interior wall paint. The whole process took about 6 hours. (See picture above–or, better yet, stop at our Jenison store and see it in person!)

As alluded to earlier, other ways to create murals is to use a projector to cast an image on a wall and either trace it and then paint or begin painting the image . Click here and here for more info.  You can also check out this site for some more examples of graphic murals. Silhouettes are created by drawing and then painting a picture of something, say a headboard, on the wall instead of actually using a real headboard. This technique is not only creative, but inexpensive! Take a look at current decorating magazines for more information on this technique. Stencils not only can be made but bought at local stores that sell wallcoverings, crafts, or interior decorating items.

I hope you have been inspired to get creative and make the next space you choose to decorate even more uniquely yours.

Quick Project: Paint an Accent Wall

14b_bedroom_darklilac2070_30_lavendarmist2070-60 It’s been a while since we tossed up a “quick hitter” project–a project that should take you less than a couple hours and cost you less than $40–so I thought I’d pitch this one to you:  painting an accent wall.

Painting an accent wall is an ideal project for the decorator on a budget.  You can usually get by with less than a gallon of paint and the time it takes to paint one wall is, typically, about 1/4 of the time it takes to paint an entire room.  (I’m throwing fractions around here just to show off  my vast knowledge of math.)

Alright, with that said, let’s clarify what we’re talking about here.  Painting an accent wall means taking a wall–the focal point of the room–and painting it a different (typically darker) color than the rest of the room.  And that’s it.  You don’t paint the other 3 walls, you don’t repaint your trim or your ceilings.  You paint one wall a different color than the other 3 and you’re done.

Now, while that sounds easy, there are a couple things to think about when you tackle this project:

PICK THE RIGHT WALL

This is probably the biggest question folks deal with when they tackle this accent wall project:  which wall do I choose?  Typically, the answer you’ll get from paint people and do-it-yourself decorators alike is “paint the first wall you see when you walk into a room.”

Now, while that may not be always wrong, it’s certainly not always right.  The correct answer is this:  “paint the wall that your eye is naturally drawn to after you’ve entered a room.”

For example, if you walk into a bedroom, often times, as you approach the room, the first wall you see through the doorway is the side wall.  Once you enter the room, your eye doesn’t linger there, though.  Instead, your eye is naturally drawn to the wall that the bed stands against.  That wall is the “focal” wall, the wall that you should consider for your accent wall.

So don’t spend so much time considering which wall you see first upon entering a room.  Instead, spend more time looking around and noticing where your eyes are drawn.  If you’ve got a fireplace in a living room, that wall is typically the focal wall.  Painting an accent color against that wall will make your fireplace stand out, will draw attention in that direction and will give your room that “designer feel.”  Other typical, natural focal points can be large paintings or a mirror, dominant pieces of furniture (a couch against a wall for example), or even an archway or a set of french doors.  The walls that these items sit against, on, or in are candidates for the focal wall of the room.

PICK THE RIGHT COLOR13a_chestvignette_SmolderingRed_2007_10

Once you’ve selected the right wall for your project, the next thing to consider (and, honestly, the last thing) is this:  what color?

Often, when we hear the word “accent color” we think of orange.  Or red.  Or bright green.  Or maybe a dark, dark blue.  Basically, we think of bold, crazy colors.  But don’t limit yourself in that regard.

Always remember that the depth or “boldness” of a color is subjective–it’s determined largely by the colors around it.  If you’ve got a soft tan or an off white on all the walls of a room, even a mid-range blue or an earthy green would function as an “accent color”.  In fact, an orange in a room like that would be really difficult (not impossible, but difficult) to pull off.

Conversely, if you have a room of medium to dark tones, you could go either direction.  A bold orange, green, red, blue, brown could potentially be a tremendous accent color to put on that one focal wall.  But, so also could an off white.  If the rest of your room has some color and depth to it, even an off white can function as an accent color.

So, all that to say, don’t limit yourself (and scare yourself away from the project) by thinking that in order to do the project justice, you’ll need to pop open a can of “safety orange” and kiss your calm, peaceful room goodbye.

A great way to pick a color for an accent wall is to look to your fabrics–pull one of the colors out of the throw pillows on the couch or the comforter on the bed.  Look to any art you have on the walls–is there a color in there that would look great on one single wall of the room–possibly the wall the picture itself is hanging on?  What about the carpet?  The window treatments?

Anyway, you get the idea.  Find a wall, pick a color and spend a couple hours this weekend or next painting that one single wall and you’ll be amazed at the results!

Checkerboard Table–Easy as 1, 2, 3 . . . 8

checker_2
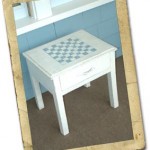
Painting a checkerboard design on a table is a great project that will infuse your front porch (or wherever) with that old-fashioned, laid- back feeling we all associate with a game of checkers.  It’s simple, quick and best of all, will probably cost you less than $20 (including the table).

1.  Acquire a Table

  The first thing you need to do is get your hands on an old end table.  Now, maybe you’ve got one stuffed away in your attic or your basement or maybe you’ve got to head to the mission store or start hitting those garage sales.  Whatever you need to do, get your hands on an old end table.  And don’t worry so much about appearances.  This project works well even if the table is chipped, scratched or cracked.

checker_42.  Paint the Table (if necessary)

  If the table is not the color you want it to be, follow these instructions to get it looking exactly the way you want it.

3.  Pencil in the Checker Board Pattern

  If Checkerboardyou’ve got a checker board around the house, get it out and duplicate the pattern on your table using a ruler and light pencil lines.  If you don’t have a checker board for reference, a standard checker board is composed of 64 squares laid out on an 8 x 8 board (see inset).  32 will be light and 32 will be dark. We recommend laying the board out with either 2″ squares, 1.5″ squares or 1″ squares based on the size of the table.  (Choosing one of these sizes makes it much easier to tape it off later when you get ready to paint).

4.  Tape it Off

  Once you’ve got the pattern penciled in, it’s time to tackle the most time-consuming part of the project:  laying down the masking tape.  Start with atape1 roll of safe-release masking tape available at your local home center or hardware store.  Purchase the roll in the width that you drew your squares.  (If you drew 2″ squares, go with the 2″ tape, etc.)  Tape around the edges of the entire board and then tape off alternating lines and alternating squares (see inset).

5.  tape1Paint the First 16 Squares

Using a paint color darker than the rest of your table (or lighter if you’re table is quite dark), carefully brush or roll the paint over your taped-off table top.  As soon as you’ve finished this, carefully remove the tape and let the surface dry.  If you’re planning sharp lines for your checker board pattern, then let the table dry overnight.  If you’re planning on distressing the top as we have in our photos, you only need to let the top dry for a few minutes.  (The reason is this:  if you tape over the freshly painted surface too soon, you run the risk of pulling up some of the new paint when you remove your tape.  If you’re planning on a distressed look, this doesn’t matter.  If not, then you better wait).

6.  Tape it Off Again and Paint the Other 16 Squares

  After you’ve let the first set of squares dry it’s time to tape off the rest of the board.  Lay your tape just as you did the first time, taping off alternating lines and alternating squares (see inset).  Once this is accomplished, apply your paint to the open squares using the same method as you did previously.  Again, carefully remove the tape immediately after you finish painting.

7.  Tape and Paint the Border

Once you’ve finished the squares, lay two strips of tape around each side of the board exposing a 1/8″ or so gap that will become the border.  Paint this border in and remove tape carefully.

8.   Distress & Finish

  If you’re planning on distressing the piece, you can do this as soon as the paint is dry to thChecker Board Table checker_33e touch, or you can leave this part of the project for another day.  Just use light pressure with some 150 grit sandpaper and dust over the entire surface of the table.  Continue this until the checker board pattern is sufficiently distressed.  Wipe the table clean with a slightly damp rag and, when it’s dry, either leave it as is or apply a single coat of a flat polyurethane varnish or a spray lacquer.  (Be advised, unless you use a water-based polyurethane or a non-yellowing lacquer, this protective coat will yellow slightly over time.)

This Checkerboard project takes a little bit of patience, but other than that, it’s easy.  It’s something anyone can do and it’s extremely inexpensive.  Check it out!  And let us know how it went!

A Gallon of Paint: The Tire of the Home Improvement World

bigstock_group_of_automotive_tires_74428147_smallerI drive an old car.  An OLD car.  It’s a 1996 Chevy Cavalier.  It’s purple.  It used to be my wife’s.  And yet, even though it has all that going against it–even though it’s probably one of the least “manly” cars you’re likely to see on the road–I continue to drive it.  The reasons?  It’s paid for and it continues to run.

That is, until a couple months ago.  See, a couple months ago, the front end started giving out.

Now, I should be clear and explain that I’m not a car guy.  So, what I mean when I say the “front end started giving out,” is simply that the car started shaking violently whenever I exceeded 30mph.  In fact, it would shake so violently that the flabby skin under my arms–you know, where your muscles would be . . . if you had them–started jiggling and bouncing and flopping all over the place.  It got so bad that just feeling it bouncing started to make me motion sick.

After one excessively jiggly ride, I got out of the car, waited for the flabby skin to settle down, and then announced to anybody who was listening (my wife), that it was time for a new car “because this one’s shot.”

However, before I jumped into the process of buying a new vehicle–and partly because I knew of my limitations as a “car guy”–I brought my little purple car in to a repair shop so they could confirm my diagnosis of death.  Surprisingly, after about 15 minutes with the car, they informed me that I needed a new passenger-side front tire.

Yeah.  Instead of the $4000 bill for replacing my front end, I needed a $67 tire.

Well, naturally, I told them to go ahead with the work and I was shocked when I drove the car off the lot and my flabby underarm skin didn’t jounce all over the place.  It was hard to believe that a $67 tire could make all that difference.  But it did.

And crazy as it sounds . . . a gallon of paint is just like that tire.

See, many folks look at their homes and, if they’re bored with it or if their feeling that some changes need to be made, most of them feel that the solution is to remodel.  They debate whether or not they should tear out a wall, put in new flooring, rip out their cabinets and replace them with new.  They toy around with the ideas of buying new furniture, new artwork, new window treatments all in the hopes of sprucing up their home and giving it a much-needed facelift.

However, what many folks don’t realize is that a gallon of paint can often make all the difference in the world.

Now, maybe that doesn’t sound accurate to you, but it’s the truth.  Painting a room in your home is rated by almost every home decorator and home fix-it guru as the best “bang-for-your-buck” project you can tackle.  And the reason is simple:  the color on our walls does more to influence the look and feel of a room than almost anything else.

You want to make your furniture look new?  Then put a new backdrop behind it.  Change that taupe on your walls to a brighter color, a darker color, a lighter color.  Go with a green or a blue or a grey and watch how your couch or your chairs suddenly take on new life.

Sick of those old cabinets?  Well, rather than rip them out and replace them (easily a $10,000 project), why not repaint them?  Get rid of that old wood look and turn them white, or bisque or whatever color you can imagine.  Sure, it will take some work, but in the end, you can probably accomplish the project for under $200–much less than the cabinet re-do.

To get back to my car scenario:  I was convinced the only way to make a difference in the way my car felt, was to either drop $4000 on huge repairs or to buy a new car.  I was shocked to find out that something so small–a new tire–could make the car drive almost like new.  In the same way, don’t let yourself be convinced that the only way to spruce up your home significantly is to tackle some hugely expensive remodel project.  A gallon of paint can go a long way’s toward changing the look and feel and attitude of any room–and at a price you just can’t beat.