Stenciled Dresser Project

green_furniture_web_030816Finding and old piece of furniture–something that’s seen it’s better days–and breathing new life into it with a little paint and some creativity is easily one of my favorite do-it-yourself projects. I love it because it’s usually inexpensive (if you’re a smart shopper), doesn’t take much time, and the results can be dramatic.

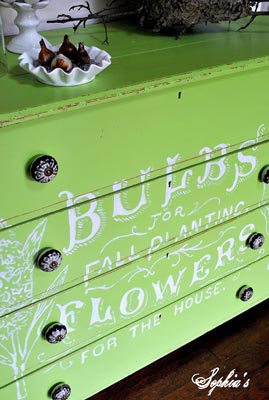
Today, I want to highlight and recommend a simple project we discovered on a great decorating blog called “Sophia’s Decor“.  (Check it out sometime–you’ll thank us later!)

This is a simple project that anyone can accomplish.  Please head to Sophia’s Decor for some great pictures and more detailed comments about the project.  But to quickly summarize:

Here’s What You Need:

  • A piece of furniture to paint (this is important)
  • Paint (main color and stencil color)
  • TSP
  • Sandpaper
  • Paint Supplies
  • Stencil or Projector

Here’s What You Do:

1 Start by scuff sanding your furniture piece with some 120-150 grit sandpaper.  This doesn’t need to be a complicated, lengthy, arm-breaking, sweat-producing sanding job.  You’re basically just dusting over the piece to dull the previous finish so your paint will bond.
2 After the scuff-sanding, wash the piece down with a TSP and water mixture.  This will remove the sanding dust and will also help to clean away any surface contaminants that might be left from cleaners and so on.
3 When the piece is completely dry, apply your main color.  Brush or roll it directly onto the furniture piece without a primer.  (If you plan to distress it, it’s important to skip the primer step.)
4 Once the piece is painted (it may take one or two coats depending on your color), go ahead and distress it.  This is a bit of an art project and takes a little bit of thought.  It’s not complicated, but you want to be careful to create an authentic distressed look without going too far.  Carefully run your sandpaper over the edges of the drawers and the top and the legs and you’ll notice that very quickly you cut through to the wood beneath.  Work around the spots that would see normal wear over the years:  the drawer pulls, edges and so on. Continue like this until you’ve achieved the look you desire and then wipe the piece clean with a damp rag.
5 When it’s dry, it’s time to apply the stencil.  This part will take some planning and some thinking and some searching to find just the right graphic.  In this case, the blogger at Sophia’s Decor used a projector to display the image on the dresser and then she traced it with a pencil, using an off white paint to fill in the lines.  You could also accomplish the same affect if you found a stencil to your liking.
6 However you put the design on, let it dry a couple days.  Once it’s dry, the last step is a light sanding over the letters.  (Don’t work too hard with this sanding or you’ll remove too much of the lettering!)  The goal here is to lightly distress the lettering and give the piece an aged look.
7 At that point, you can leave the piece as is, or, if you prefer, you could apply a light, single coat of polyurethane in a low-gloss or flat finish.  A solvent-based polyurethane will yellow slightly over time, so be aware of that before you top-coat anything that’s white!

Overall, this project will take you a couple days from start to finish–though most of that time will be just letting it dry in between paint coats. It’s fun, easy and, because the furniture piece is small compared to the room it is eventually placed in, you can experiment with colors that might be too strong for the walls.

If you try something like this, or have a project you think turned out really well, please post a pic on our Facebook page here.  We love to see what you’ve come up with!

The Fifth Wall

bigstock-Happy-Woman-Painting-The-Ceili-7960216_smaller_curl3Has this ever happened to you:  you walk into the paint store for paint and then spend the next three days or a week or more agonizing over the color chips you brought home?  You hold them up to every piece of furniture in the room.  You lay them on your carpet, on your end table.  You try to picture them large scale–covering your walls.  You debate between one shade and a slightly darker shade.  And then, finally, after all the debate and analysis and agony, you pick the perfect colors.

You make your way to the paint store, order a gallon of one and two gallons of the other and then, almost as a side note, you grab a gallon or two of ceiling white and call it good.

Do you see the problem here?  The mistake?  It may not be obvious, but it’s this:  we put huge amounts of energy and thought into our wall colors and don’t give our ceilings the time of day.

Next time you paint–change that line of thinking.  Your ceiling isn’t just a ceiling–it’s a fifth wall.  And, as such, you shouldn’t necessarily just roll white paint up there.

If you’re looking to make an impact in your home, putting color on a ceiling is a surefire way to do that.  And the reason is simple:  it’s extremely rare. apt-therapy_shadow_curlMost folks forget about their ceilings when it comes time to paint and as a result, most ceilings are forgettable.

Change that in your home by rolling a color up there.  Just keep this in mind:  the darker the color you put on the ceiling, the lower it will make those ceilings feel.  This can be great in big, high-ceilinged rooms.  Rolling a color on your ceiling that’s a shade or two darker than your wall color can go a long ways toward making your room feel cozier, warmer, more inviting.  A darker color on your ceiling will draw your eyes downward, bring down those big open spaces, and create settings that feel more personal, more intimate.

Lighter colors on the ceiling will make the room feel a little more expansive, a little more open.

white_ceiling_curlHowever, there’s something very interesting to realize here:  many folks understand this concept and they figure that painting those ceilings white will really serve to open the room up.  However, think about this:  if you’ve got a medium toned color on your walls, no matter what shade, a white on the ceiling can often produce a very sharp distinction between the walls and the ceiling.  This sharp distinction, this high contrast between walls and ceiling, can often lead people to conclude that their wall color doesn’t work–that it needs to be repainted.

Look at the picture above.  The green on those walls is a strong color.  However, the room works because the ceiling is a soft tan. It’s not a dark ceiling–definitely not dark in comparison with the walls–but it’s dark enough to create a nice balance in the space.

tan_ceiling_curlImagine the same room with a white ceiling. In fact, you don’t have to imagine it, look at the picture below.  That’s the same room with  a standard white on the ceiling and the whole mood of the room changes.  The stark white on the ceiling makes the green on the walls feel harsh.  Many times, folks would paint a room like this, think they love that green, only to be back later for new paint because the color’s just too strong on the walls.

Now, I admit, the green truly is a strong color–but you can minimize it’s strength, tone it done, control it a little better, by putting a color other than white on the ceiling.

All that to say:  don’t forget about the fifth wall in every room–your ceilings.  You can put some color up there to make a room feel more inviting, to make it feel cozier, or even to tone down the visual power of a wall color you really love.  Keep it in mind.

5 Tips to Help With Touch-Up Painting

bigstock-Couple-painting-home-5695270I received a question in my email the other day regarding touching up some paint on a wall. The question was a good one and I thought I’d spell out a few simple tips here that will help make your next touch-up job go a little easier.

1. MAKE SURE IT’S THE RIGHT COLOR

It happens often: you paint the walls a certain color and then pick up another gallon of paint in a slightly darker color. It looks great. Until 2 years later when you grab that darker color by accident and use it to touch up spots on your lighter walls. Suddenly a quick touch-up project becomes a repaint. If you’ve worked with multiple shades of similar colors, never assume that the gallon you grabbed is the right color. Always test a sample in an inconspicuous spot before proceeding!

2. EVEN IF YOU’RE “SURE” IT’S THE RIGHT COLOR, CHECK IT

What I mean is this: even if you never used multiple shades as described above and you’re absolutely, 100% positive that you are holding the can of the paint you originally used on your walls, you should still check that color. Yes, it was originally the right color, but things have changed. The paint on your walls typically darkens and deepens over time. And even in the most immaculate households, it can sometimes get a little dirty. What that all adds up to is that the paint on your walls may no longer match the paint in that original can. So don’t do what so many folks do and touch up 27 silver-dollar-sized spots on your wall only to find out the next morning that every single one of them is lighter than the wall paint. Instead, sample a small area first, allowing the paint to dry down adequately, before you begin touching up.

3. IF THE PAINT’S TOO LIGHT, FIND A SWITCH PLATE

This tip is pretty self-explanatory but sometimes folks don’t realize just how many options are truly open to them. If you check your color before touching up and discover that it’s too light–don’t panic. All you need to do is look for something in your room that has your wall color on it. This can be a switchplate, a piece of trim, a picture frame or anything along these lines. If you can’t find anything like that, another option is to simply cut a small, shallow hole in your drywall and remove a quarter-sized sample. Take this sample and bring it to RepcoLite and we’ll custom match a color for you so you can accomplish your project.

4. PAINT CORNER TO CORNER IF POSSIBLE

OK, once you have your color figured out, it’s time to actually do the work. And the ideal way to do any touch up is to look for an obvious breaking point in a room and paint a larger section. What I mean is this: ideally, don’t touch up 25 quarter-sized spots on your walls. Rather, paint that one wall corner to corner with your new color. Or paint from your built in cabinet to the doorway. Basically, look for a breaking point and paint a larger section. This will help your new paint blend in visually much better and makes the whole process of touching up much easier.

5. APPLY SMALL AMOUNTS OF PAINT USING THE ORIGINAL APPLICATION TOOL!

Sometimes, you just don’t want to paint corner to corner. Sometimes you simply want to do the little touch-ups. When that’s the case, here’s the best way to tackle it: First, make sure you use the application tool you used to originally applied the paint. If you brushed the paint onto the surface originally, then use a brush to do your touch-ups. If you rolled the paint onto your walls, then use a small roller of similar nap to do your touch-ups. And, when you’re doing these, use small amounts of paint and put some care and effort into feathering them out.

Touching up our walls doesn’t need to be complicated. But it does take a little effort to do it well. If you follow these tips, you should have no problem pulling it off!

3 Ways to Compromise With Your Kids about Paint Colors

donuts-690281_1280Once upon a time, probably about 6 years ago or so, my wife and I walked with our kids to the Zeeland Bakery.  Caleb (who was 5 at the time) waited outside with me while my wife and the other kids sauntered into the shop and ordered various donuts and cookies and different types of bread.  (It’s always a huge undertaking whenever we go to the bakery).

Anyway, while Caleb and I were waiting outside, a lady walked by with a 1-year-old boy in a stroller.  I smiled at the lady and Caleb smiled at the lady and he even went so far as to say “Hello.”  I was proud that the little guy was so polite.  And it was this pride which eventually led to my downfall.

See, as the lady was walking away, but while she was still within earshot, I thought I’d demonstrate how polite and kind my little guy was.  So I said, loud enough for the lady to hear, “Wasn’t that a nice little boy?”

Oh, it was a question that he should have been able to hit out of the park.  It was an easy one.  A no-brainer.  All he had to say was “Yes Dad, that boy seemed very nice, indeed.”  Had he said that, the lady would have thought I was a super parent because I’d raised such a wonderfully polite little lad.  In fact, I figured there was always the off chance that she’d turn her stroller around, shake my hand and ask my advice as to how to raise her own child.

Yes, my mind was brimming with the possibilities and the glory when Caleb spoke up.  He raised his little voice to match my raised voice and suddenly, as is always the case when this kind of thing happens, the entire world quit moving.  Suddenly, there were no cars–no road noise.  The shop doors quit opening and closing.  The clocks that had been ticking ceased their workings for a few split seconds.  Even the birds and the wind and the airplanes and the fountains went silent.  A whisper at one end of Main Street would have been audible at the other.  And it was into this utter and complete silence that Caleb bellowed his answer, informing me, the lady, her poor, poor child and everybody else within earshot that, “No,” he didn’t think that kid was all that much.  “In fact,” he went on to say, “the kid was actually kind of ugly.  His ears were big and his nose was all turned up and his eyes were squinty.  Like a rat.”  As if this wasn’t bad enough, Caleb ended by informing me (and all of Zeeland) that he had only said “hello” to the kid because “he felt sorry for him.”

Well, I just stared at him in horror and disbelief as he continued to rattle off all sorts of uncomplimentary descriptions that reverberated off the buildings and up and down the silent streets.  Silent, that is, except for the wildly squeaking wheels of the lady’s stroller as she pushed her child rapidly away from that horrible father and his nasty little son….

I mention this little episode partly as penance but also because it’s the perfect example of how kids think and act.  If you ask for a child’s opinion, you’re going to get it.  They’ll typically tell you exactly what they think.  Problem is, while they’re usually honest, they don’t always exercise the best judgment.

In an earlier article (which you can read HERE), I suggested that it’s important to involve your kids in the process of decorating their rooms.  You should let them pick the colors, ask them what they like and what they hope to see in their rooms.  However, when you do that, you’re going to have to be ready for some crazy answers from time to time.  In fact, when you ask an 8-year-old what colors he’d like on his walls, don’t plan on hearing him say “Oh, a nice medium-beige with an earthy brown would do just lovely.”  No, get ready for black and orange (halloween colors).  Or bright blue and red and yellow (Superman colors).

So, with that said, if you do decide to let them help you decorate their own rooms (which I still believe to be a great idea), you better have a method in mind as to how to incorporate their ideas without completely abandoning the overall look of the room.  You both need to be happy with the outcome.  And that means compromise.  Here are 3 tips:

1. PICK AN ACCENT WALL

When your kids choose the brightest yellows and oranges, the flashiest greens and blues, a great compromise is to paint one of the walls–an accent wall–with one of those bright, flashy colors.  Have them settle on which color they like best and see if you can’t work that into a small wall–a wall with a window or a door.

Now, in most cases, when you paint an accent wall, you’d pick the focal point of the room to do this with.  In this case, however . . . well, not so much.  If you’re trying to minimize the effect of the color, then picking the focal point of the room is the last thing you want to do.  Just pick a small wall–a wall that’s not the first thing you see when you walk into the room–and see if you can’t put their color there.  They’ll be happy, feeling proud when they see their bright wall and you’ll be happy because the room doesn’t glow like the face of the sun.

2. PICK MUTED VERSIONS OF THEIR COLOR

Another great compromise that sometimes works in the paint store is to steer kids toward more muted versions of their colors.  If they love bright reds and yellows, maybe throw out some options like a rusty red or terracotta and a more muted yellow.  Sometimes they’ll see these new colors and be completely willing to compromise.  Again, with this type of scenario, both of you can potentially reach a mutually happy outcome.

3. ACCESSORIZE, ACCESSORIZE, ACCESSORIZE

Perhaps the best way of working wild, crazy colors into a decorating scheme is to bring those colors in with accessories.  If your kids want to see black and orange or some other funky combination of colors on their walls, but you can’t bring yourself to do it, then offer this:  coat the walls with a nice neutral color and then bring in accessories that fit your child’s desired color scheme.  Bring in lampshades with bright colors, find art prints with the colors, switchplates and any number of other accessories that will serve to fill the room with the chosen colors without overloading the walls and driving you crazy.

The bottom line is this:  when you bring your kids into the decorating picture, you’ve got to be ready to compromise.  Don’t let them decide everything when you hate what they’re coming up with.  Likewise, don’t decide everything yourself when they hate what you’re coming up with.  You both have to be happy with the outcome for this little project to work.  If you hate the room, you’re always going to feel irritated when you walk past it.  If they hate the room, don’t worry, they’ll find a way to let you know about it.

So work together, have fun, and compromise!

Let Them Help: Decorating With Your Kids’ Input!

paint_handsEvery now and then I hit upon something that I know is a good idea. And, though this doesn’t happen very often, this is one of those times. There’s no way around it: decorating your kids’ rooms with their help is a great opportunity for you and for them. Oh, I know there are lots of little bugs in the idea and potential complications–but that doesn’t change the fact that it’s a good thing to do.

Taking a room that was decorated with younger kids in mind and turning it into “hip, way cool pad” is a great way to let your kids know that YOU know that they’re growing up. Taking down the wallpaper borders of stuffed bears and turtles and replacing it with something more age-appropriate will make your kids feel important. And involving them in that process, seeking their input and listening to their suggestions will make them feel that they are on the path to growing up–they’re actually an active force in the creation of their new room.

Surprise Makeovers are Cool on TV, But Not So Much In Real Life

If you still need convincing that it’s a good idea to involve your kids in the process, then think about it this way: on TV, surprise makeovers are cool. They really are. But that’s because we don’t normally watch the recipient of the new room beyond their initial reaction. We see them when they first whip off a blindfold and stand blinking and squinting in the bright lights as they try to take in their new surroundings. Everybody’s happy and giggly and the show ends. We don’t see the couple standing there 12 hours later, now that the cameras and energetic TV personalities are gone, staring at the new walls and wondering what happened and how anybody ever thought that bright orange was a good look.

Your kids feel the same way about their room as you would about your home. Their room is their space–their world away from the world, especially as they get older. Just as you wouldn’t likely appreciate it if your husband or your neighbor just dropped by one afternoon and repainted your living room in colors of their choosing, neither will your kids necessarily be receptive to the changes you bring about one day while they’re off at school. Your vision for their room isn’t necessarily their vision for the room. You’ve got to make it your goal to discover a mutually acceptable vision.

Involve Them, But Remember Their Limitations

To that end, involve them in every aspect of the process. Take them to the store and let them look at colors. Let them flip through wallpaper books and mural books. Let them explore the world of Faux Painting. However, make sure that you keep the outings short and sweet–no marathon shopping trips that will frustrate and wear your kids out. Remember that their attention spans are not like yours–keeping the trips to a limited amount of time will make sure both of you enjoy the outings. And don’t forget to think bigger than just a trip to the paint store or the furniture store: try to tie your decorating trips in with a nice dinner out or something like that.

Taking the kids to the paint store and listening to their suggestions and then taking them out to dinner will be one of those special moments kids remember. If you treat their opinions as valid options and listen to their thoughts and take the time to discuss things with them over dinner, they will start to feel like an intricate part in the decision process. And trust me, I may have young kids and I may not have had much experience in the world of psychology, but I know this is a good thing. You don’t have to be a genius to see that by involving your kids in something so small as decorating their rooms, you’re basically telling them that their opinions matter and that you value their thoughts.

What If . . ?

Alright, now you’re probably thinking that I’m living in a world where everything is puppy dogs and lollipops. Sure it sounds good to involve the kids in the decorating process, but what’s going to happen when they pick out Sponge-Bob Yellow and Bright Red for their walls?  We’ll cover that in the next post.

The Vile Showerhead (or, Finding the Dread-Free Life)

shower-1027904_640(1)I’m a “dreader”.  That’s not a word–I know that.  But that doesn’t change the truth:  I dread things.  On a regular basis.

For example, I re-decorated my bathroom about a year ago.  I put wood planking on the walls, hung some wallpaper, stained and varnished new trim, installed a new (bowed) shower rod and new curtain and finally, to finish the whole thing off, I installed a new shower head.

Which was the biggest mistake I made.

See, right after installing it, my wife marched right in, closed the door and proceeded to take a 45-minute shower.  When she was done, the kids all marched through, one after the other.

When the shower marathon ended that day, I opened the bathroom door and it was as if a cloud had localized in that tiny room.  I literally couldn’t see the other side through the steam.  The little ceiling fan was working overtime, but there was no way it could keep up.

“Fortunately,” I thought, trying to wave away the steam, “this is something that won’t happen everyday.  Once the ‘newness’ of the shower head wears off, we’ll go back to having to fight the kids to take baths.”

Nope.  Not a chance.  Every single day since the installation of that vile shower head, our bathroom is engulfed in steam.  Shower after shower, hour after hour:  steam, steam, steam.

Well, that went on for a long time and then the inevitable happened:  the mold started growing around the edges of the ceiling.  The wallpaper started peeling and curling up on all the seams.  My beautiful bathroom had gone from a place of despair to a place of beauty and then back again to a place of despair all in about 6 months time. It was depressing to say the least.

And that’s where the “dreading” comes in.  Everyday, I’d look at the ceiling and see the mold or the wallpaper and see the peeling and I’d dread the “fix-up” job that was to come.

I dreaded it because it seemed like such a big job:  fixing the mold, fixing the paper, repainting the ceiling.  I’d just gone through some of this work and now, thanks to that dumb shower head, I had an even bigger mess to fix.

And so I stared at it for a long time.  I thought about it.  I tried to ignore it.  But most of all I dreaded it.

Until finally I got so sick of being depressed and frustrated about it that I actually fixed it.

I took a week and on a Monday night, I sprayed the mold with a bleach solution and scrubbed the ceiling.  That took me exactly 17 minutes.

Two nights later I came back with more bleach–no scrubbing this time, just the bleach on the mold.  That took about 7 minutes.

On Friday night I went around the room and primed all the previously moldy spots with ProFlo Alkyd primer and then I re-pasted all the peeling paper.  That night’s work took about 15 minutes.

Finally on Saturday, I got ready to paint the ceiling and finish the job.  I was ready for a big, painstaking job (I hate painting ceilings) but I was surprised to find that the whole thing took about an hour from the time I opened the can of paint to the time I put the paint back on the shelf in the workroom.

In the end, I realized that the job I’d dreaded for the last 6 months or more had taken me less than two total hours to fix.  In my mind, I’d exaggerated and inflated and imagined the work to be 10x worse than it was.  I imagined the mess, the problems to be 10x less fixable than they were.  I imagined the pain to be 10x greater than it was.

I’d spent 6 months feeling bad and frustrated and almost (in a sad and pathetic way) depressed about a room that took me less than 2 hours to fix.

So how does this apply to you?  Well, I can’t speak for you, but I’ve talked to many folks in the paint store at RepcoLite who feel the same way I was feeling.  They’re frustrated about the seemingly endless amounts of work needed in their homes.  They look at the jobs and the work to be done and assume that they’re worse than they really are.  And so they do what I did:  they put them off and they stew on them, thinking about them and mulling them over in their minds for months until the jobs seem even bigger and more horrible.  In short, we dread them and waste our time worrying about them and frowning over them.

But what we really should be doing is “doing” them.  The jobs aren’t as bad as we think.  They’ll go smoother.  They’ll go more quickly.  They won’t be as painful.  And best of all, once we’re done, you’ll notice what I noticed:  a real sense of relief and freedom from the work that had been hanging over my head.

So, bottom line:  If you’ve got a project that’s creating that feeling of dread, jump into it.  Get it accomplished.  And then kick back and enjoy the dread-free life…